Computer Vision — Beginner
Learn how AI cameras find, sort, and count everyday objects
AI cameras can do amazing things, but the ideas behind them do not need to feel hard or confusing. This beginner course is designed like a short technical book, guiding you step by step through the core camera skills that power many modern systems: sorting images, spotting objects, and counting items. If you have ever wondered how a camera can tell fruit apart, detect a person in a scene, or count boxes on a conveyor line, this course gives you a simple and practical starting point.
You do not need coding, math, or AI experience to begin. Everything is explained from first principles using plain language and everyday examples. Instead of throwing complex terms at you, the course builds a strong foundation chapter by chapter. By the end, you will understand how beginner-level computer vision systems work and how to think clearly about using them in real life.
The course is organized into six clear chapters that build on each other like a short book. First, you will meet the idea of an AI camera and learn how images become information a computer can use. Next, you will see how cameras learn from examples and labels. Once that base is clear, the course moves into the three practical skills at the center of many vision systems.
In the final chapter, you will bring these ideas together and plan a simple real-world vision project. You will also learn basic good practice around testing, privacy, and responsible camera use.
Many introductions to computer vision move too fast or assume you already know programming and machine learning. This course takes a different path. It is written for complete beginners who want clear understanding before tools and code. The goal is not to overwhelm you. The goal is to help you think confidently about what AI cameras can do, when to use sorting instead of spotting, and why counting is sometimes harder than it looks.
Each chapter includes milestone lessons that mark your progress and help you connect one idea to the next. By the time you finish, you will be able to describe a simple AI camera workflow in plain English and make better decisions about beginner vision projects at home, in business, or in public services.
This course is ideal for curious learners, non-technical professionals, students, small business owners, and anyone exploring smart camera systems for the first time. If you want a gentle and practical introduction to computer vision, this is the right place to start.
Whether you want to understand smart checkout cameras, warehouse counting tools, or simple quality-check systems, this course gives you a clear beginner path. You will leave with a solid grasp of the ideas behind image classification, object detection, and visual counting.
Ready to begin? Register free and start building practical AI camera skills today. You can also browse all courses to continue your learning journey across AI topics.
Computer Vision Educator and AI Applications Specialist
Sofia Chen teaches practical AI concepts for beginners with a focus on computer vision and real-world camera systems. She has helped students and teams understand how image-based AI works using simple language, clear examples, and hands-on learning.
An AI camera is not a magical eye. It is a practical system that combines a normal camera with software that can turn pictures into useful decisions. In this course, you will learn to think about that system in a simple, reliable way. First, a scene appears in front of the lens. Next, the camera captures that scene as a digital image. Then a computer model reads the image as patterns of numbers. Finally, the system produces an output such as a label, a box around an object, or a count. This chapter introduces that full chain so you can build a solid beginner mental model before touching tools or code.
Many people first meet computer vision through impressive demos: a camera recognizes fruit, follows a person, or counts cars on a road. Those examples are exciting, but the real skill is understanding what job the camera is being asked to do. Is it sorting images into groups? Is it spotting objects and showing where they are? Is it counting items without counting the same one twice? If you can answer those questions clearly, you are already thinking like an engineer.
We will also focus on an important idea: computers do not see the world the way people do. A person instantly understands context, purpose, and meaning. A computer starts with a grid of pixel values. It must learn from examples how certain number patterns relate to useful categories such as bottle, person, or empty shelf. That is why image quality, camera position, lighting, and the choice of training examples matter so much. Good results usually come from good problem definition and sensible image collection, not from guessing.
As you read, keep one practical goal in mind: by the end of this chapter, you should be able to explain in simple words how an AI camera reads images, tell the difference between sorting, spotting, and counting tasks, describe object detection with boxes and labels, understand why counting needs rules to avoid double counting, and choose suitable images for a beginner computer vision project. These are the foundation skills for every later chapter.
This chapter is designed as your first practical map of the field. You do not need advanced math. You do need curiosity, careful observation, and the habit of asking, “What exactly should the camera decide?” That question will guide every successful project you build from here.
Practice note for Understand what an AI camera does: document your objective, define a measurable success check, and run a small experiment before scaling. Capture what changed, why it changed, and what you would test next. This discipline improves reliability and makes your learning transferable to future projects.
Practice note for Recognize common vision tasks in daily life: document your objective, define a measurable success check, and run a small experiment before scaling. Capture what changed, why it changed, and what you would test next. This discipline improves reliability and makes your learning transferable to future projects.
Practice note for See how cameras turn scenes into digital pictures: document your objective, define a measurable success check, and run a small experiment before scaling. Capture what changed, why it changed, and what you would test next. This discipline improves reliability and makes your learning transferable to future projects.
Practice note for Build a simple mental model of image-based AI: document your objective, define a measurable success check, and run a small experiment before scaling. Capture what changed, why it changed, and what you would test next. This discipline improves reliability and makes your learning transferable to future projects.
An AI camera is best understood as two parts working together: image capture and image interpretation. The first part is the physical camera. It gathers light through a lens and creates a digital picture. The second part is the AI model or vision software. It examines that picture and tries to answer a question. Depending on the task, the answer might be “this is an apple,” “there is a person here,” or “five boxes crossed the line.”
This means an AI camera does not simply record video. It adds a layer of decision-making. A normal camera helps humans look later. An AI camera helps a computer react now. In a shop, it may detect products on a shelf. On a road, it may spot vehicles entering a lane. At home, it may notice a pet near a food bowl. The camera provides the raw visual input, but the useful behavior comes from the software logic connected to that input.
For beginners, a simple mental model is helpful: see, interpret, act. First the system sees a scene. Then it interprets the image using learned patterns. Finally it triggers an action such as saving a label, drawing a box, updating a count, or sending an alert. If any part of this chain is weak, the whole system suffers. A blurry camera, poor lighting, or unclear project goal can hurt performance just as much as a weak model.
A common mistake is to ask an AI camera to do too many jobs at once. For example, a beginner may want one camera to recognize every product, every person, and every action in a busy scene. That usually creates confusion. A better engineering choice is to define one narrow goal first, such as spotting whether a package is present on a conveyor. Simple, focused tasks are easier to collect images for, easier to test, and easier to improve.
When you hear the term AI camera in this course, think of a practical system that turns images into decisions. That is the core idea that connects all later topics.
Humans experience an image as a scene: a banana on a table, a car in a lane, a cat on a sofa. A computer begins with something much simpler: numbers arranged in a grid. Each tiny square in that grid is called a pixel. In a color image, each pixel often contains values for red, green, and blue. Together, millions of these values form the picture. To a computer, an image is not “a dog near a door.” It is a structured collection of numeric patterns.
This is why computers need numbers. Software cannot directly work with human meaning. It works with measurable inputs. Brightness becomes values. Color becomes values. Position in the image becomes row and column locations. Once an image is represented numerically, algorithms can compare patterns, detect edges, learn shapes, and estimate whether part of the image matches known examples.
Imagine a simple beginner project that sorts pictures into “ripe banana” and “not ripe banana.” A person may notice color and shape instantly. The computer instead learns that certain pixel patterns often appear in examples labeled ripe. During training, it sees many images and gradually connects those numerical patterns to the correct category. During prediction, it receives a new image and estimates which label is more likely.
Engineering judgment matters here. If your images are too dark, too small, or full of background clutter, the number patterns become harder to learn from. A banana photographed against a plain background is easier for a beginner model than a banana in a crowded fruit basket. Similarly, if the camera angle changes wildly, the model must learn many more patterns. Beginners often get better results by keeping the setup consistent: same distance, similar lighting, and a clear subject.
Another common mistake is forgetting that resizing and compression change the data. A tiny low-quality image may lose the details the model needs. A very large image may contain useful detail but slow down processing. Real projects balance image quality, speed, and hardware limits. The key lesson is simple: images become data through pixels, and better visual data usually leads to better AI behavior.
This course is built around three core vision jobs: sort, spot, and count. These are beginner-friendly ways to organize common computer vision tasks. Sorting means deciding which group an image belongs to. Spotting means finding where an object is in the image. Counting means determining how many relevant objects appear or pass through a scene.
Sorting is often called classification. The system looks at a whole image and returns a label such as apple, orange, or empty. It does not necessarily say where the object is. This is useful when each image contains one main subject and the question is simple. For example, a recycling system may sort images into paper, plastic, or metal.
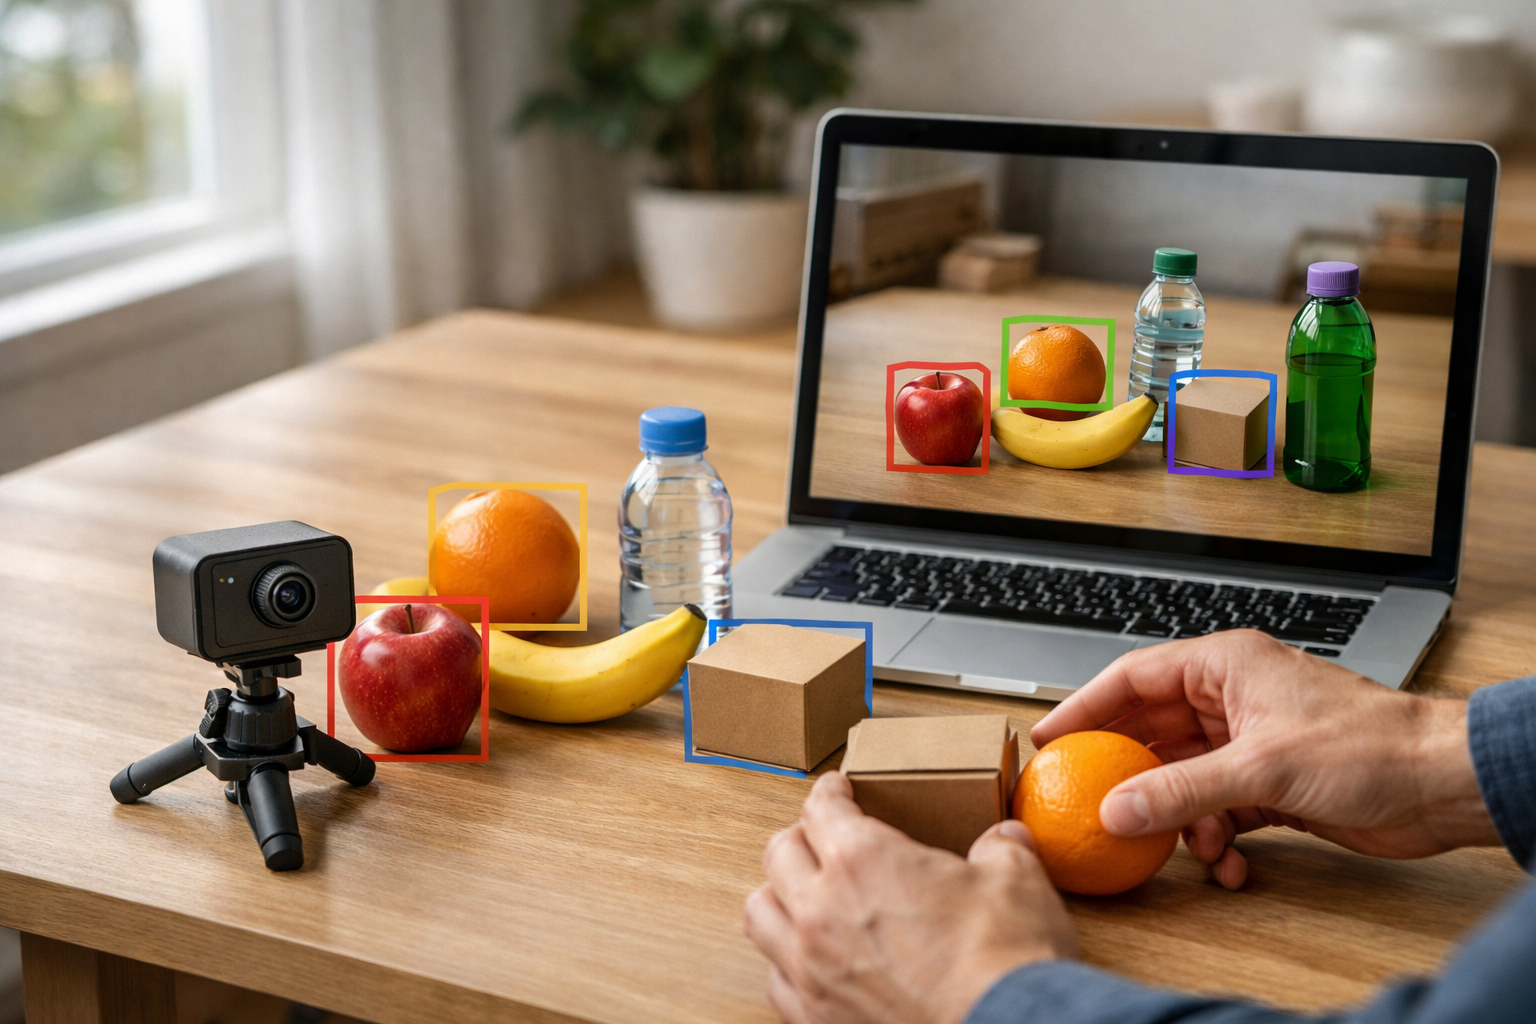
Spotting usually means object detection. In detection, the system draws boxes around items and attaches labels such as person, bottle, or box. This is one of the most important ideas in beginner computer vision. A box tells you where the object is, and the label tells you what the model believes it is. Often there is also a confidence score, which estimates how sure the model is. This makes spotting more informative than sorting because it can handle multiple objects in one image.
Counting builds on spotting or tracking. If a camera sees five oranges in one image, counting may be as simple as adding the detections. But in video, counting is harder. The same car appears in many frames. Without rules, the system may count it over and over. Good counting systems avoid double counting by tracking objects across frames or by counting only when an object crosses a virtual line or enters a defined zone.
A practical beginner habit is to choose the simplest job that solves the real problem. If you only need to know whether a shelf is empty or not, sorting may be enough. If you need to know where each item is, use spotting. If you need totals over time, design a counting workflow with anti-duplicate logic. Many failed projects begin with the wrong task definition.
Computer vision becomes easier to understand when you connect it to ordinary places. In shops, an AI camera might watch shelves and spot missing products. If the goal is simply “shelf empty or not,” that is a sorting task. If the goal is “where are the cereal boxes,” that is spotting. If the goal is “how many bottles were removed today,” that becomes counting and usually requires video over time.
On roads, vision systems often detect cars, buses, bicycles, and pedestrians. A city may use sorting to classify a road condition image, such as clear or blocked. It may use spotting to place boxes around vehicles in a junction. It may use counting to measure traffic flow by counting vehicles that cross a line. This is where double counting matters a lot. A car waiting at a red light appears in many frames, so the system must track it as one object, not count every frame as a new car.
At home, examples are often simpler and more personal. A pet feeder camera may spot whether a bowl is present, whether a pet is nearby, or how many times a pet visits during the day. A smart door camera may detect people or packages. A laundry helper app may sort images into dark clothes and light clothes. These examples show that the same basic task types appear in many settings.
When choosing images for a beginner project, daily-life examples teach a useful lesson: start with scenes that are visually clear. A neat tabletop with one fruit is easier than a busy kitchen. A doorway camera with a fixed angle is easier than a handheld camera moving around the room. A shop aisle with good lighting is easier than a dim garage. Good beginner images usually have one main subject, steady framing, enough light, and labels that a human can apply consistently.
The more you connect vision tasks to real places, the easier it becomes to decide what the camera should do and what kind of data you need to collect.
AI vision is good at repetitive visual tasks with clear rules and many examples. It can inspect similar images again and again without getting tired. This makes it useful for jobs like checking whether a part is present, spotting boxes on a conveyor, or counting vehicles through a gate. When the camera view is stable and the object types are limited, modern systems can perform very well.
It also works well when the environment is controlled. Good lighting, fixed camera placement, and consistent object appearance help the model learn reliable patterns. That is why many successful beginner projects happen in constrained settings rather than chaotic ones. A fruit sorter on a plain background is easier than identifying every object in a crowded market stall.
However, AI struggles when the scene changes in ways the training data did not cover. Shadows, glare, motion blur, strange angles, overlapping objects, and low resolution can reduce accuracy. Object detection boxes may become unstable when one object blocks another. Counting systems may fail when people or vehicles cluster together. Classification models may make poor guesses when the object is tiny or the background dominates the frame.
Another challenge is ambiguity. Humans can use context and common sense. AI usually cannot, unless it has been trained for that exact pattern. A toy car and a real car may confuse a weak model if the images are unusual. A system trained only on daylight footage may struggle at dusk. Beginners often blame the model first, but the real cause is often data mismatch.
The practical lesson is not that AI is weak. It is that AI must be matched carefully to the task. Use engineering judgment. Ask: Is the camera fixed? Is the object visible? Are labels clear? Can I collect enough examples of normal and difficult cases? Strong projects come from realistic expectations and good setup choices. Understanding limits early saves time later.
To build a useful beginner project, think in an end-to-end workflow rather than just a model. Start by defining one question the camera must answer. For example: “Is there an apple in the basket?” “Where are the bottles on the shelf?” or “How many people entered the room?” This first decision determines whether your project is sorting, spotting, or counting.
Next, choose a camera setup that supports the task. Keep the view stable. Make sure the object is large enough in the frame. Reduce visual clutter if possible. Use lighting that is bright and consistent. These simple choices often matter more than model complexity. Then collect images that reflect the real situation. Include normal examples and a few difficult ones, such as partial occlusion or slight shadows, but do not begin with chaotic data.
After collection comes labeling. For sorting, each image gets one category label. For spotting, each object needs a box and label. For counting in video, you may also need a counting rule, such as “count only when the center of the box crosses the line from left to right.” This rule is essential because it prevents double counting. Without it, the same object may be counted every time it appears in a new frame.
Then you train or configure the model, test it on new images, and inspect mistakes carefully. If it misses objects, ask whether they are too small or too dark. If it confuses categories, ask whether the labels are inconsistent. If the count is too high, check whether the same object is being counted more than once. Improvement usually comes from better data, better framing, or clearer rules.
A strong first project might use a fixed camera, one or two object categories, and a simple output. For example, detect apples on a table and count them once per image. That small workflow teaches nearly everything important: how images become data, how object detection uses boxes and labels, how counting logic works, and how to choose suitable images. Start simple, observe carefully, and improve step by step. That is how real computer vision projects are built.
1. What is the best description of an AI camera in this chapter?
2. Which sequence matches the chapter's simple mental model of how an AI camera works?
3. If a system draws boxes around objects and names them, which task is it mainly doing?
4. Why does the chapter say counting systems need extra rules?
5. Which project setup would be most suitable for a beginner computer vision project?
When people first hear that an AI camera can recognize objects, it can sound almost magical. In practice, the process is much more down-to-earth. A camera captures an image, the computer turns that image into data, and a trained model looks for patterns it has seen before. If the examples were prepared well, the system can sort images into categories, spot objects by drawing boxes and labels, or count how many items are present. This chapter explains that process in plain language so you can understand what the camera is really doing.
A useful way to think about computer vision is to compare it with teaching by examples. You do not explain every possible shape of an apple with a long rulebook. Instead, you show many pictures of apples and non-apples. Over time, the system begins to notice useful patterns such as color, texture, outline, and context. It does not "see" in the human sense. It measures image features and compares them with patterns learned from earlier examples.
That is why examples are the heart of beginner vision projects. If your goal is sorting, the system learns which whole image belongs to which category, such as ripe fruit versus unripe fruit. If your goal is spotting, it learns to find one or more objects inside the image and place boxes around them. If your goal is counting, it often relies on spotting first, then uses rules to avoid counting the same item twice. These are different tasks, even if they use the same camera.
Another important idea is that images must become numbers before a computer can use them. A digital image is a grid of tiny picture elements called pixels. Each pixel stores values, often for red, green, and blue. To a computer, an image is therefore not "a banana on a table" but a large block of numerical values. The model learns to connect those values with labels provided by humans. This is why clear labels matter so much. The computer cannot guess your intention unless the examples and names are consistent.
Beginners often assume that more pictures automatically mean better results. More examples help, but only if they are relevant and well organized. A small, clean image collection can beat a large, messy one. Good engineering judgment means choosing images that match the real task, writing simple labels, and checking whether the system is learning the right thing for the right reason. If all photos of apples are taken on a wooden table and all photos of oranges are taken on a white plate, the model may accidentally learn table versus plate instead of apple versus orange.
In this chapter, you will learn how examples help AI notice patterns, how labels guide learning without heavy technical language, how categories differ from objects and scenes, and how to prepare simple image sets for a first project. By the end, you should be able to choose suitable images, understand why object detection uses boxes and labels, and explain how counting systems reduce double counting when items move through a camera view.
Practice note for Learn how examples help AI notice patterns: document your objective, define a measurable success check, and run a small experiment before scaling. Capture what changed, why it changed, and what you would test next. This discipline improves reliability and makes your learning transferable to future projects.
Practice note for Understand labels without technical overload: document your objective, define a measurable success check, and run a small experiment before scaling. Capture what changed, why it changed, and what you would test next. This discipline improves reliability and makes your learning transferable to future projects.
Practice note for Compare categories, objects, and scenes: document your objective, define a measurable success check, and run a small experiment before scaling. Capture what changed, why it changed, and what you would test next. This discipline improves reliability and makes your learning transferable to future projects.
An AI camera learns best by comparing many examples, not by reading instructions the way a person would. If you want it to recognize cups, you show many images of cups in different sizes, colors, and positions. You also show images that do not contain cups. From those examples, the model begins to notice patterns that tend to appear together. In simple terms, it learns what usually makes a cup look like a cup.
This matters because no two pictures are exactly the same. A blue cup in sunlight looks different from a red cup under indoor lighting. One may be viewed from the side, another from above. A beginner mistake is to train with only a few near-identical images and expect the system to handle real-world variation. That usually leads to disappointment. The model may perform well on familiar images but fail as soon as the scene changes.
It also helps to separate three common vision jobs. In image classification, the model decides the main category of a whole image, such as "cat" or "dog." In object detection, the model finds individual objects and draws boxes around them with labels. In scene understanding, the goal may be broader, such as identifying a kitchen, street, or garden. These are related, but they are not the same. Sorting a photo into a category is easier than finding every object inside it.
For counting tasks, the system often depends on object detection first. If it can find each apple with a box and label, it can estimate how many apples are present. But counting becomes harder when objects overlap, move, or reappear across frames in a video. This is why a strong foundation in examples is important. The better the examples reflect the real situation, the more reliable the final count tends to be.
As a practical rule, collect examples that show normal variation on purpose. Include different distances, positions, and object appearances, while still staying focused on the task. Variety teaches the model what matters and what should be ignored.
Labels are the names we attach to examples so the system can connect image patterns with meaning. If you show ten pictures of bananas and label them all as "banana," the model starts linking those visual patterns to that word. Without labels, supervised learning has no target to aim for. The model may still detect patterns mathematically, but it will not know which pattern should be called what.
For beginner projects, keep labels simple and practical. Use names that directly match your goal. If you are building a sorter for fruit, labels like "apple," "banana," and "orange" are clear. If your task is quality sorting, labels like "ripe" and "unripe" may be more useful than fruit names. The label should serve the decision you actually want the system to make.
In object detection, labels usually work together with boxes. A person marks the area where the object appears, then assigns a name to it. The box tells the system where the object is, and the label tells it what the object is. This is how a camera can move from general recognition to spotting. Instead of saying "there is fruit somewhere in this image," the model can say "there is an apple here" and place a box around it.
Common mistakes happen when labels are inconsistent. For example, one person may label a mug as "cup" while another labels it as "mug." If the project only needs one drink-container category, mixing names creates confusion. Another mistake is making labels too detailed too early, such as splitting "red apple," "green apple," and "yellow apple" when the real task only requires "apple." Start with the simplest label set that solves the problem.
There is also a difference between categories, objects, and scenes. A category label might describe the whole image, such as "bakery." An object label identifies a specific item, such as "bread" or "tray." A scene label describes the overall environment, such as "kitchen" or "street." Knowing this difference helps you choose the right type of labeling and prevents you from asking one dataset to do several jobs poorly instead of one job well.
Not all training images are equally useful. Good examples are clear, relevant, and representative of what the camera will really see. Bad examples are misleading, low quality, or unrelated to the task. The difference matters because models learn from whatever patterns are present, even if those patterns are accidental.
Imagine you want to teach a camera to spot recyclable plastic bottles on a conveyor belt. Good examples would show bottles from different angles, with different label designs, in realistic belt conditions. Bad examples might include only studio photos on clean white backgrounds. Those images may look neat, but they do not match the real environment. A model trained on them may struggle when faced with shadows, motion blur, or clutter.
Another type of bad example is a wrongly labeled image. If a can is labeled as a bottle, the system learns the wrong association. Even a small number of incorrect labels can hurt a beginner project, especially when the dataset is small. This is why careful review is part of the workflow, not an optional extra. Quality control is one of the most valuable habits in computer vision work.
Bias can also enter through the examples you choose. If every photo of "good fruit" is bright and every photo of "bad fruit" is dim, the model may learn brightness instead of quality. This is a subtle but common engineering mistake. A useful check is to ask: what shortcut might the model take here? If there is an easy background clue that separates the classes, the model may rely on that clue instead of the object itself.
Good examples teach the intended concept. Bad examples teach accidents. For a beginner, that single idea explains many success and failure stories in AI camera projects.
Lighting, viewing angle, and background often matter more than beginners expect. A camera does not know that an object stays the same when the room gets darker or the object is rotated. It must learn that stability from examples. If your dataset contains only one lighting condition, one angle, and one background, the model may treat those conditions as part of the object's identity.
Lighting changes color and contrast. A yellow banana in bright sunlight may appear very different under warm indoor bulbs. Shadows can hide edges. Glare can wash out details. For this reason, it is wise to collect images in the kinds of light your project will actually face. If your camera will operate in a shop, do not train only on outdoor images.
Angle changes shape. A plate seen from above looks circular; from the side it may appear thin and narrow. If you want a camera to recognize an object from several viewpoints, include those views in the training set. Do not assume the model will "figure it out" from one pose. Sometimes it can generalize, but relying on that too early is risky.
Background matters because models notice patterns everywhere, not just on the main object. A toy car photographed only on a blue mat may become strongly linked with that mat. Then when the toy appears on a wooden floor, performance drops. This does not mean backgrounds must be random chaos. It means they should be varied enough that the object remains the main consistent signal.
These factors also affect counting systems. If overlapping objects blend into the background or become hard to separate in poor lighting, the detector may miss some items or create unstable boxes. In video, an object may be detected in one frame but missed in the next, making counting harder. Good image preparation reduces these problems before training even begins.
A practical approach is to create a checklist: same environment as final use, realistic light range, several angles, and more than one background. This is simple engineering judgment. You are designing conditions that help the model learn the object, not the accident around the object.
Once you have collected and labeled images, the next step is usually to split them into different groups. One group is used for training, where the model learns from examples. Another group is used for testing or validation, where you check how well it performs on images it has not seen before. This separation is essential. If you test on the same images used for training, you can get a false sense of success.
A beginner-friendly way to think about training is repetition with adjustment. The model makes guesses, compares them with the correct labels, and gradually adjusts internal settings to reduce mistakes. You do not need deep mathematics to use this idea well. What matters most at the start is disciplined workflow: clean images, consistent labels, realistic splits, and careful review of errors.
When checking results, do not look only at one overall percentage. Ask practical questions. Which class is often confused with another? Are small objects missed more often than large ones? Are boxes too loose or too tight? Does the system perform worse in dim light? These observations tell you what to fix next. They are often more useful than a single score.
For object detection and counting, error analysis is especially important. A detector can make several kinds of mistakes: miss an object completely, place a box in the wrong place, use the wrong label, or detect the same object more than once. Double counting often happens when one object receives multiple boxes or when the same moving object is counted again in later frames. Counting systems reduce this by using confidence thresholds, overlap rules, and simple tracking across frames so one object keeps one identity for a short time.
A smart beginner workflow is iterative. Train a small model, test it, inspect failures, improve the dataset, and repeat. If the model misses dark objects, add more realistic dark examples. If it confuses apples with tomatoes, include clearer side-by-side comparisons. Improvement usually comes less from magical settings and more from better data and better checking.
Your first image collection should be small enough to manage but rich enough to teach useful patterns. The goal is not to build the biggest dataset. The goal is to build one that clearly matches the project. Start with a narrow task. For example, instead of "recognize all kitchen objects," begin with "spot apples and bananas in a fruit bowl" or "count bottles moving past a fixed camera." A focused task gives you clearer labels and more reliable results.
Choose images that fit the real camera setup. If the final system will use a top-down camera, collect top-down images. If the camera will be fixed in one location, capture examples from that position. This helps the model learn the patterns it will actually need. At the same time, include realistic variation in lighting, object placement, and object appearance so the model does not become too narrow.
For a beginner collection, organize files carefully from the start. Keep image names tidy, store labels in a consistent format, and write down the meaning of each class. This simple documentation saves time later, especially if you need to correct labels or add new examples. Many small projects fail not because the model is weak, but because the data becomes confusing to manage.
It is also wise to include negative examples where the target object is absent. If you want to detect oranges, add some images with bowls, tables, and other fruit but no oranges. This teaches the model that not every round orange-like shape is the target. Negative examples make sorting and spotting more realistic.
With this approach, a beginner can build a practical image set that supports real learning. The camera is not becoming intelligent by magic. It is being taught through examples, names, and careful choices. When those choices are thoughtful, even a simple project can demonstrate how AI cameras sort, spot, and count in ways that are useful and understandable.
1. According to the chapter, what is the main way an AI camera learns to recognize things?
2. What is the difference between sorting and spotting in beginner vision projects?
3. Why do clear and consistent labels matter when training a vision model?
4. What is a risk of using poorly chosen training images, such as apples always on a wooden table and oranges always on a white plate?
5. How does counting often work in an AI camera system, based on this chapter?
In this chapter, we focus on the simplest computer vision job an AI camera can do: sorting. In computer vision, this job is called image classification. The idea is straightforward. You give the system one image, and it gives back one main label such as apple, empty shelf, damaged package, or full bin. This is often the first useful skill beginners build because it is easier than drawing boxes around many objects or counting moving items over time.
Classification matters because many real projects start with a yes-or-no or category choice. Is this product good or bad? Is the parking space free or occupied? Is this leaf healthy or diseased? These are sorting decisions. They help us understand one of the core course outcomes: an AI camera turns images into data, compares patterns it has learned, and chooses the best matching label. That makes classification a practical entry point into how an AI camera reads images.
It is also the best place to separate three common vision tasks. Sorting means assigning a label to the whole image. Spotting, also called object detection, means finding where things are by drawing boxes and labels. Counting means keeping track of how many objects or events happen, often while avoiding double counting across frames. In this chapter, we stay with sorting, but we will connect it to the bigger picture so you can choose the right task for a beginner project.
A good classification workflow is simple and disciplined. First, decide the labels. Next, collect images that clearly match those labels. Then check whether each image really shows one main idea. After that, train the model and review its results, especially cases where it seems unsure. Finally, improve the dataset by removing confusing images and adding more examples from realistic conditions such as different lighting, angles, and backgrounds.
Engineering judgment matters even in beginner projects. If the image contains many important objects, classification may be too simple. If the camera must tell you where something is, you need detection instead. If the task depends on repeated events over time, you may need counting logic. But if the whole image can reasonably be summarized by one main answer, classification is often the cleanest and fastest tool.
By the end of this chapter, you should be able to explain classification in simple words, understand why one image usually gets one main label, describe confidence without formulas, and recognize practical situations where sorting is the right beginner-friendly computer vision method.
Practice note for Understand classification as a sorting task: document your objective, define a measurable success check, and run a small experiment before scaling. Capture what changed, why it changed, and what you would test next. This discipline improves reliability and makes your learning transferable to future projects.
Practice note for Learn how one image gets one main label: document your objective, define a measurable success check, and run a small experiment before scaling. Capture what changed, why it changed, and what you would test next. This discipline improves reliability and makes your learning transferable to future projects.
Practice note for Explore confidence scores in simple terms: document your objective, define a measurable success check, and run a small experiment before scaling. Capture what changed, why it changed, and what you would test next. This discipline improves reliability and makes your learning transferable to future projects.
Practice note for Use classification ideas in practical scenarios: document your objective, define a measurable success check, and run a small experiment before scaling. Capture what changed, why it changed, and what you would test next. This discipline improves reliability and makes your learning transferable to future projects.
Practice note for Understand classification as a sorting task: document your objective, define a measurable success check, and run a small experiment before scaling. Capture what changed, why it changed, and what you would test next. This discipline improves reliability and makes your learning transferable to future projects.
Classification is the task of sorting an image into one category from a set of possible categories. Think of it like placing each photo into a labeled tray. A photo of a ripe banana goes into the ripe tray. A photo of a cracked bottle goes into the damaged tray. The model is not drawing a box around the banana or bottle. It is looking at the whole image and deciding which label fits best.
This is one of the easiest ways to understand how an AI camera reads images. The camera captures pixels. Those pixels become numeric data a computer can process. The model learns patterns in that data such as color, texture, shape, and arrangement. During training, it sees many examples with known labels. Later, when it receives a new image, it compares the visual patterns in that image to what it has learned and chooses the closest category.
For beginners, classification is useful because the output is simple. Instead of coordinates, tracking IDs, or multiple object counts, you get a short answer. That makes it easier to test whether your idea works. A common beginner mistake is picking a problem that really needs spotting or counting and trying to force it into classification. For example, if you need to know whether an image contains three apples or five, classification is the wrong tool. But if you only need to say empty bowl or bowl with fruit, classification may be enough.
Good engineering judgment starts with asking one question: can the entire image be described by one main category? If yes, classification is a strong candidate.
The key rule in basic image classification is simple: one image gives one main answer. That does not mean the image contains only one object. It means the system is trained to return one label that best describes the full image. For example, a photo of a recycling bin might show the bin, the floor, a wall, and some shadows. But the label might still be full bin because that is the main decision you care about.
This idea is powerful because it keeps the task focused. If your labels are full and empty, the model learns to separate those image-level conditions. It does not need to identify each individual item inside the bin. Likewise, if your labels are fresh fruit and damaged fruit, the model is not counting bruises or locating every soft spot. It is deciding which category best matches the whole picture.
However, this simplicity creates limits. A single image may contain mixed evidence. Imagine a shelf with both damaged and healthy apples. What is the correct label? If your labeling rules are unclear, the model will learn inconsistent patterns. That is why project design matters. You should define labels in plain language before collecting data. If an image has no clear main answer, either remove it, crop it, or redesign the task.
A practical tip is to imagine a human helper labeling images quickly. If that person regularly hesitates, your categories are probably too vague. In beginner projects, strong labels beat clever models. Clear categories make training easier, errors easier to diagnose, and outcomes easier to explain to others.
Classification becomes easier to understand when we look at practical scenarios. Suppose you run a small produce station and want an AI camera to sort images into fresh or damaged. This is a classic classification setup. Each image should show one item, or at least one clear overall condition. The camera does not need to mark every bruise. It only needs to choose the image-level label that matches the item.
Now consider a storage bin monitored by a fixed camera. Your goal is to decide whether the bin is full or empty. Again, this is classification. The entire scene has one condition. In a beginner project, this can work very well if the camera angle stays stable and the examples include realistic changes in lighting, shadows, and background clutter.
These examples also teach an important lesson about image selection. You should choose images that match the real operating environment. If the deployed camera looks down from above, training mostly on side-view photos will reduce performance. If the system will be used in dim light, include dim-light examples. If some images are blurry because of motion, include a controlled amount of blur in training so the model learns realistic variation.
Another practical lesson is to make labels operational, not poetic. Fresh might mean no visible mold, no large bruise, and normal color. Full might mean more than 80% of the container area is occupied. Even if the model does not know these rules directly, your labeling process should. That is how you turn a vague idea into a usable engineering task.
When a classification model gives an answer, it often also gives a confidence score. In simple terms, confidence tells you how strongly the model leans toward its chosen label. If the system says fresh with high confidence, it means the image looks very similar to examples it has learned for that class. If confidence is lower, the image may be unusual, blurry, poorly lit, or visually similar to another category.
It is important not to treat confidence as certainty. A high-confidence answer can still be wrong. This happens when the training data has hidden bias, when the background is misleading, or when the new image is very different from the examples used during training. For instance, a model may learn that damaged fruit often appears on a dark tray. Then it might incorrectly treat the tray as a clue instead of the fruit itself. In that case, confidence can be high for the wrong reason.
In practice, confidence is useful for workflow decisions. You might accept high-confidence predictions automatically and send low-confidence images to a human for review. You might also use confidence to find weak spots in your dataset. If many images from one camera position produce low confidence, you probably need more training examples from that angle.
A good beginner habit is to inspect not only the model's answer but also its confidence pattern over many images. If confidence drops whenever lighting changes, the model may not be robust. Confidence is best used as a warning light and prioritization tool, not as proof that the model is always right.
Most beginner classification projects fail for a few predictable reasons. The first is poor label design. If two labels overlap too much, the model cannot learn a stable rule. For example, slightly damaged and bad may be hard to separate if there is no clear standard. The fix is to simplify the categories or write stricter labeling guidelines.
The second mistake is collecting images that do not represent the real task. Clean sample images from the internet may look impressive, but they rarely match a factory corner, classroom shelf, or home camera view. Real projects need real conditions: glare, blur, shadows, partial occlusion, and normal background mess. If the deployment setting is messy, your dataset must be messy too.
The third mistake is accidental shortcut learning. A model may seem accurate while relying on irrelevant clues. Maybe all empty bin photos were taken in the morning and all full bin photos in the afternoon. The model then uses lighting instead of bin contents. This creates a fragile system that breaks in new conditions. To reduce this risk, vary the background, time of day, camera position, and image source within every class.
Another mistake is using classification when the image contains several important objects and no single main answer. If your real need is to know which object is where, use object detection with boxes and labels instead. If you need repeated totals over time, counting systems must also handle tracking so they do not count the same object again and again. Choosing the correct task type is part of good engineering.
Sorting is the right tool when your decision can be expressed as one main label for the whole image. That makes classification especially useful for simple inspections, status checks, and first-stage screening systems. Examples include door open or door closed, helmet or no helmet for a cropped worker image, plant healthy or plant stressed, and package sealed or package unsealed.
Classification is also a smart choice when you want to build confidence with a beginner project quickly. It needs less annotation work than object detection because you are labeling whole images rather than drawing boxes. That lowers the setup cost and helps you focus on core ideas such as data quality, category clarity, confidence interpretation, and realistic testing.
Still, good project planning means knowing when to stop using classification. If the camera must identify multiple items in one frame, report their locations, or support counting without double counting, you have moved beyond simple sorting. Detection adds boxes and labels. Counting often adds time-based logic so the same object is not counted in every frame it appears. Classification does not solve those problems by itself.
For a beginner, the practical outcome is this: choose classification when the image has one overall condition, the labels are clear, and the final decision does not depend on object location or repeated tracking. If those conditions hold, classification is not just easier. It is often the most reliable and teachable starting point in computer vision.
1. What is image classification mainly described as in this chapter?
2. Which situation is the best fit for using classification?
3. Why does one image usually get one main label in classification?
4. How should a beginner think about confidence scores?
5. Which action would most improve a beginner classification dataset?
In earlier parts of this course, you learned that an AI camera can treat an image as data and make decisions from patterns in that data. Now we move from a simple idea—sorting a whole image into one category—to a more useful skill: spotting objects inside the image. This is called object detection. Instead of saying only “this is a fruit photo” or “this is a shelf photo,” a detection system can say “there are three apples here, one banana there, and a bottle on the right.” That makes detection the bridge between seeing and acting.
For beginners, object detection is easiest to understand as a combination of two jobs done together. First, the system must locate where an object appears. Second, it must decide what that object is. The result is usually shown as a box around the object and a label attached to that box. This is why detection feels more visual and more practical than plain classification. A warehouse camera may need to find every package on a conveyor. A shop camera may need to spot products on a shelf. A safety camera may need to notice people, helmets, or vehicles. In all of these cases, one label for the whole image is not enough.
Object detection also prepares us for counting. Before an AI camera can count items well, it must first separate one item from another. If the system cannot tell where each item starts and ends, it will struggle to count reliably. That is why boxes, labels, confidence scores, and overlap handling matter so much. These are not advanced extras. They are the basic tools that help a beginner read detection outputs with confidence.
As you read this chapter, keep one practical question in mind: what does the camera need to notice in order to help with the task? Good computer vision projects start with that question. If your goal is to sort images into broad categories, classification may be enough. If your goal is to find, count, track, or check the position of objects, detection is often the better choice.
This chapter explains how AI spots multiple objects in one image, what boxes and labels mean, how detection differs from classification, and how to read simple detection outputs in a practical way. We will also look at common mistakes and the engineering judgment needed to choose the right approach for beginner projects.
Practice note for Understand how AI spots multiple objects in one image: document your objective, define a measurable success check, and run a small experiment before scaling. Capture what changed, why it changed, and what you would test next. This discipline improves reliability and makes your learning transferable to future projects.
Practice note for Learn what boxes and labels mean: document your objective, define a measurable success check, and run a small experiment before scaling. Capture what changed, why it changed, and what you would test next. This discipline improves reliability and makes your learning transferable to future projects.
Practice note for See how detection differs from classification: document your objective, define a measurable success check, and run a small experiment before scaling. Capture what changed, why it changed, and what you would test next. This discipline improves reliability and makes your learning transferable to future projects.
Practice note for Read simple detection outputs with confidence: document your objective, define a measurable success check, and run a small experiment before scaling. Capture what changed, why it changed, and what you would test next. This discipline improves reliability and makes your learning transferable to future projects.
Practice note for Understand how AI spots multiple objects in one image: document your objective, define a measurable success check, and run a small experiment before scaling. Capture what changed, why it changed, and what you would test next. This discipline improves reliability and makes your learning transferable to future projects.
A classification model looks at the entire image and returns one main answer, such as “cat,” “road,” or “empty shelf.” That is useful when the whole scene fits one label. But many real camera tasks are more specific. A photo of a storeroom may contain boxes, labels, people, and tools all at once. If you want the camera to help find only the boxes, classifying the whole image as “storeroom” does not solve the problem. Detection solves this by looking for individual objects inside the scene.
You can think of the change like this: classification asks for a summary, while detection asks for a map. The summary tells you the general topic of the picture. The map tells you where important things are located. This location information is the reason detection is so useful in practical systems. It allows a robot arm to reach toward an object, a counting system to total items, or a safety monitor to check whether a person is inside a restricted zone.
From an engineering point of view, detection is harder than classification because the model must do more work. It must handle different object sizes, different positions, partial views, and cluttered backgrounds. A single object may appear near the corner, partly hidden, or much smaller than expected. Good beginner projects reduce this difficulty by choosing clear images, stable camera angles, and objects that stand out from the background. For example, detecting bright-colored packages on a dark conveyor is easier than detecting transparent bottles in a crowded reflective scene.
A common beginner mistake is choosing detection when the task is really only sorting. If you only need to know whether a bin image contains recyclable material or not, classification may be enough. Another common mistake is trying to use classification for a job that needs object locations, such as counting apples in a crate. In that case, the system needs to separate one apple from another, so detection is a better fit. Good project design starts by matching the camera task to the right vision tool.
The most common way to show a detected object is with a bounding box. A bounding box is a rectangle drawn around the object. Next to that box, the system places a label such as “person,” “box,” “apple,” or “helmet.” This simple visual format is one of the reasons object detection is easy to inspect. A person can quickly look at the image and judge whether the system found the right item in roughly the right place.
Boxes and labels are not just for display. They are the structured output the computer uses. A typical detection result includes the label name, the box position, and a confidence score. The box position is often stored as numbers, such as left edge, top edge, width, and height. That means the image becomes data the computer can use directly. Another program can read those numbers and decide what to do next, such as crop the object, count it, trigger an alert, or compare its position with a line or zone.
For beginners, it helps to remember that a bounding box is an approximation. It does not trace the exact shape of the object. It simply covers the area where the object appears. Because of that, some boxes include background space, and some are not perfectly tight. That is normal. The goal is not artistic drawing. The goal is useful location information.
When creating or reviewing training data, consistency matters more than perfection. If one apple is boxed tightly and another loosely, the model learns mixed rules. If labels are inconsistent—sometimes “carton,” sometimes “box,” sometimes “package” for the same thing—the model becomes confused. Clear naming and steady box style improve results. Practical teams often write simple labeling rules before collecting data. For example:
These decisions seem small, but they shape how well the detector learns and how easy the outputs are to trust later.
One of the biggest differences between detection and classification is that detection can return many answers from one image. A single frame might contain five bottles, two cans, and one hand. A detector does not need to choose only one. It can place separate boxes around each object and assign a label to each box. This is what makes spotting useful for shelf analysis, traffic scenes, produce counting, and warehouse monitoring.
To a beginner, this can feel almost magical, but the practical idea is simple: the model searches the image for patterns that match known object types at different positions and sizes. If it finds a likely match, it proposes a box and label. It repeats this process across the image, so multiple objects can be found in the same scene. The output is then a list of detections rather than one class name.
Reading these results becomes easier once you treat each detection as a record. For example, an output might mean: detection 1 is “box” at these coordinates with 94% confidence; detection 2 is “box” at another position with 91% confidence; detection 3 is “person” near the left side with 88% confidence. This structured view is important because real systems do not just draw colorful rectangles. They use the list to make decisions.
Multiple detection is also the first step toward counting. If the model finds four separate boxes for four visible apples, the counting system can total them. But counting becomes harder when objects touch, overlap, or move across frames. That is where double counting risks appear. If the same item is detected twice in one image, or detected again and again as it moves through video, the system needs rules to avoid adding it more than once. In simple image-based counting, one clean box per item is often enough. In video, engineers may add tracking or counting lines so an object is counted only when it crosses a specific point once. This is a good example of how spotting supports counting but does not automatically solve every counting problem by itself.
Detection outputs usually include a confidence score. This score estimates how sure the model is about a particular box and label. A high score often means the object pattern was clear. A lower score means the model is less certain. Beginners should not treat confidence as a promise that the answer is correct. It is better to read it as a useful clue. A box with 98% confidence may still be wrong in a strange scene, and a box with 55% confidence may still be useful depending on the project.
A practical system usually sets a threshold. Detections below that threshold are hidden or ignored. If the threshold is too high, the system may miss real objects. If it is too low, it may show too many false detections. This is engineering judgment: choose the threshold based on what matters most. In safety, missing a person may be worse than showing an extra false alarm. In product counting, too many false boxes may be more harmful than missing a few unclear items.
Overlap is another key issue. Sometimes the model proposes several boxes for the same object because many nearby rectangles look plausible. If all of them were kept, the system might appear to detect one item two or three times. To reduce this, detectors use overlap-handling steps that keep the best box and remove duplicates. This matters greatly for counting, because duplicate boxes can lead to double counting. It also improves readability for people who inspect results on screen.
Missed objects happen too. An item may be too small, too dark, too blurry, partly hidden, or unusual compared with the training examples. A common beginner mistake is blaming the model immediately when the real problem is image quality. If the object is barely visible to a human, the detector will struggle as well. Better lighting, a closer camera angle, less clutter, or more representative training images often help more than changing model settings. Good computer vision is not only about algorithms. It is also about giving the system clear visual evidence to work with.
Object detection becomes easier to understand when you connect it to real jobs. In safety systems, a camera may detect people, helmets, safety vests, forklifts, or vehicles. The value comes from location. If a person is detected inside a dangerous zone, the system can raise an alert. A classification-only model that says “factory scene” would not help enough because it does not tell us where the risk is.
In retail, detection can spot products on shelves, identify empty spaces, or count front-facing items. A store may want to know whether a shelf section contains the expected products and whether any labels are missing. Boxes and labels help by turning the shelf image into a list of visible items and positions. Staff can then review only the shelves that need attention. This saves time and focuses effort.
In logistics, cameras often watch conveyors, pallets, bins, and loading areas. Detection can find parcels, damaged items, labels, or misplaced objects. If a package enters a counting zone, the system can count it once. If a parcel appears outside the expected area, the system can flag it. In these settings, stable camera placement and repeatable backgrounds make beginner projects much easier. The more predictable the scene, the more reliable the detector tends to be.
Across all these examples, one lesson stays the same: choose suitable images for the project. Good beginner images are clear, well lit, and closely matched to the real task. The object should be visible enough, not too tiny, and not hidden by heavy clutter. The camera should capture the view that matters operationally. If workers wear helmets viewed from above, train on that view. If products are counted as they pass one lane, collect images from that lane. Practical success comes from aligning the images, labels, and workflow with the real use case rather than collecting random pictures that look only vaguely related.
By now, the difference between sorting and spotting should be clear. Sorting, or classification, works best when one label can describe the whole image well enough for the task. Spotting, or detection, wins when you need to know where objects are, how many appear, or whether specific items are present together. If the next action depends on object position, detection is usually the better choice.
Suppose you have images from a recycling line. If the task is simply to sort images into “contains plastic” or “does not contain plastic,” classification may be enough. But if the task is to count bottles, reject only frames with metal cans, or guide a robot toward a specific object, detection is the right tool. The same scene may support both approaches, but the project goal decides which one is more useful.
Good engineering judgment means balancing complexity and value. Detection offers richer output, but it also requires more careful labeling, more detailed evaluation, and often more effort in data collection. For a beginner project, choose spotting when the extra location information directly supports the outcome you want. Do not choose it only because it seems more advanced. The best model is not the most complicated one; it is the one that solves the actual problem reliably.
When you read a simple detection output now, you should be able to interpret it with confidence: each object is represented by a box, a label, and usually a confidence score. Multiple objects can appear in one image. Overlap handling helps prevent duplicates. Missed objects often point to image quality or training gaps. Most importantly, detection is the foundation for many counting and monitoring systems because it turns visual scenes into structured object-level data. That is the core idea of this chapter: an AI camera does not just look at a picture as one thing. It can learn to spot the individual things inside it and describe them in a way that people and machines can both use.
1. What is the main difference between object detection and classification?
2. Why are boxes and labels important in object detection?
3. Why does counting often build on detection?
4. Which task is most likely to require object detection instead of classification?
5. According to the chapter, what practical question should guide a beginner vision project?
In earlier chapters, you learned that an AI camera can spot objects by drawing boxes around them and assigning labels such as person, box, bottle, or car. Counting is the next step. Instead of only asking, “What is in this image?” we now ask, “How many are there?” This sounds simple, but counting introduces a new layer of care. A system must not only detect objects, but also decide which detections should be included in the total and which should not. That means counting is really a decision process built on top of detection.
For beginners, it helps to think of counting as detection plus rules. The detector finds likely objects. Then a counting rule decides when an object should increase the number. In a still image, that rule may be as simple as “count every visible apple.” In a video, the rule is often stricter, such as “count a person only once when they cross the doorway line.” This difference matters because moving scenes create repeated views of the same object across many frames. If you count every frame, your total will explode and become useless.
This chapter connects the technical idea of detections to the practical idea of useful numbers. You will see how counting builds on detection, why moving scenes are harder than still images, and how simple engineering judgement improves results. You will also learn that counting is not just a computer vision task. It is part of a real workflow. A business, classroom, farm, store, or warehouse does not want boxes on a screen. It wants a number that helps someone act.
Good counting systems begin with good images and clear goals. If the camera angle is poor, objects overlap heavily, or the scene changes too fast, count quality drops. If the goal is vague, the system may count the wrong thing. For example, do you want to count every person visible in a frame, every person entering a room, or the maximum number of people present at one time? These sound related, but they are different tasks and need different rules.
As you read, keep one idea in mind: a count is only useful if you understand what it means. A number on its own can be misleading. A count may mean “objects currently visible,” “objects that crossed a line today,” or “objects detected above a confidence threshold.” Practical computer vision always depends on defining the meaning of the output. Once the meaning is clear, you can improve the system with simple methods such as better camera placement, confidence limits, tracking, and line-crossing rules.
By the end of this chapter, you should be able to explain how counting grows out of object detection, recognize common counting mistakes, and choose practical rules that make beginner systems more reliable. You should also be able to connect counts to actions, such as reordering stock, checking traffic flow, or estimating how busy a space has become. That is where AI camera skills become genuinely useful.
Practice note for Understand how counting builds on detection: document your objective, define a measurable success check, and run a small experiment before scaling. Capture what changed, why it changed, and what you would test next. This discipline improves reliability and makes your learning transferable to future projects.
Practice note for Learn why counting can go wrong in moving scenes: document your objective, define a measurable success check, and run a small experiment before scaling. Capture what changed, why it changed, and what you would test next. This discipline improves reliability and makes your learning transferable to future projects.
A detector can draw a box around each visible object, but counting asks for one more decision: which of those detections should become part of the final number? That is why counting is more than detection. Detection creates candidates. Counting filters, interprets, and totals them. In practice, this means you must define the counting task very clearly before you build anything.
Suppose an AI camera looks at a shelf of cans. If your task is to count the number of cans in a single photo, you can often count every detected can above a confidence threshold. But if your camera watches a conveyor belt over time, simply adding every detection from every frame would count the same can again and again. The counting logic must understand that repeated detections across nearby frames may belong to one physical item.
This is where engineering judgement begins. A beginner might say, “The model found 10 boxes in this frame, so the count is 10.” That can be true for one image. It is often wrong for a video stream or a changing scene. Counting needs context. Are you measuring what is present now, what passed by during a period, or what entered a region? Each version requires different rules.
Another practical point is confidence. Object detectors are not perfect. They sometimes miss real objects, and they sometimes invent detections from shadows, reflections, or cluttered backgrounds. A counting system therefore needs a decision boundary, usually a confidence threshold, to control which detections are trusted. A threshold that is too low can inflate counts with false positives. A threshold that is too high can drop real objects and lower the count.
So counting is best understood as a pipeline: capture image, detect objects, apply rules, then produce a number with a clear meaning. Once you see counting this way, the task becomes easier to design. You stop treating the count as magic and start treating it as the result of several understandable choices.
Still-image counting is the best place for beginners to start because there is only one moment to analyze. You are not yet dealing with time, motion, or repeated appearances across frames. The usual workflow is straightforward: choose an image, run object detection, keep detections that match the target class, and total them. For example, if you want to count oranges in a crate, you count all detections labeled orange that meet your confidence rule.
Even in a single image, count quality depends heavily on image choice. Good counting images have clear lighting, enough resolution, and a camera angle that shows most objects without too much overlap. If objects are piled on top of each other, partly hidden, or very small in the frame, the detector may miss them. If the background is messy and visually similar to the target object, the detector may create false boxes.
A practical beginner strategy is to simplify the scene before trying to improve the model. Move the camera closer. Use a plain background if possible. Keep the view stable. Make sure the target objects are large enough to be seen. These simple changes often improve counting more than changing code or model settings.
You should also decide what counts as one item. If part of an object is cut off at the edge of the image, should it be counted? If two objects overlap and the detector gives only one box, what is the expected behavior? Real projects need these rules written down. Otherwise, people looking at the same image may disagree about the correct count, which makes evaluation difficult.
For beginners, still images are useful because they teach the core idea: counts come from detections, but only after you define rules. Once you can get reliable counts in stable photos, you are ready to move to video, where the same ideas still apply but need extra tools to handle motion and time.
Video counting is more powerful than still-image counting because it can measure flow over time, such as people entering a room or boxes moving through a factory line. But it is also where counting can go wrong most easily. The key reason is simple: the same object appears in many frames. If a person is visible for 100 frames, a detector may produce 100 detections for that one person. Without extra logic, the system may count 100 instead of 1.
To solve this, video counting usually needs some form of tracking or event rule. Tracking tries to follow the same object from frame to frame and assign it a temporary identity. Then the system can say, “This is still the same person, so do not add a new count yet.” An event rule adds the count only when the tracked object does something specific, such as crossing a line or entering a zone.
Moving scenes also create visual problems. Motion blur can make objects less clear. Fast camera motion can shake the whole image. Lighting can change as objects move through shadows or reflections. Crowded scenes create occlusion, where one object blocks another. All of these can break tracks and damage count quality.
For a beginner project, choose a controlled video scene. A fixed camera is much easier than a moving camera. A top-down or side view with a clear path is often easier than a crowded front view. Slow, steady motion is easier than chaotic movement. This is not a limitation; it is good engineering judgement. Start where success is likely.
When you test a video counter, do not only inspect the final number. Watch the count change over time. Ask when the system added a number and why. The most useful debugging method is often visual: display boxes, object IDs, a counting line, and the current total. That way, you can see whether the system is making a reasonable decision or reacting to noise.
The two biggest counting errors are double counts and missed counts. A double count happens when one real object is counted more than once. A missed count happens when a real object should have been counted but was not. Good counting systems try to reduce both, but there is usually a trade-off. Rules that are very strict may reduce double counts while increasing misses. Rules that are very relaxed may catch more objects but count some twice.
Double counts are common when tracks are unstable. Imagine a person walking through a door. If the tracker loses that person for a few frames and then creates a new ID, the system may think a new person has appeared and count again. This also happens when objects stop, turn around, or overlap with others. Missed counts often occur when detections are weak, objects are partly hidden, or the count event is too strict and the object never clearly satisfies it.
There are several simple ways to improve quality. First, use a fixed camera and a clean view whenever possible. Second, set confidence thresholds carefully and test them on real examples. Third, use a counting rule tied to a specific event, such as crossing a line in one direction, instead of counting every appearance. Fourth, add a short memory so an object that disappears briefly is not treated as a brand-new object immediately.
Another practical method is to define a narrow area where counting is allowed. If you count only near a doorway or only inside a clear belt region, you reduce the chance of accidental counts from background detections. This is a strong beginner technique because it uses scene knowledge instead of complicated modeling.
Most importantly, evaluate errors honestly. Do not just celebrate a count that looks close on one example. Test multiple clips and note when the system fails. Ask whether the problem comes from poor detection, poor tracking, or a weak counting rule. That diagnosis helps you improve the right part of the workflow.
One of the best beginner ideas in computer vision is that simple rules can create strong results. In counting, the most useful rules are often based on lines and zones. A line is an imaginary boundary drawn on the image. A zone is an area, such as a doorway, shelf region, or loading area. These tools turn raw detections into meaningful events.
A line-crossing rule is common in people or vehicle counting. You draw a line across the path and increase the count only when an object crosses that line in the desired direction. This helps prevent double counting because the same object may be visible for many frames, but it should cross the line only once. Direction matters too. If you count entries, you may want to ignore exits, or track them separately.
A zone rule is useful when you care about presence in an area rather than crossing a boundary. For example, you might count how many packages are currently in a sorting area, or how many cars are parked in a marked region. A zone can also be part of a stronger rule, such as “count the object only after it appears in zone A and then exits through zone B.”
These rules are effective because they limit when counting is allowed. Instead of reacting to every box, the system waits for a clear event. That reduces noise from false detections and weak tracks. It also makes the count easier to explain to other people. “We count a person when their center point crosses the entrance line” is much clearer than “We count based on frame-by-frame detections.”
For beginners, line and zone rules are often enough to build a useful project. They are easy to draw, easy to test, and easy to change. If counts are wrong, you can often improve the result by moving the line, resizing the zone, or refining the direction rule without retraining the detector at all.
A count becomes valuable when it supports a decision. In a shop, counts can estimate foot traffic. In a warehouse, counts can track boxes moving through a station. In agriculture, counts can estimate fruit on a branch or animals entering a pen. In a classroom or office, counts can help understand room usage. The AI camera is not the final goal. The final goal is a useful action, report, alert, or trend.
That means you should always ask what the number will be used for. A live dashboard may need the current count now. A weekly operations report may need totals by hour or day. A safety system may need an alert when the count exceeds a limit. Different uses lead to different design choices. Real-time alerts need stable, immediate counting. Reports may tolerate small delays but require clear logs and timestamps.
Practical reporting also needs metadata. A count without context is weak. Good reports include the time period, camera location, target class, counting rule, and confidence assumptions. For example, “42 people entered through Door A between 9:00 and 10:00 using a line-crossing rule” is far more useful than simply “42.” This context helps others trust and interpret the result correctly.
Another important habit is separating raw counts from business decisions. The computer vision system should provide clean numbers and events. A higher-level rule can then decide what to do. For example, if the hourly count drops below a target, send a restocking check. If vehicle count rises above a threshold, open another gate. This separation makes systems easier to maintain and improve.
As a beginner, you do not need a complex deployment to see the value of counting. Even a simple table with timestamps and totals can show patterns. Once counts are connected to actions, the purpose of detection becomes much clearer: the camera is no longer just spotting objects. It is producing information that helps people respond to the real world.
1. How does counting relate to detection in an AI camera system?
2. Why can counting go wrong in moving video scenes?
3. Which rule is the best example of improving count quality in a doorway video?
4. Why is it important to define what a count means?
5. What is the main goal of a practical counting system?
By this point in the course, you have learned the basic language of beginner computer vision. You know that an AI camera does not “understand” a scene the way a person does. Instead, it turns images into data, looks for patterns, and produces simple outputs such as a label, a box, or a number. In this chapter, we bring those pieces together into a practical plan. The goal is not to build the most advanced system. The goal is to make a beginner-friendly vision project that solves one clear problem in a reliable and responsible way.
Many new learners jump too quickly into tools, models, or code. A better approach is to start with the real-world task. What are you trying to help a person do? Are you trying to sort photos into categories, spot objects inside a scene, or count how many items pass through an area? These are different jobs, and each one needs different images, different rules, and different ways to judge success. Good engineering judgment starts by shrinking the problem until it becomes clear, measurable, and realistic.
A useful vision plan has a few simple parts. First, define the problem in one sentence. Second, choose the task type: sort, spot, or count. Third, collect images that match the real setting. Fourth, decide the rules for what should count as correct. Fifth, test the system in normal conditions, not only perfect ones. Finally, review the limits, risks, and what you would improve next. This process turns a vague idea like “make a smart camera” into a small project you can actually complete and explain.
As you read this chapter, notice that practical computer vision is often about making careful choices before the model ever runs. Where will the camera point? What will be inside or outside the frame? What counts as one object? What should happen when the image is blurry, dark, crowded, or partly blocked? These decisions matter because computers are literal. If your goal is fuzzy, your results will also be fuzzy. If your images do not match the task, even a good model will seem weak. A beginner who plans well usually gets better results than someone who uses a more complex tool without a plan.
We will also use plain-language evaluation. Instead of worrying first about advanced math terms, ask simple questions: Does it usually work? When does it fail? Are the mistakes acceptable for the job? Does the system miss important objects, or does it report too many false ones? Can a person understand the output and trust it enough to use it? These are the kinds of questions that matter in the real world.
Think of this chapter as your bridge from theory to action. You are not only learning what computer vision can do. You are learning how to choose a suitable first project, how to judge whether it works, and how to improve it safely. That is the heart of building a simple real-world vision plan.
Practice note for Choose the right task for a real problem: document your objective, define a measurable success check, and run a small experiment before scaling. Capture what changed, why it changed, and what you would test next. This discipline improves reliability and makes your learning transferable to future projects.
Practice note for Plan a beginner-friendly camera project: document your objective, define a measurable success check, and run a small experiment before scaling. Capture what changed, why it changed, and what you would test next. This discipline improves reliability and makes your learning transferable to future projects.
Practice note for Evaluate results in plain language: document your objective, define a measurable success check, and run a small experiment before scaling. Capture what changed, why it changed, and what you would test next. This discipline improves reliability and makes your learning transferable to future projects.
The best beginner vision projects solve a small, clear problem. A weak project idea sounds broad, such as “watch everything in the room” or “understand customer behavior.” A strong project idea sounds specific, such as “tell whether a bin contains plastic bottles or cans,” “spot parked cars in marked spaces,” or “count apples moving past a conveyor line.” Specific problems are easier because they limit the scene, the object types, and the expected output.
A good way to choose a problem is to ask three practical questions. First, what decision will the camera help someone make? Second, what visible evidence in the image supports that decision? Third, can a beginner collect enough sample images to test the idea? If you cannot answer all three, the problem may still be too vague. For example, “detect whether a shelf needs restocking” sounds useful, but it may really hide several tasks: spotting products, counting gaps, handling different package sizes, and dealing with shadows or reflections.
Start where the camera has a stable view and a simple background. A tabletop, a doorway, a fixed parking space, or a single storage bin are friendly starting points. Avoid moving cameras, crowded scenes, and many overlapping objects in your first project. Simpler scenes reduce confusion and help you understand how images become data the computer can use. They also make it easier to explain why the system succeeds or fails.
Common beginner mistakes include trying to solve too many problems at once, ignoring the real environment, and choosing a task with no clear success measure. A strong project keeps the purpose narrow. For example, instead of “monitor the kitchen,” choose “count oranges placed in the fruit tray each morning.” That project has one object type, one area, and one clear result. Small scope is not a weakness. It is good engineering judgment.
By the end of this step, you should be able to write a one-sentence project goal. Example: “Use a fixed camera to count boxes crossing a marked line at the warehouse entrance during daylight.” If you can say the goal that clearly, you are ready for the next choice: deciding whether the task is really sorting, spotting, or counting.
Once the problem is clear, choose the correct vision task. This choice matters because each task answers a different question. Sorting asks, “What kind of image is this?” Spotting asks, “Where is the object?” Counting asks, “How many objects, often without counting the same one twice?” If you choose the wrong task, the system may produce results that sound interesting but do not actually solve the real problem.
Use sorting when the whole image belongs to one main category. For example, a beginner project might sort fruit photos into “apple” or “banana,” or sort recycling images into “paper bin full” or “paper bin not full.” Sorting is usually the simplest task because it gives one answer for the whole image. However, it becomes weak when multiple important objects appear at once. If one image contains several different items, sorting may hide useful detail.
Use spotting when location matters. Object detection works by placing boxes around objects and assigning labels such as “car,” “person,” or “bottle.” Spotting helps when you need to know where something is, not just whether it exists somewhere in the image. For example, finding occupied parking spaces or locating damaged fruit on a table requires boxes and labels. Spotting is also often the step that makes counting possible, because the system must first detect each object before it can count it.
Use counting when the final goal is a number. Counting systems often combine spotting with simple tracking rules. If one object moves through several frames of video, the system should count it once, not once per frame. A common method is to count an object only when its box crosses a line or enters a region. This helps avoid double counting. It is a practical example of why counting is more than just “spot everything and add it up.”
A common mistake is to pick counting when a simple sort would do, or to pick sorting when location is essential. Match the task to the decision. If a worker only needs to know whether a tray is empty or not, sorting may be enough. If the worker needs to know where each item is placed, spotting is better. If the worker needs totals over time, counting is the right choice. Good project planning means choosing the simplest task that truly answers the need.
After choosing the task type, the next job is to prepare your project so the computer sees the right kind of examples. Images should match the real use case as closely as possible. If the camera will operate near a doorway, collect doorway images. If it will count fruit on a tray, collect tray images from the same angle and distance. A beginner system often fails not because the model is bad, but because the training and test images do not look like the real world.
Try to include natural variation. Use bright and dim light, clean and messy backgrounds, different object sizes, and a few partially blocked objects if those conditions are realistic. At the same time, do not add random complexity that does not belong to the task. If the project is about counting bottles on one belt, do not mix in photos from many unrelated places. Good image selection means realistic variety, not visual chaos.
Next, write simple rules. For sorting, define exactly what each class means. For spotting, decide what objects deserve a box and what should be ignored. For counting, define the event that increases the number. Does the count happen when the center of the box crosses a line? When more than half the object enters a region? These rules matter because they make the system consistent. Without rules, people label images differently, and results become hard to trust.
You also need plain-language success goals. Instead of saying only “make it accurate,” say what success looks like in practice. For example: “Correctly sort full versus empty trays most of the time,” “Spot nearly all visible boxes on the shelf,” or “Count passing packages with only rare double counts during normal lighting.” Clear goals help you evaluate results honestly and explain them to others.
Common setup mistakes include collecting too few examples, forgetting difficult cases, changing the camera angle after labeling, and failing to define what counts as correct. A solid beginner plan keeps the setup stable. Fix the camera if possible, keep the scene narrow, write labeling rules before you begin, and decide how you will judge success before you look at the results. This turns your project from a casual experiment into a small engineering workflow.
A system that works on clean sample images may still struggle in real use. That is why testing should happen under normal conditions, not only ideal ones. Real conditions include shadows, glare, clutter, partial blocking, similar-looking objects, and changes over time. If your camera will run in the morning and late afternoon, test both. If people may place objects at slightly different angles, include that too. Vision systems are sensitive to the details that people often ignore.
When you evaluate results, use plain language first. Ask: What does the system get right most of the time? What mistakes happen again and again? Are the failures minor or serious for the task? For example, if a sorter occasionally confuses two similar package colors, that may be acceptable in a toy project. But if a counting system regularly counts one object twice when traffic is busy, that is a serious issue because the final number becomes unreliable.
For counting projects, test double-counting and missed counts directly. Watch what happens when an object pauses near the line, turns around, or overlaps with another object. Simple tracking rules can help, but they are never perfect. You may need to adjust line placement, camera angle, or movement speed. This is a good example of engineering judgment: sometimes the best improvement is not changing the model at all, but improving the scene setup.
It is also useful to separate “demo success” from “real success.” A demo may work with five hand-picked examples. Real success means the project performs reasonably across normal images collected on different days. Keep notes on failures. If the same mistake happens often, it points to a fix: more training images, clearer labels, a narrower camera view, or a simpler goal.
Good evaluation is honest, not defensive. You do not need a perfect model to have a useful project. You need to understand where it works, where it fails, and whether those limits are acceptable for your beginner use case.
Even simple camera projects have responsibilities. A beginner may think only about whether the system works, but responsible computer vision also asks whether it should be used in that way. Privacy is the first concern. If your task can be done by watching objects rather than people, choose the object-focused setup. For example, count boxes on a belt instead of filming workers’ faces. Aim the camera only where needed, and avoid collecting extra personal details that do not help the task.
Fairness matters because a system may work better in some conditions than others. In a beginner project, this often appears as uneven performance across lighting, backgrounds, object colors, or sizes. A detector trained mostly on bright images may fail in dim scenes. A sorter trained on one package design may struggle when the design changes. Fairness in this course means checking whether your examples represent the real range of conditions the camera will face, rather than silently favoring one narrow case.
Responsible use also means being clear about limits. If the camera is only reliable during daylight, say so. If it works for counting large boxes but not small envelopes, document that. People lose trust when a system is presented as smarter or broader than it really is. Honest limits are part of good engineering, not a sign of weakness.
Another practical issue is data handling. Store only what you need, keep access limited, and remove images when they are no longer necessary for the project. If you are testing in a shared space, make sure permission and local rules are respected. You do not need advanced legal language to act responsibly. A simple habit of minimizing data, reducing harm, and explaining purpose goes a long way.
A useful rule for beginners is this: small purpose, small view, clear rules. Build systems that are narrow, understandable, and easy to monitor. That keeps your project safer, easier to explain, and more likely to succeed technically as well.
You now have the pieces needed to design a beginner-friendly real-world vision plan. The next step is to turn this chapter into action. Start with one project that is small enough to finish in a short time. Good examples include sorting images of two object types, spotting one kind of item in a fixed scene, or counting objects crossing a single line. These projects teach the core ideas without burying you in complexity.
As you build, keep linking practice to the course outcomes. Explain in simple words how the AI camera reads images as data. Identify whether your project is sorting, spotting, or counting. If you use detection, describe how boxes and labels represent objects. If you count across video frames, explain how your rules try to avoid double counting. If you choose images carefully, explain why those examples fit the task better than random pictures from the internet. These explanations show that you understand the system, not just the tool.
After your first project, improve one thing at a time. You might collect better images, adjust the camera position, narrow the background, add more difficult examples, or refine your counting rule. Avoid changing everything at once, because then you will not know what caused the improvement or the new problem. Step-by-step iteration is a core habit in computer vision work.
You can also expand your project in stages. A sorter can become a spotter if you later need object locations. A spotter can become a counter if you add tracking across frames. But do not rush into expansion before the simple version is stable. Strong foundations matter more than ambitious feature lists.
Most importantly, remember that beginner computer vision is about making useful choices. The camera, the images, the labels, the rules, the tests, and the limits all shape the result. If you can plan those choices clearly, you are already thinking like a vision engineer. Your next steps are not only about using bigger models. They are about observing the real world carefully, matching the right task to the right problem, and building systems that are understandable, measurable, and responsible.
1. What is the best first step when planning a beginner-friendly AI camera project?
2. Why is it important to choose between sort, spot, and count early in a project?
3. Which image collection plan best matches the chapter’s advice?
4. According to the chapter, how should a beginner evaluate results in plain language?
5. What is the most responsible final step in a simple real-world vision plan?
- Learning Evolved.
- Intelligence Amplified.


