Computer Vision — Beginner
Learn to spot and track objects in images and video from zero
This beginner-friendly course is a short technical book in course form, designed for people who have never studied AI, coding, or data science before. If you have ever wondered how a phone camera can identify a face, how a traffic system can count cars, or how a smart video tool can notice a person entering a room, this course will give you the foundation you need. You will learn the basic ideas behind AI object detection in a simple, visual, step-by-step way.
The focus of this course is object detection, which means teaching a computer not only to recognize what is in an image, but also to locate where it is. That is the key difference between simply saying “this photo has a dog” and saying “there is a dog in this part of the photo.” From there, you will extend the same idea into video, where the computer looks at many image frames over time.
Many AI courses begin with code, math, or technical language that can feel overwhelming. This course does the opposite. It starts from first principles and explains everything in plain English. You will learn what images are from a computer’s point of view, how AI learns from examples, what labels and boxes mean, and why object detection can succeed in one photo but fail in another.
Each of the six chapters builds naturally on the previous one. You begin with the big picture, then move into training data and labels, then practice reading object detection outputs on photos, then understand how the same process works in video. After that, you learn how to judge whether results are good enough for a simple real-world task. Finally, you bring everything together in a beginner mini project.
You do not need programming experience. You do not need advanced math. You do not need to know what machine learning means before you start. The lessons are written for complete beginners who want a gentle but practical introduction to computer vision. The goal is not to turn you into a research scientist overnight. The goal is to help you understand what object detection is, how it works, what its limits are, and how to use it confidently at a basic level.
This makes the course ideal for curious learners, career explorers, product managers, educators, students, and anyone who wants to understand a fast-growing part of AI without getting lost in complexity. If you want to continue after this course, you will also have a strong base for more advanced topics in computer vision.
The structure feels like a short technical book: each chapter introduces one major idea, reinforces it with examples, and prepares you for the next chapter. By the end, you will not just know terms. You will have a practical mental model for how computers spot objects in still images and in moving video.
If you are ready to begin, Register free and start building real AI understanding today. You can also browse all courses to explore more beginner-friendly topics after this one.
When you finish, you will be able to explain object detection clearly, interpret common outputs, understand simple evaluation ideas, and complete a small beginner project in a structured way. Most importantly, you will have a solid and confidence-building first step into the world of computer vision.
Computer Vision Engineer and AI Educator
Sofia Chen builds practical computer vision systems for image and video analysis and specializes in teaching AI to first-time learners. She is known for breaking complex ideas into simple steps and helping beginners build confidence with real-world examples.
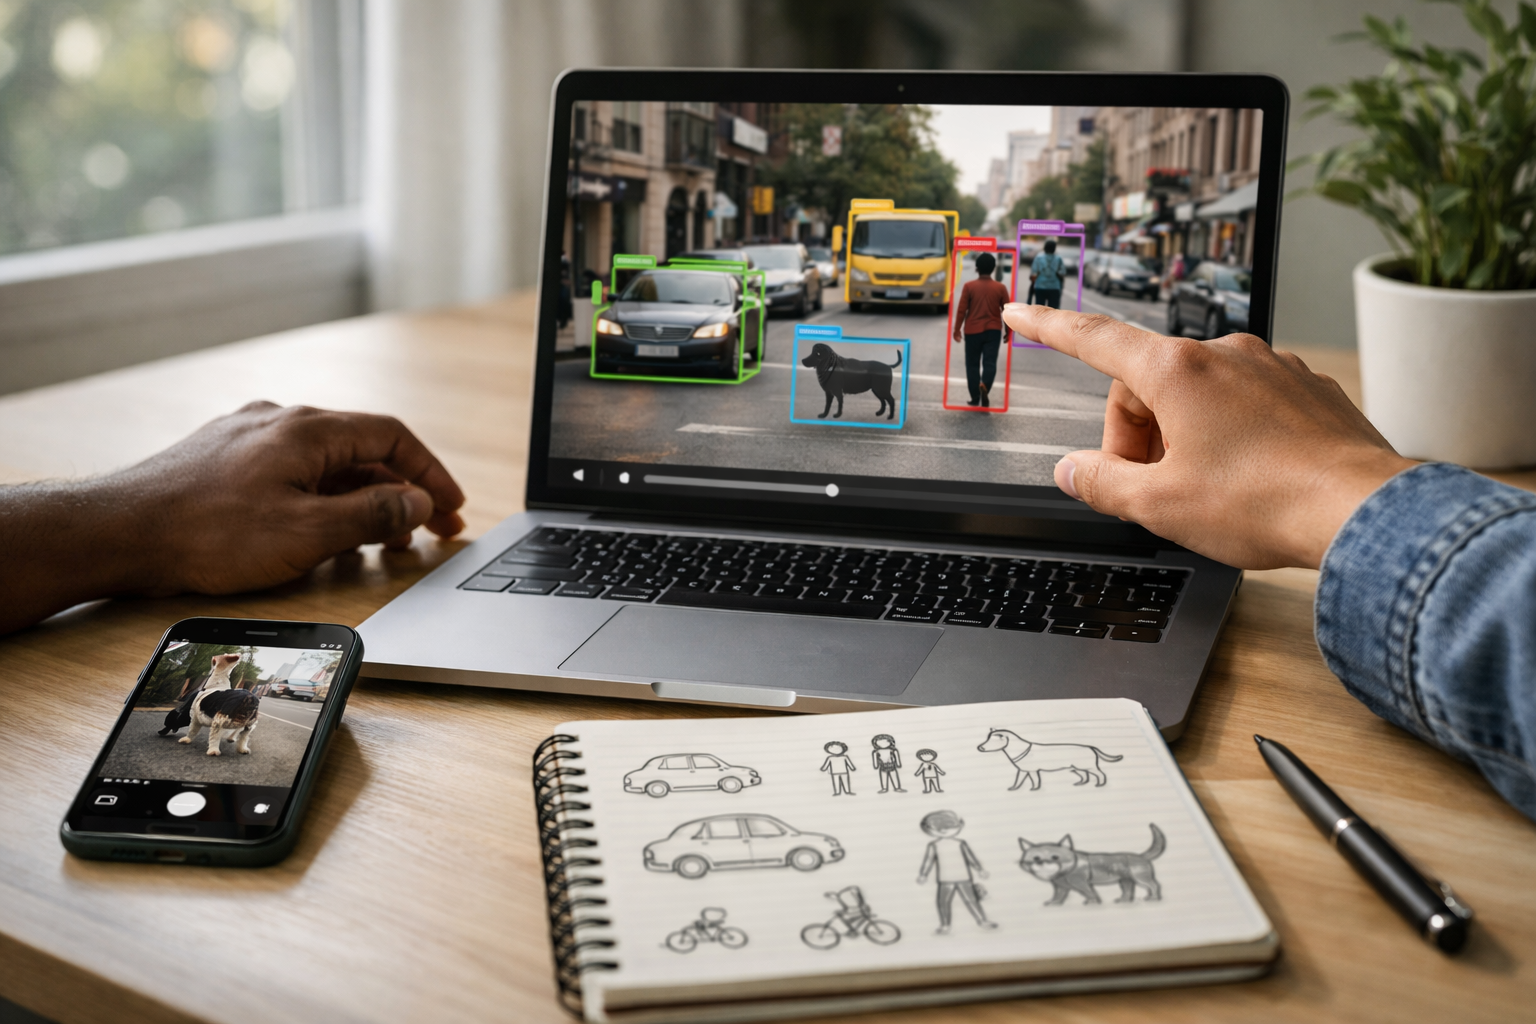
Object detection is one of the most useful ideas in computer vision because it answers a practical question: what is in this image or video, and where is it? For a beginner, that one sentence is the best starting point. A detection system does not just say “this looks like a street scene” or “this image contains a dog.” Instead, it points to specific objects, draws boxes around them, and gives each one a name such as person, car, bicycle, or cup. In many real systems it also reports a confidence score, which is the model’s estimate of how likely its guess is to be correct.
This matters because most real-world visual tasks depend on location, not just recognition. A phone camera may want to focus on a face. A warehouse system may want to count boxes on a shelf. A road safety application may need to notice pedestrians and vehicles in the right part of the scene. A wildlife camera may want to mark every animal that appears in frame, not simply state that “an animal exists somewhere.” Object detection turns raw pixels into usable information that software can act on.
As you move through this course, you will build a simple mental model of how detection works in both photos and video. For photos, the model looks at one image and returns detected objects. For video, the same idea is applied frame by frame, fast enough to create the impression of continuous understanding. This chapter introduces that mental model without requiring advanced math. The goal is to make the outputs readable, the workflow understandable, and the engineering tradeoffs visible from the start.
You will also learn a distinction that many beginners confuse: image classification and object detection are not the same task. Classification asks, “What is this image mostly about?” Detection asks, “Which objects appear, where are they, and how confident is the model?” A third related task, segmentation, goes even further by outlining object shapes more precisely. Knowing these differences will help you choose the right beginner-friendly tools and avoid frustrating mistakes later.
Another early skill is learning to read a detection result correctly. Beginners often focus only on whether the label sounds right, but a practical reader checks more than that. Is the box placed correctly? Is the confidence score high enough to trust? Are there duplicate boxes on the same object? Did the detector miss small or partially hidden items? These are not advanced concerns. They are part of everyday engineering judgment, even in simple projects.
By the end of this chapter, you should be able to explain in plain language what object detection does, recognize common outputs such as labels, boxes, and confidence scores, describe how video is handled frame by frame, and understand a beginner workflow from input image to final result. That foundation will support everything else in the course, from trying simple tools on photos to preparing basic image and video data for experiments.
Practice note for See what AI object detection can do in everyday life: document your objective, define a measurable success check, and run a small experiment before scaling. Capture what changed, why it changed, and what you would test next. This discipline improves reliability and makes your learning transferable to future projects.
Practice note for Tell the difference between recognizing and locating objects: document your objective, define a measurable success check, and run a small experiment before scaling. Capture what changed, why it changed, and what you would test next. This discipline improves reliability and makes your learning transferable to future projects.
Practice note for Read a simple detection result with boxes and labels: document your objective, define a measurable success check, and run a small experiment before scaling. Capture what changed, why it changed, and what you would test next. This discipline improves reliability and makes your learning transferable to future projects.
Practice note for Build a first mental model of how photo and video AI works: document your objective, define a measurable success check, and run a small experiment before scaling. Capture what changed, why it changed, and what you would test next. This discipline improves reliability and makes your learning transferable to future projects.
Object detection is already part of daily life, even when people do not use that name for it. Modern phones detect faces so the camera can focus and adjust exposure. Photo apps can find pets, cars, or food when you search your library. Smart doorbells notice people near a front entrance. Retail systems count products on shelves. Traffic tools monitor cars, buses, and pedestrians. In industrial settings, detection can help check whether items are present on a conveyor belt. In safety systems, it may help identify dangerous situations such as a person entering a restricted area.
These examples matter because they show why object detection is more than a research demo. The output can support a real action: crop a photo, trigger an alert, count items, guide a robot, or measure movement over time. For beginners, this is a helpful mindset. You are not building AI for the sake of labels on a screen. You are building a system that converts visual scenes into structured information that another part of the software can use.
Good engineering judgment starts with matching the task to the environment. A phone camera usually works at short range and wants fast response. A traffic camera may need to handle distant objects, weather, and night scenes. A warehouse application may care more about consistent counts than artistic image quality. If the environment changes, model performance changes too. A detector that works well on clear daytime street photos may struggle on indoor security footage or crowded shelves.
One common beginner mistake is assuming that a model that detects everyday objects everywhere will perform equally well in a specific local setting. In practice, lighting, camera angle, motion blur, object size, and clutter all matter. Another mistake is trusting a detection just because a box appears. A box is a prediction, not proof. In real applications, you often choose thresholds and rules so the system behaves safely and usefully.
The practical outcome of this section is simple: object detection is valuable because it connects AI vision to actions in the world. When you evaluate any beginner project, ask two questions: what objects must the system notice, and what will the software do with those detections afterward?
To understand object detection, it helps to remember that a computer does not see a photo the way a human does. A digital image is a grid of pixels, and each pixel stores numbers, often representing red, green, and blue intensity values. To us, that grid becomes a person, bicycle, tree, or stop sign. To the computer, it begins as a large table of values. The challenge of computer vision is turning those values into meaningful patterns.
A detection model learns that certain combinations of edges, textures, colors, and shapes often appear together. Early visual clues might be simple, like lines or corners. Higher-level clues combine into more useful patterns, such as wheels, faces, windows, or animal fur. The model does not “understand” objects the way humans do. Instead, it learns statistical visual patterns from many examples. If enough patterns match what it has learned, it predicts an object and its location.
This is why data quality matters from the very beginning. If your photos are too dark, too blurry, too small, or cropped badly, the useful patterns become harder to detect. If an object is tiny in the image, the model may miss it even if a person can still recognize it. If the scene is cluttered or objects overlap heavily, the visual patterns become ambiguous. Beginners often think poor results mean the model is broken, when the real issue is that the input does not clearly show the visual evidence needed.
There is also a practical lesson for preparing data. Try to use images and video that resemble the setting where you want detection to work. If your project is about indoor tools on a desk, random outdoor images are less helpful. If your camera is mounted high above a room, collect examples from that angle. This alignment between training examples or test inputs and the real task is one of the most important habits in applied AI.
In short, computers need visual patterns, not human intuition. The practical outcome is that you should start paying attention to image conditions: lighting, size, angle, distance, and motion. Those factors strongly influence whether the model can find the patterns required for reliable detection.
Beginners often mix up three related computer vision tasks: classification, object detection, and segmentation. They are connected, but they answer different questions. Classification is the simplest of the three. It usually takes an image and predicts one label, or a small set of labels, describing what the image contains overall. For example, a classifier might say “dog” for a photo. It recognizes the main subject, but it does not tell you where the dog is.
Object detection adds location. It predicts both what the object is and where it appears, usually by drawing a bounding box around it. If a photo contains three dogs and one ball, a detector can mark each dog separately and also mark the ball. This makes detection much more useful for counting, tracking, monitoring, cropping, and interaction. If your software needs object positions, classification alone is not enough.
Segmentation goes one step further by outlining the shape of an object more precisely, often at the pixel level. Instead of a rectangle around a cat, segmentation can identify the exact pixels belonging to the cat. That is useful when shape matters, such as medical imaging, photo editing, or robotics where a rough box is not precise enough.
Engineering judgment means choosing the simplest method that solves the problem. If you only need to sort photos into categories, classification may be enough. If you need to count people or locate products, use detection. If you need fine object boundaries, use segmentation. A common mistake is choosing a more complex method than necessary, which increases effort without improving the outcome.
For this course, object detection is the main focus because it sits at a practical middle ground. It is more informative than classification and easier for beginners to interpret than full segmentation. Once you understand this distinction clearly, many later design choices become easier.
A typical object detection result includes three basic parts: a bounding box, a class name, and a confidence score. The bounding box is the rectangle showing where the object is located. The class name is the predicted category, such as person, car, bottle, or cat. The confidence score is a number, often between 0 and 1 or shown as a percentage, indicating how strongly the model believes the prediction is correct.
Reading these outputs well is a core beginner skill. Suppose the detector draws a box around a dog and labels it “dog, 0.92.” That means the model believes there is a dog in that location with high confidence. If another box says “cat, 0.38,” you should be more cautious. Low-confidence detections may be false positives, especially in cluttered scenes. In practical systems, developers often set a confidence threshold so weak predictions are hidden. Raising the threshold reduces doubtful results but may also hide real objects. Lowering it reveals more objects but increases mistakes.
Bounding boxes also deserve careful attention. A correct label with a poor box can still be a bad result. The box may be too large, too small, shifted, or duplicated. When two boxes overlap on the same object, post-processing methods usually try to keep the best one, but imperfect duplicates still happen. Small objects and partially hidden objects are especially difficult. A model might detect a visible person but miss a half-covered backpack next to them.
Beginners sometimes treat confidence as certainty. It is not. A score is the model’s estimated confidence under the patterns it learned from data. A high score can still be wrong, and a lower score can still be right. That is why visual checking matters, especially when testing on new images. Look at the box placement, the scene context, and whether the class label makes sense.
The practical outcome is that a detection is not just a word. It is a structured prediction you must read critically. When you test beginner tools on photos, always inspect all three parts together: location, label, and confidence.
At a basic level, object detection on video works by applying detection to many still images in sequence. Those still images are called frames. If a video has 30 frames per second, the model may process 30 separate images each second, depending on the system speed. This is the simplest mental model for beginner video AI: video is a stream of photos shown quickly one after another.
However, video introduces practical challenges that do not appear as strongly in single photos. Objects move, cameras shake, lighting changes, and motion blur appears. An object may be clear in one frame and blurry in the next. It may enter or leave the scene, become blocked by another object, or change size as it moves closer or farther away. This means detections can fluctuate over time. A person detected strongly in one frame may briefly disappear in the next, then reappear.
This frame-by-frame behavior is important because beginners often expect perfect continuity. In reality, video detection is a sequence of predictions, and consistency must often be improved with extra logic such as smoothing, tracking, or temporal rules. Even before you learn those advanced ideas, it helps to expect some flicker. A detector is not watching video the way humans do; it is repeatedly making decisions on changing frames.
There are also performance considerations. Processing every frame at full resolution can be slow. Some systems reduce image size or skip frames to stay fast enough for near real-time use. That is a tradeoff. Lower resolution and fewer frames improve speed but can reduce accuracy, especially for small or fast-moving objects. Engineering judgment means choosing a balance that fits the use case.
The practical outcome is this: for photos, you care about one good result. For video, you care about stable results over time. Understanding that difference will help you interpret outputs properly and prepare better test clips for beginner experiments.
A beginner-friendly object detection workflow is easier to understand when broken into stages. First, you choose an input: a photo, a folder of images, or a short video clip. Second, you prepare that input so it is usable. Preparation may be simple: make sure files open correctly, the image is not extremely tiny, and the subject is visible. For video, keep clips short and clear when testing early ideas. Third, you run a detection model using a tool or app that accepts your input. Fourth, you inspect the result: boxes, class names, and confidence scores. Finally, you decide what the result means for your project.
This sounds simple, but each stage involves useful judgment. Input choice matters because not all test data is equally informative. Start with clear examples before moving to difficult ones. Preparation matters because bad lighting, awkward cropping, or heavy blur can make a fair test look like a failure. Tool choice matters because beginner tools often come with pre-trained models that recognize common object categories but not specialized local items. Inspection matters because raw output needs interpretation, not blind trust.
A practical workflow often looks like this:
Common beginner mistakes include using only one image, testing only ideal cases, or assuming the first model should solve every scenario. Another mistake is skipping documentation of results. Even simple notes such as “works well on bright indoor photos, struggles on small objects” build strong engineering habits.
The practical outcome of this chapter is a full first mental model. An image or video frame enters the system as pixels. The model searches for learned visual patterns. It returns object locations, names, and confidence scores. You then judge whether those outputs are useful for a real task. That is the foundation for everything that follows in this course.
1. What is the main job of object detection in an image or video?
2. How is object detection different from image classification?
3. Which set of outputs is most typical of a simple detection result?
4. According to the chapter, how is video object detection handled?
5. When reading a detection result, what should a beginner check besides whether the label sounds right?
When beginners first hear that an AI system can detect objects in photos and video, it can sound almost magical. In practice, object detection starts with something much more ordinary: examples. A computer does not “understand” a bicycle, dog, or backpack the way a person does. Instead, it learns patterns from many images where those objects have already been pointed out by humans. This chapter explains that process in plain language so you can build good intuition before touching advanced tools.
A useful way to think about object detection is as a teaching process. If you wanted to teach a child what a cup looks like, you would not show only one perfect studio photo. You would show cups on tables, in sinks, partly hidden behind other objects, large in the foreground, small in the background, and seen from different angles. AI learning works in a similar way. It improves by seeing many examples and by getting consistent feedback about what is present and where it appears in the image.
That “where” part is what separates object detection from simple image classification. In classification, the system might answer, “This photo contains a dog.” In object detection, it goes further and says, “There is a dog here,” usually by drawing a box, assigning a label, and giving a confidence score. For video, this happens frame by frame. The model processes each frame as if it were an image, then produces detections that may change as the object moves, turns, or becomes blocked from view.
For beginners, the most important lesson is that data quality matters more than expected. People often assume success depends mainly on choosing a clever model. In real projects, better examples and cleaner labels often matter more than complicated algorithms. A small, well-prepared dataset can outperform a larger messy one if it matches the real-world problem closely. If your future system will inspect warehouse shelves, then your training images should look like warehouse shelves, not random internet pictures with very different lighting and camera angles.
Another key idea is annotation. Before a model can learn to detect objects, someone has to label them. In beginner tools, this usually means drawing rectangular boxes around objects and attaching a class name such as person, car, or helmet. These labels become the teaching material. If the boxes are too loose, too tight, inconsistent, or missing important objects, the model learns from those mistakes. This is why annotation is not boring paperwork; it is part of the engineering itself.
As you read this chapter, focus on the practical workflow. First, define what you want to detect. Next, collect images and possibly video frames that represent that situation. Then label the objects carefully. After that, split the data into training, validation, and test sets so you can measure whether learning is real or just memorized. Finally, review failure cases. If the system misses small objects, struggles in dim rooms, or confuses similar categories, those outcomes usually point back to the data you gave it.
By the end of this chapter, you should be able to describe in simple terms how AI learns from examples, why labels and annotations matter, and how data choices affect real-world results. That understanding will make beginner-friendly detection tools feel much less mysterious and much more manageable.
Practice note for Understand how AI learns from examples: document your objective, define a measurable success check, and run a small experiment before scaling. Capture what changed, why it changed, and what you would test next. This discipline improves reliability and makes your learning transferable to future projects.
Practice note for Learn why data quality matters more than beginners expect: document your objective, define a measurable success check, and run a small experiment before scaling. Capture what changed, why it changed, and what you would test next. This discipline improves reliability and makes your learning transferable to future projects.
Practice note for Explore labels and annotations without technical overload: document your objective, define a measurable success check, and run a small experiment before scaling. Capture what changed, why it changed, and what you would test next. This discipline improves reliability and makes your learning transferable to future projects.
Training data is the collection of examples used to teach an AI system what to look for. For object detection, each example is usually an image, or a frame taken from video, along with human-made labels showing which objects are present and where they are located. If you want a model to detect cats, bicycles, and bottles, your training data must include many images of those things under different real conditions.
A simple mental model is flashcards. Each flashcard shows the AI a scene and says, in effect, “Here is a bottle,” “Here is a bicycle,” and “Here is exactly where it appears.” After enough examples, the model starts noticing visual patterns such as edges, shapes, textures, and part combinations that tend to belong to each object class. It does not reason like a person. It learns statistical patterns from repeated exposure.
Good training data should match the job you care about. If your project involves indoor office photos, do not assume outdoor street images will teach the right patterns. If your camera is mounted high on a wall, collect examples from that viewpoint. If your future input is video from a phone, include motion blur and ordinary phone-quality images. Training data works best when it resembles the environment where the model will be used.
Beginners often ask how much training data is enough. The honest answer is: enough to cover the important variety of the task. Ten nearly identical photos teach very little. One hundred more varied images may teach much more. Start by asking practical questions: Are objects large and small? Close and far away? Centered and near the edge? Clear and partly hidden? Bright and dim? The more useful variety your data includes, the better chance the model has of handling new examples.
In short, training data is not just a folder of pictures. It is the main teaching tool for the model. If it is relevant, diverse, and carefully labeled, the system has a chance to learn something useful. If it is narrow, messy, or unrealistic, the model will copy those weaknesses.
Not all examples help equally. Good examples are clear, relevant, and varied. They show the objects you care about in conditions that matter for your project. Bad examples are misleading, low quality in the wrong way, or unrelated to the final use case. For instance, if you are training a detector for delivery boxes on porches, a dataset filled with online product photos against white backgrounds will not prepare the model for real homes, shadows, and clutter.
Bias often appears quietly. Suppose nearly all your training images show red cars during daylight. The model may appear to detect cars well, but fail on black cars at night or white vans in rain. The issue is not that the model is careless; it learned what you showed it most often. Hidden bias can come from camera placement, location, time of day, season, object color, image quality, and even which examples were skipped because labeling them felt difficult.
Another common problem is imbalance. If one class has thousands of examples and another has only a few dozen, the model may favor the common class. It may also confuse two classes if one is consistently labeled more carefully than the other. This is why engineering judgment matters. Before training, inspect your dataset like a detective. Look for overrepresented situations and missing situations. Ask, “What will my users show this system that my data does not yet cover?”
For beginners, the practical outcome is simple: a model reflects its examples. If the examples are narrow or biased, the detections will be narrow or biased too. Better data selection is often the fastest way to improve results.
Before an object detector can learn, someone must mark objects in images. The most common beginner method is bounding box annotation. A person opens an image in a labeling tool, draws a rectangle around an object, and assigns a class label such as dog, car, or person. That rectangle tells the model where the object is, and the class tells it what the object is.
Although the task sounds simple, consistency matters a lot. Boxes should usually fit the visible object closely without cutting off important parts or including too much empty background. If one labeler draws tight boxes and another draws very loose boxes, the model receives mixed teaching signals. It may still learn something, but usually not as well as it could. Consistent annotation rules are one of the easiest quality improvements a beginner can make.
You also need to decide what to do with partially hidden objects, tiny distant objects, reflections, and objects cut off by the image edge. There is no universal answer, but there should be a clear project rule. For example, you might choose to label partially visible bicycles if at least half the object can be seen, or ignore bottles smaller than a certain size because they are not useful in your application. These choices affect what the model learns to detect.
Missing labels are especially harmful. If an image contains three people and only one is labeled, the model may be punished during training for noticing the unlabeled two. That creates confusion. Beginners sometimes focus on speed and accidentally leave many objects unlabeled. In practice, fewer images with careful annotations are often better than more images with careless ones.
When you later use a detection tool, the outputs usually look familiar because they reflect the annotation format: a label, a box, and a confidence score. In that sense, annotation defines the language the model learns to speak.
A class is the name of an object category the model should recognize, such as cat, truck, or helmet. Choosing classes sounds easy, but it is really a design decision. A beginner-friendly project becomes much easier when the classes are practical, visually distinct, and aligned with the real task. If your goal is to count parked vehicles, you may only need one class called vehicle. If your goal is traffic analysis, you might need separate classes such as car, bus, truck, and motorcycle.
The main question is not “What could I detect?” but “What decision do I want the system to support?” That question helps prevent class lists from becoming too detailed too early. Beginners often create categories that are difficult even for humans to separate consistently. For example, distinguishing between very similar product packages may require more data and stricter labeling rules than a first project can support. Broader categories often produce stronger early results.
Class definitions must also be clear. Does person include mannequins on display? Does cup include mugs? Does bag include backpacks and handbags together or separately? If the rules are fuzzy, labels become inconsistent, and the model learns that confusion. Writing a short annotation guide with examples is a practical professional habit, even in small projects.
Another useful idea is background. Everything not labeled is, in effect, treated as “not one of the target classes.” If your classes are too broad or too vague, the model may struggle because the background contains many look-alikes. Choosing classes carefully makes both labeling and learning easier.
Strong object detection projects start with a well-defined target list. Clear categories reduce annotation errors, improve training quality, and make model outputs easier to interpret in real use.
Once images are labeled, they are usually split into three groups: training, validation, and testing. The training set is what the model learns from directly. The validation set is used during development to check progress and compare settings. The test set is held back until the end to measure how well the final model performs on data it has not seen during tuning.
A beginner analogy is studying for an exam. Training is practice. Validation is the occasional mock test used to see whether your study method is helping. Testing is the final exam you should not peek at in advance. If you keep adjusting your model based on the test set, it stops being a fair measure of real performance.
This split matters because AI systems can memorize patterns in the training data without learning to generalize. A model might perform impressively on images it has already seen, yet fail on new photos from a slightly different room or camera. Validation and test sets reveal whether the model truly learned useful visual patterns or just remembered details from the training examples.
For video projects, be careful when extracting frames. Consecutive frames can be nearly identical. If one frame goes into training and the next frame goes into testing, the final score may look unrealistically high. A better approach is to split by whole video clips or recording sessions so the sets are more independent.
The practical lesson is that evaluation begins with data organization. If your splits are careless, your results may look better than they really are. Simple discipline here saves a lot of confusion later.
Beginners are often surprised by how sensitive object detection can be to ordinary visual changes. A bottle on a table may be easy to detect in bright daylight, but much harder in dim evening light. A bicycle seen from the side may be obvious, while the same bicycle viewed from the front looks very different. Small distant objects contain fewer pixels, so the model has less information to work with. Busy backgrounds can also distract the system by adding patterns that resemble parts of the target object.
These factors matter because the model learns from visual evidence, not object concepts. If most training images show large centered objects on clean backgrounds, the model may rely too heavily on those conditions. Then, when faced with crowded shelves, low contrast scenes, tilted camera angles, or motion blur from video, performance drops. This is not random failure. It is a sign that the training data did not fully prepare the model for those variations.
Engineering judgment means anticipating where variation will come from. If your camera moves, include movement. If users upload phone photos, include mixed orientations and everyday clutter. If the system will run indoors and outdoors, gather both lighting conditions. If small objects matter, make sure they appear often enough in the labeled data. Do not assume the model will “figure it out” later.
One of the best beginner habits is failure review. After testing a model, collect examples where it misses objects, draws poor boxes, or reports the wrong class. Then look for patterns. Are errors concentrated in dark scenes? At long distances? On reflective surfaces? Against certain backgrounds? Those observations tell you what new data to collect or which labels to improve.
In real projects, better results often come from matching training conditions to deployment conditions. Lighting, angle, size, and background are not minor details. They are part of what the model is actually learning.
1. According to the chapter, how does an object detection system learn what objects look like?
2. What is the main difference between image classification and object detection?
3. What does the chapter say beginners often underestimate?
4. Why are annotations important in object detection?
5. If a model struggles in dim rooms or misses small objects, what does the chapter suggest you should examine first?
In this chapter, we move from the basic idea of object detection into hands-on use with still images. A photo is the easiest place to start because it gives us one frozen moment to inspect carefully. Instead of worrying about motion, timing, or changing frames, we can focus on the core outputs of a detector: what object it believes is present, where it thinks the object is located, and how confident it is in that guess. This makes photos the ideal practice ground for beginners who want to understand how detection systems behave in the real world.
When you run object detection on a photo, the AI model scans the image and searches for patterns it has learned during training. It may find a person, a dog, a bicycle, a bottle, or a car. For each object, it usually returns a label, a rectangular box showing the object location, and a confidence score. These outputs are simple to view, but they still require interpretation. A high score does not always mean the result is perfect, and a low score does not always mean the object is absent. Good engineering judgment means learning to read the outputs with context.
A beginner-friendly workflow usually follows a few clear steps. First, choose an easy tool or demo environment so you can focus on understanding rather than coding complexity. Second, load a photo and run the detector. Third, inspect the boxes, labels, and scores. Fourth, compare strong and weak results to learn what makes a detection reliable. Finally, improve the image input when needed by choosing clearer, brighter, less cluttered examples. This sequence helps you build intuition that later transfers to video, where detection happens frame by frame.
It is also important to remember the difference between classification and detection while working with photos. A classifier might say, “this image contains a dog.” A detector goes further and says, “there is a dog here,” drawing a box around it. That spatial information is what makes object detection useful in practical systems such as counting people, checking shelf items, monitoring traffic, or tagging photos. In a photo workflow, the box is often just as important as the label itself because it shows whether the model truly found the object or only guessed based on nearby visual clues.
As you read this chapter, pay attention not only to what buttons to click, but also to how to think like a practitioner. Beginners often assume AI outputs are either right or wrong. In practice, many results sit in a gray area. A box may cover most of a dog but miss the tail. A person in the background may be detected only at low confidence. A car may be missed entirely because it is small, dark, or partially hidden. Your job is to learn how to recognize these situations, judge whether the outputs are useful, and make simple adjustments that lead to clearer detections.
By the end of this chapter, you should be able to run object detection on common photos, read the results in a practical way, and make basic decisions about whether the detections are strong enough for a beginner project. That skill forms the bridge between theory and real use.
Practice note for Run object detection on still images: document your objective, define a measurable success check, and run a small experiment before scaling. Capture what changed, why it changed, and what you would test next. This discipline improves reliability and makes your learning transferable to future projects.
Practice note for Interpret outputs in a practical way: document your objective, define a measurable success check, and run a small experiment before scaling. Capture what changed, why it changed, and what you would test next. This discipline improves reliability and makes your learning transferable to future projects.
The fastest way to learn object detection on photos is to begin with tools that remove setup friction. For beginners, a web demo, a hosted notebook, or a simple drag-and-drop application is often better than building a full program from scratch. The goal at this stage is not software engineering depth. The goal is visual understanding: upload a photo, run detection, and inspect the outputs. If the tool requires package management, model downloads, GPU drivers, and configuration files before you see your first box, learning slows down.
A good beginner tool should have a few qualities. It should support common image formats such as JPG and PNG, display boxes directly on the photo, show confidence scores clearly, and let you try multiple images quickly. It is also helpful if the tool uses well-known object classes such as person, dog, car, bicycle, cat, bottle, and chair. Familiar categories make it easier to judge whether the model is behaving sensibly. If possible, choose a tool with a confidence threshold slider so you can immediately see how outputs change.
There is also value in picking a demo environment that explains which model is being used. Some models are general-purpose detectors trained on common objects, while others are specialized for faces, vehicles, or retail products. Beginners sometimes test a photo of fruit with a model trained mostly on street scenes, then conclude that detection does not work. In reality, the tool and the task do not match. Good judgment starts with asking: what kinds of objects does this model know how to detect?
For practical learning, keep a small folder of test photos. Include a few easy images with one large object, a few moderate images with two or three objects, and a few harder images with clutter or partial views. This makes your practice repeatable. If you test random internet photos every time, it becomes hard to compare results across tools and settings. Consistent examples help you notice patterns, such as how one model handles pets better than another or how confidence drops when lighting is poor.
A common beginner mistake is choosing a tool because it looks advanced rather than because it teaches clearly. Start simple. You want quick feedback, visible outputs, and low setup overhead. Once you can explain why a detector succeeded or failed on a still image, you will be ready for more code-based workflows later.
Running object detection on a still image usually follows a short workflow. First, open your chosen tool. Second, upload or drag in a photo. Third, select a model if the tool offers multiple options. Fourth, click the run or detect button. The system then processes the image and returns one or more detections. In many tools, the original photo is displayed with colored rectangles drawn around detected objects. Next to each box, you may see a class label such as person or dog and a confidence value such as 0.92 or 92%.
At a technical level, the detector is not literally “looking” at the image the way a person does. It is computing patterns from pixel values and matching them against learned features from training data. But for practical use, you can think of it as searching the photo for recognizable object shapes and textures. The output is a list of object candidates ranked by confidence. Some tools show all candidates above a threshold. Others display only the strongest results by default.
When you load your first photo, start with easy cases. Use a well-lit image of a single pet, a clear street scene with one car, or a front-facing person with little background clutter. Doing this gives you a baseline. If the detector struggles on easy images, check whether the tool is using the right model, whether the image uploaded correctly, and whether the object class is part of the model's vocabulary. Beginners often test impossible cases first, such as tiny distant objects or unusual angles, and then misjudge the detector.
After running detection, do not just note whether an object was found. Inspect how the box fits the object. Does it cover the full person or only the upper body? Does it include much empty background? Is the label appropriate, or is the model confusing a sofa with a chair? This is where interpretation begins. A result can be usable even if not perfect, and a high-confidence result can still be poorly localized.
To build skill, repeat the same workflow on several photos and record what you see. For each image, note the visible objects, the detections returned, and whether the outputs would be good enough for a simple project such as counting pets or finding parked cars. This habit turns clicking a demo into real observation and prepares you for systematic testing later.
The three outputs you will see most often are boxes, labels, and confidence values. A box marks the estimated location of an object. A label names the object category. A confidence value estimates how sure the model is about that label at that location. These outputs work together. If you read only the label, you miss whether the model found the right region. If you read only the box, you miss what the model thinks it is. If you read only the confidence, you may trust a result that is visually poor.
Start with the box. Ask whether it tightly covers the object or only roughly surrounds it. In beginner projects, a rough box is often acceptable if your goal is simply to know that the object exists. But if you want accurate counting, cropping, or tracking later, loose or overlapping boxes matter more. For example, a detector might place one large box over two closely standing people. That may be enough for saying “people are present,” but not enough for counting each person correctly.
Next, examine the label. Labels come from a fixed list of classes used during model training. That means the detector can only predict from what it knows. A fox may be labeled as dog, or a van as truck, because the model is choosing the closest learned category. This is not always a failure; sometimes it is a sign that the true object is outside the class list. Beginners should check whether the output is semantically close enough for the project goal.
Confidence values need careful interpretation. A confidence of 0.95 usually means the model strongly favors that prediction, but it does not guarantee correctness. Likewise, a confidence of 0.45 is not automatically useless. In a cluttered photo with a partially hidden cat, 0.45 might still be informative. Practical interpretation means comparing the confidence with the visual evidence. If a box clearly outlines a cat under a table but has moderate confidence, you may still accept it in an exploratory setting.
One strong habit is to look for consistency. If a clear car repeatedly gets high-confidence car labels across several photos, the detector is behaving reliably. If a lamp is sometimes labeled bottle and sometimes vase, confidence alone is not enough. You are learning not just what the model says, but how stable and trustworthy its outputs are across examples.
A confidence threshold is a cutoff value that determines which detections are shown. If the threshold is set to 0.50, the tool may display only detections with confidence at or above 0.50. This explains why an object can appear in one run and disappear in another even when the image does not change. The detector may still be considering the object, but if its score falls below the chosen threshold, the tool hides it. Understanding this simple setting is essential for practical work.
Lowering the threshold usually increases sensitivity. You will see more boxes, including weaker guesses. This can help when objects are small, partially blocked, or poorly lit. However, it also increases false positives, where the model labels background regions as objects. Raising the threshold usually makes outputs cleaner by showing only stronger detections, but it can also hide real objects that the model recognized with only moderate confidence. There is no universal best threshold; it depends on the use case.
For beginner photo projects, a useful approach is to test a few threshold levels such as 0.30, 0.50, and 0.70 on the same images. Then compare what changes. At 0.30, you may see many extra boxes around clutter. At 0.70, you may lose the small dog in the corner. This exercise teaches a key engineering lesson: model output is not fixed truth. It is filtered evidence, and your settings shape what you see.
Another reason objects appear or disappear is competition between overlapping detections. Many detectors generate multiple possible boxes for the same object and then keep the strongest one while removing weaker overlaps. If two nearby objects are hard to separate, one may be suppressed. Beginners do not need the full mathematics, but they should know that post-processing affects the final display.
A common mistake is tuning the threshold based on one photo and assuming it will work everywhere. Instead, choose settings by looking across a small set of varied images. If your goal is a simple demo, a moderate threshold may be fine. If your goal is to avoid missing any person in a photo, you may accept lower-confidence boxes and review them manually. The right threshold reflects the practical cost of misses versus false alarms.
Object detection works best when the object is visible, reasonably large, and visually distinct from the background. Real photos often break these conditions. Blur removes edges and texture. Low light hides detail. Busy backgrounds add distractions. Partial occlusion means part of the object is hidden behind something else. Unusual angles can make familiar objects look unfamiliar to the model. These are common reasons why a detector gives weak results or misses an object entirely.
Blur is especially important because detectors rely on patterns such as contours, corners, and surface features. A blurry dog may lose the visual cues that separate it from a pillow or blanket. Clutter creates another problem: the detector sees many competing shapes. A toy-filled room with overlapping objects is much harder than a single mug on a clean table. Small objects are also challenging because they occupy only a few pixels, leaving less evidence for the model to use.
The good news is that beginners can often improve results with simple input choices. Use photos that are bright and in focus. Make the main object large in the frame when possible. Avoid heavy cropping that cuts off important parts. If you are taking your own photos, step closer, reduce background distractions, and keep the camera steady. Even a modest improvement in image quality can produce clearer detections than changing tools randomly.
When a result is weak, compare the image conditions with the output. Did the model miss the bicycle because only the wheel is visible? Did it confuse a backpack with a suitcase because both are partly hidden? This style of diagnosis matters more than blaming the model in general. You are learning cause and effect. Better images usually lead to better detections, and understanding why helps you prepare data more intelligently for future projects.
One practical rule is to change one factor at a time. Try a sharper version of the same photo, or crop to make the object larger, or choose an image with less clutter. Then rerun detection and compare. This is how beginners build evidence-based intuition instead of guessing.
The best way to become comfortable with object detection on photos is to practice on familiar categories. Pets, people, cars, and everyday household objects are ideal because many beginner models are trained to recognize them. Start with a small set of images: a clear photo of a dog or cat, a photo with one or two people, a street image with a parked car, and a tabletop image with items like a bottle, cup, chair, or backpack. These examples let you observe different strengths and weaknesses of detection systems.
For each photo, follow the same process. First, predict what a detector should find. Second, run the tool. Third, compare the outputs with your expectation. Fourth, judge whether the result is strong, weak, or mixed. A strong result usually has the correct label, a box that covers the object well, and a confidence that matches the visual clarity of the image. A weak result may have a loose box, uncertain label, low confidence, or complete miss. Mixed results are common: the person is detected well, but the small cat in the background is missed.
Try comparing photos of the same category under different conditions. Use one clear pet photo and one dim, cluttered pet photo. Use one large close-up car and one distant car in traffic. This helps you see that performance depends heavily on input quality and scene complexity. It also reinforces a practical lesson: before adjusting settings, first ask whether the image itself is giving the model enough information.
You can make this practice more systematic with a short checklist:
This section is not about perfect accuracy. It is about building a working sense of what detectors do well, where they struggle, and how small improvements in image choice can make outputs more useful. Once you can evaluate photo detections confidently on everyday objects, you are ready to carry that judgment into video, where the same logic applies one frame at a time.
1. Why are still photos a good starting point for beginners learning object detection?
2. When interpreting detection results on a photo, what should you examine together?
3. What is the key difference between image classification and object detection?
4. If a detection has a high confidence score, what should a beginner conclude?
5. According to the chapter, what is a good first step if detections are unclear or weak?
In earlier chapters, object detection was presented mainly on single photos. That is the easiest place to begin because one image gives the model one chance to answer a simple question: what objects are here, where are they, and how confident is the model? Video keeps the same basic idea, but now the detector must do that work again and again across a sequence of images. This chapter helps you build intuition for that shift. The key idea is that video detection is not a completely different task from photo detection. In beginner-friendly terms, it is object detection performed frame by frame, usually many times per second.
That simple definition is useful, but it hides important engineering judgement. In video, the system must deal with motion, repeated predictions, timing, and continuity. A person seen in one frame is often still present in the next frame, though perhaps shifted slightly, partly hidden, blurred, or darker because the lighting changed. Because nearby frames are related, video gives us both new problems and new opportunities. The problem is that image quality may get worse during movement. The opportunity is that nearby frames can support each other. If one frame is weak, the previous and next frames may still help us understand what is happening.
A practical beginner workflow for video usually looks like this:
As you read this chapter, keep one mental model in mind: every video is a stream of still images, but a useful video system should also respect time. Time is what turns isolated detections into behavior. Instead of saying only “there is a car,” a video-aware system may say “the same car moved from left to right,” “the person remained in the scene for ten seconds,” or “the package appeared and then disappeared.” Those are practical outcomes that matter in traffic, retail, and home camera settings.
Another important lesson in this chapter is restraint. Beginners sometimes expect a detector on video to be perfectly stable and perfectly consistent. Real systems are not like that. Boxes jitter slightly. Confidence scores rise and fall. One frame may miss an object that is obvious in the next frame. Good engineering is not about assuming every frame is perfect. It is about designing a workflow that remains useful even when some frames are noisy.
By the end of this chapter, you should be able to explain in plain language how video detection works frame by frame, why motion changes the problem, how tracking helps connect detections over time, and why real-time performance is often a practical requirement rather than just a technical luxury.
Practice note for Understand how video detection works frame by frame: document your objective, define a measurable success check, and run a small experiment before scaling. Capture what changed, why it changed, and what you would test next. This discipline improves reliability and makes your learning transferable to future projects.
Practice note for See why motion creates new challenges and opportunities: document your objective, define a measurable success check, and run a small experiment before scaling. Capture what changed, why it changed, and what you would test next. This discipline improves reliability and makes your learning transferable to future projects.
Practice note for Recognize basic ideas behind tracking the same object over time: document your objective, define a measurable success check, and run a small experiment before scaling. Capture what changed, why it changed, and what you would test next. This discipline improves reliability and makes your learning transferable to future projects.
Practice note for Use video examples to build intuition without heavy coding: document your objective, define a measurable success check, and run a small experiment before scaling. Capture what changed, why it changed, and what you would test next. This discipline improves reliability and makes your learning transferable to future projects.
The easiest way to understand video is to stop thinking of it as magic and instead think of it as a fast slideshow. A video is a sequence of still images called frames. If those frames are shown quickly enough, your eyes and brain perceive smooth motion. Common frame rates include 24, 30, or 60 frames per second. From an object detection point of view, this means a ten-second video at 30 frames per second contains about 300 individual images that could be analyzed.
This matters because a beginner can often transfer what they already know from photos directly into video. If you know how a detector outputs a label such as person, a box around the object, and a confidence score such as 0.91 on one image, then you already understand the core unit of video detection. The model still sees one frame at a time. It does not automatically “understand the movie” in the same way a human does. Any sense of continuity comes from processing many frames in order and comparing results over time.
There is also an important practical point: not every project needs every frame. If an event changes slowly, you may sample fewer frames to save computing power. For example, in a parking lot camera, checking every second frame or every third frame may still be enough for counting cars. But if you are watching fast motion, such as a cyclist moving through an intersection, skipping too many frames may cause missed detections or jerky tracking. Engineering judgement begins with the question: how much temporal detail does this task really need?
A common beginner mistake is to assume that more frames always mean better results. More frames give more chances to detect, but they also increase processing cost. If the detector is slow, trying to process every frame can create delay. So the practical lesson is simple: video is many images shown quickly, and your job is to decide how many of those images you need to analyze for the application to remain useful.
Once you accept that video is a sequence of images, the next step is to run object detection across consecutive frames. The simplest pipeline is repetitive: take frame 1, run the detector, collect boxes and labels; then do the same for frame 2, frame 3, and so on. This sounds almost too simple, but it is the core of many real systems. The detector does not have to become more complicated at first. Instead, the system around it becomes more aware of time and order.
In practice, when you compare detections from neighboring frames, you start to notice patterns. A car detected at the center-left in one frame is often detected slightly farther right in the next. A person walking toward the camera may have a larger box over time because they occupy more pixels. Confidence scores often fluctuate a little even when the object has not really changed. That is normal. A stable video workflow expects small variation rather than treating every change as meaningful.
A useful beginner habit is to inspect a short clip frame by frame and ask three questions. First, did the detector find the expected object? Second, did the box stay roughly aligned with the object? Third, did the confidence score remain reasonable across time? This builds intuition about detector behavior in motion. You do not need heavy coding to do this. Many beginner-friendly tools or notebooks can step through frames and draw predictions visually.
One engineering judgement here is threshold choice. If the confidence threshold is too high, detections may disappear on weaker frames even when the object is still present. If the threshold is too low, false positives may appear and flicker. Beginners often notice this as “the box keeps popping in and out.” The fix is not always a better model; sometimes it is a better operating threshold or a simple smoothing rule across nearby frames.
The practical outcome is that frame-by-frame detection gives you a timeline of object presence. From that timeline, you can estimate counts, durations, entrances, exits, and movement trends, even before you add a true tracking system.
Video introduces visual conditions that are less common or less obvious in curated photo examples. Motion blur is one of the biggest. When either the camera or the object moves quickly, the object can smear across pixels. To a human, a blurred bicycle may still be easy to recognize because we use context and experience. To a detector, blur can reduce the sharp edges and texture patterns that help classify and localize an object. That often lowers confidence and can shift the box.
Lighting also changes over time in video. A person walking from bright sunlight into shade may look very different from one second to the next. Headlights, reflections, automatic camera exposure, and flickering indoor lights can all alter the appearance of a frame. In a single photo project, you might only notice whether the image is bright or dark. In video, the scene can change continuously, which means the detector must be robust across a moving range of conditions.
Partial visibility, often called occlusion, is another major challenge. A shopper may walk behind a shelf. A car may be hidden briefly by a truck. A pet may move behind furniture and then reappear. On some frames, only part of the object is visible. Beginners are often surprised when detections disappear during occlusion and then return. This is expected behavior. The model can only detect what the frame provides clearly enough.
The opportunity in video is that nearby frames can compensate for weak ones. If the detector misses one blurry frame but detects the object before and after, the overall system can still remain useful. This is why video systems often combine detection with temporal reasoning or tracking. The practical lesson is not to judge a model based on a single bad frame. Instead, evaluate whether it behaves acceptably across the full clip. Common mistakes include testing only on clean sample videos and then being surprised when real camera footage is shakier, darker, and more crowded.
Detection answers the question “what is in this frame?” Tracking adds a new question: “which object is the same one from earlier frames?” In plain language, tracking tries to keep an identity attached to an object over time. Instead of drawing a fresh box around every detected person independently, a tracker may say this is person 1, this is person 2, and person 1 is the same individual we saw one second ago.
Why is that useful? Because many practical video tasks are about persistence, not just presence. In traffic analysis, you may want to count vehicles only once as they cross a line. In retail, you may want to estimate how long a customer stayed near a shelf. In a home camera, you may want to know whether the same person moved from the driveway to the front door. Without tracking, repeated detections across frames can lead to duplicate counting.
At a beginner level, you can think of tracking as matching detections from frame to frame based on clues such as location, box size, movement direction, and sometimes visual appearance. If a box in frame 10 is close to a similar box in frame 11, the system may treat them as the same object. This is not perfect. When objects cross paths, leave the scene, or become hidden, identities can switch or disappear. That is one reason tracking is a full topic on its own.
A useful engineering mindset is that tracking does not replace detection; it depends on it. If detection is noisy, tracking becomes harder. But even simple tracking can make video outputs feel much more stable and meaningful. Common beginner mistakes include assuming the tracker “knows” the object even when it has been hidden for a long time, or assuming every identity number is always correct. In practice, tracking improves continuity, but it also introduces its own errors and trade-offs.
When working with photos, speed matters mostly for convenience. With video, speed can become part of the problem definition. If a camera produces 30 frames per second but your system can only process 5 frames per second, then you are not operating in real time. Depending on the application, that may be acceptable or unacceptable. A recorded video review for education or offline analysis can tolerate delay. A safety alert at a doorway or an assistance feature in traffic cannot tolerate much delay.
Real-time does not always mean perfect frame-by-frame processing at the camera’s full rate. It usually means the system keeps up well enough for the purpose. A beginner should ask: how quickly must the system respond, and how much detail can be sacrificed to get there? Smaller models, lower image resolution, and fewer processed frames can increase speed. But each of those choices may reduce accuracy, especially for small or distant objects.
This is where engineering judgement becomes concrete. If you shrink the frame too much, a person far from the camera may become too tiny to detect. If you process every fourth frame, you may miss a fast-moving object. If you use a very high confidence threshold to reduce false alarms, you may create more missed detections. There is no universal best setting. Good settings depend on the camera view, object size, scene complexity, and business goal.
A practical beginner workflow is to test short clips under realistic conditions and measure outcomes that matter: missed objects, false alarms, delay, and visual stability. Avoid evaluating only on a polished demo clip. Real-time performance is not just about model speed on a laptop benchmark. It includes the whole pipeline: reading frames, running inference, drawing overlays, storing results, and possibly tracking identities. A useful system balances all of these, not just the detector alone.
Traffic video is one of the clearest examples of why frame-by-frame detection plus time awareness matters. A detector can find cars, buses, bicycles, and pedestrians on each frame. But a practical system usually wants more than isolated boxes. It may want to count vehicles passing through an intersection, estimate congestion, or detect when a lane is blocked. Here, tracking helps prevent counting the same car many times. Motion also creates challenges: fast vehicles can blur, headlights can change exposure at night, and partial occlusion happens when larger vehicles hide smaller ones.
Retail cameras show a different set of concerns. People move more slowly, but clutter is often higher. Shelves, signs, carts, and other customers can block the view. A frame-by-frame detector may find shoppers successfully, but confidence may vary as people turn sideways, bend down, or move behind displays. Tracking is valuable because retail questions often involve duration: how long someone stayed in a zone, whether a queue formed, or whether an item area attracted attention. The best beginner takeaway is that stable counting and timing are usually built on both detection and continuity across frames.
Home cameras are practical because they are familiar. A doorbell or indoor pet camera often needs simple, understandable outputs such as person detected, package detected, pet detected, or motion near the entrance. These scenes can still be difficult. Lighting changes from day to night, rain can reduce visibility, and moving shadows can confuse naive systems. In a home setting, real-time response matters because the user may expect a quick notification. But the system also needs restraint, because false alerts are frustrating. That is why balancing speed, confidence threshold, and tracking persistence is important.
Across all three examples, the core lesson stays the same. Video object detection begins with single-frame detection, but practical value comes from respecting time. By looking across consecutive frames, handling motion-related problems, and introducing basic tracking ideas, you move from drawing boxes on pictures to understanding events in motion. That shift is the foundation for all beginner-friendly video AI work.
1. What is the simplest beginner-friendly way to describe object detection in video?
2. Why does motion make video detection more challenging than photo detection?
3. What is the main benefit of comparing detections between neighboring frames?
4. What does assigning a persistent identity to the same object over time represent?
5. According to the chapter, what is a realistic expectation for a video detection system?
In earlier chapters, you learned that an object detection system does more than say what is in an image. It also tries to show where each object is by drawing a box and assigning a confidence score. That is exciting, but beginners often make one important mistake: they look at a few nice examples and assume the model is good enough. In real work, even a simple beginner project needs a better habit. You need to measure results, notice patterns in errors, and make practical improvements.
This chapter explains how to judge whether a model is working well enough for a simple task. You do not need advanced math. Instead, think like an engineer. Ask: does the model find the objects I care about, in the situations that matter, often enough to be useful? Can I spot false alarms and missed detections? Are the confidence scores helping me make sensible decisions? If the model struggles, can I improve the images, labels, or settings before assuming the whole project has failed?
A good beginner workflow is simple and realistic. First, choose a clear task, such as detecting people in a doorway camera, cars in a parking lot image, or bottles on a table. Next, collect a small set of test photos or short video clips that represent the real conditions you care about. Then run your detector and inspect the outputs carefully: labels, boxes, and confidence scores. Finally, summarize what went right and what went wrong. You are not just hunting for a single accuracy number. You are building judgment.
In object detection, “good enough” depends on the job. A toy demo may tolerate occasional mistakes. A counting tool for inventory may need boxes to be fairly accurate. A safety-related system may require very careful testing, human review, and strict limits. That is why measuring results is not only about scoring the model. It is also about understanding the consequences of mistakes and choosing sensible beginner improvements.
As you read this chapter, keep one idea in mind: every detection result can be examined from two angles. First, did the model detect something that was truly there? Second, did it miss something important or raise a false alarm? Once you learn to see results this way, you can improve your projects much faster and avoid common beginner confusion.
By the end of this chapter, you should be able to explain basic accuracy ideas in simple language, identify false positives and false negatives, and make practical beginner improvements to data and settings. These skills are essential whether you are testing on single photos or running detection frame by frame on video.
Practice note for Judge whether a model is working well enough for a simple task: document your objective, define a measurable success check, and run a small experiment before scaling. Capture what changed, why it changed, and what you would test next. This discipline improves reliability and makes your learning transferable to future projects.
Practice note for Spot false alarms and missed detections: document your objective, define a measurable success check, and run a small experiment before scaling. Capture what changed, why it changed, and what you would test next. This discipline improves reliability and makes your learning transferable to future projects.
Practice note for Understand basic accuracy ideas without advanced math: document your objective, define a measurable success check, and run a small experiment before scaling. Capture what changed, why it changed, and what you would test next. This discipline improves reliability and makes your learning transferable to future projects.
Practice note for Make sensible beginner improvements to data and settings: document your objective, define a measurable success check, and run a small experiment before scaling. Capture what changed, why it changed, and what you would test next. This discipline improves reliability and makes your learning transferable to future projects.
A detection is usually considered correct when three things match reality well enough: the label is right, the object really exists in the image or frame, and the box is placed close enough around that object. If the model says “dog” and there is a dog in the picture, that sounds promising. But if the box is drawn around the background instead of the dog, the result is not very useful. Likewise, if the box is correct but the label says “cat,” the detection is still wrong for most tasks.
For beginners, it helps to think in practical terms rather than formal equations. Imagine you are checking a photo of a street. If the model draws a box around a car and the box mostly covers the car, you would probably count that as correct. If it draws a box over half the car and half the sidewalk, you might call it weak or incorrect depending on your task. The key is consistency. Use the same standard when reviewing many results.
When evaluating a simple project, compare the predictions with what a careful human observer would mark. Look at each predicted box and ask: is this the right object class, and is the box close enough to be useful? Then look at the image again and ask: is there any important object that should have been detected but was not? This second step is where many beginners forget to check for misses.
A useful review workflow is to create a small test set with varied examples: bright images, darker images, crowded scenes, and objects at different distances. Run the model, then sort the outputs into groups such as correct detections, wrong labels, poor boxes, and missed objects. This gives you a much clearer picture than simply saying “it looks okay.” In video, repeat the same idea across several frames, because an object may be detected in one frame but missed in the next.
Engineering judgment matters here. A box that is slightly loose might be acceptable for counting objects but not for measuring position precisely. A model that detects most large people in a room may still be unsuitable if your actual goal is to detect small tools on a workbench. Correctness always depends on the task, so define success before you start judging results.
Two of the most important mistakes in object detection are false positives and false negatives. A false positive is a false alarm: the model says an object is present when it is not. For example, it may label a shadow as a person or mistake a patterned chair for an animal. A false negative is a miss: the object is really there, but the model fails to detect it. For example, a bicycle is visible in the image, but no box appears.
Confidence scores help control these mistakes, but they do not remove them. A confidence score is the model’s estimate of how likely a detection is to be correct. Many tools let you set a threshold. If the threshold is low, the model will show more detections, including more weak guesses. This may reduce missed detections, but it often increases false alarms. If the threshold is high, the model becomes more strict. This may reduce false positives, but it can also hide real objects that the model detected with only moderate confidence.
This is a trade-off, and beginners should expect to tune it. Suppose you are detecting packages on a table. If missing a package is worse than showing an extra false box now and then, you might use a lower threshold and review results carefully. But if false alarms are very annoying, such as in a simple demo shown to customers, you may prefer a higher threshold so only stronger detections appear.
A practical method is to test several threshold values on the same small set of images or video frames. For each threshold, note how many obvious false alarms appear and how many real objects are missed. You do not need complicated math to learn a lot from this. Often, one threshold feels clearly more balanced for the task. Record your choice and why you made it.
In video, confidence trade-offs become even more visible. A person may be detected strongly in one frame, weakly in the next, and not at all in another because of motion blur or lighting changes. If your threshold is too high, the boxes may flicker on and off. If it is too low, random false boxes may pop up in the background. This is why evaluating frame by frame is important. You are not only checking average quality. You are checking whether the system behaves in a stable and useful way over time.
Precision and recall are common accuracy ideas in object detection, and you can understand them without advanced math. Precision answers this question: when the model says it found an object, how often is it right? Recall answers a different question: of all the real objects that were present, how many did the model successfully find? These two ideas help you describe results more clearly than using one vague word like “accuracy.”
Here is a beginner-friendly example. Imagine there are 10 real apples in a set of photos. Your detector predicts 12 apples. Out of those 12 predictions, 8 are real apples and 4 are mistakes. In simple terms, precision is about the quality of the predictions: 8 out of 12 are correct. Recall is about coverage: the model found 8 of the 10 real apples, so 2 were missed. High precision means few false alarms. High recall means few misses.
Why not just maximize both? In practice, pushing one higher can make the other worse, especially when adjusting the confidence threshold. Lowering the threshold may increase recall because more real objects are captured, but precision may drop because more weak, incorrect boxes are included. Raising the threshold may improve precision because predictions are stricter, but recall may fall because some real objects are filtered out.
For a beginner project, the goal is not perfect numbers. The goal is understanding. If your model has poor precision, users may stop trusting it because they see too many false alarms. If it has poor recall, important objects may be missed and the detector may feel unreliable. Decide which problem hurts your task more, then tune the threshold, data, and labels accordingly.
A very practical habit is to describe your results in plain language along with any numbers. For example: “The model usually finds large cars correctly, but it misses small distant cars and sometimes mistakes bright signs for cars.” That sentence tells you much more than a single score. Precision and recall are useful because they force you to think about both kinds of failure, not just the results that look impressive in a demo.
Not all objects are equally easy for a detector. Small objects are harder because they contain fewer visible pixels. A tiny bird in the corner of a photo gives the model much less information than a large dog in the center. Hidden or partly blocked objects are also difficult because only part of the shape is visible. A person behind a door, a car partly hidden by another car, or a fruit covered by packaging may confuse the model.
Unusual objects or unusual views create another challenge. If the model mostly saw front views of bicycles during training, it may struggle with a bicycle lying on its side or partly covered in mud. If your data mostly contains daytime scenes, nighttime scenes may produce many mistakes. In beginner projects, this often leads to a false conclusion that the model is “bad” overall, when in fact it is mostly unprepared for certain conditions.
Background clutter matters too. An object on a plain table is easier to detect than the same object in a crowded shelf with reflections and overlapping items. Motion blur in video can make edges less clear, while compression artifacts may remove useful detail. Even camera angle can matter. A top-down view may look very different from the side view the detector expects.
The practical lesson is to review failures by category. Do not just count mistakes; group them. Are misses happening mostly on small objects? On dark images? On objects near the edge of the frame? On rare colors or shapes? Patterns like these tell you what improvement is most likely to help. Without this step, beginners often change random settings and hope for magic.
Good engineering judgment means accepting that some conditions are genuinely harder. If your task depends heavily on tiny or hidden objects, you may need higher-resolution images, better camera placement, more representative examples, or a more capable model. For simple beginner projects, the best first step is often to improve the conditions: better lighting, less clutter, steadier video, and framing that makes important objects larger and clearer.
When beginners see weak results, they often rush to change the model first. But many early improvements come from better images and better labels. If your photos are blurry, dark, badly cropped, or inconsistent, the model has a harder job. If your labels are wrong, incomplete, or drawn carelessly, the model may learn confusing patterns. Data quality often matters as much as model choice.
Start with the images. Try to collect examples that look like the real situations where you will use the detector. Include different lighting conditions, distances, backgrounds, and object positions. Avoid building a dataset made only of easy, centered examples if your real use case is messy. For video tasks, sample frames from different moments so you capture motion blur, partial views, and changing backgrounds. If possible, improve the camera setup itself: better lighting, cleaner lens, more stable mount, and a useful angle can all raise performance.
Next, check labels carefully. Every important object that should be detected needs a correct label, and the box should cover the object consistently. If one image labels a cup tightly and another labels only half the cup, the model receives mixed signals. If some objects are left unlabeled, the model may be unfairly penalized during evaluation or trained to ignore things it should find. Consistency beats perfection. A simple, clear labeling rule followed every time is very helpful.
Then make beginner-friendly setting changes. Adjust the confidence threshold and compare results. If your tool supports image size or input resolution, test whether slightly larger images help with small objects. If there is non-maximum suppression or similar overlap control, inspect whether duplicate boxes are being reduced properly. Make one change at a time and record what happened. Randomly changing many settings makes it hard to know what actually helped.
A useful improvement loop is: review errors, identify a pattern, choose one targeted change, retest on the same hold-out examples, and compare. For example, if the detector misses objects in dim scenes, collect more dim examples and improve lighting. If boxes are often poor around partially hidden objects, add more examples of partial occlusion. This careful loop is how you make sensible beginner improvements instead of guessing.
Measuring results is not only about technical quality. Responsible use also means asking whether the system is safe, fair, and appropriate for the setting. A detector can appear accurate in a small test but still create harm if used carelessly. For example, false alarms in a security setting may wrongly draw attention to innocent people, while missed detections in a safety-related setting may hide real risks. Beginners should learn early that object detection outputs are helpful signals, not unquestionable facts.
Fairness matters when performance differs across conditions or groups. A model may work better in bright scenes than dark ones, on large visible objects than small hidden ones, or in one environment but not another. If those differences affect people or decisions, you need to test broadly and communicate limits honestly. Never assume that good-looking sample images prove equal performance everywhere.
Privacy is also important, especially with photos and video. If you collect images from cameras, ask whether you have permission, whether personal information is visible, and whether the data needs to be stored at all. Faces, license plates, addresses, and private spaces can create legal and ethical concerns. Use the minimum data needed for the task, protect stored files, and avoid sharing example images casually.
For safety-critical uses, such as medical, industrial, or public safety contexts, beginner tools and casual evaluation are not enough. These projects require stronger validation, risk planning, and often human oversight. Even in simple learning projects, it is wise to design the system so a person can review important detections rather than letting the model make high-impact decisions alone.
Responsible use also means being honest about uncertainty. Confidence scores are not promises. A high confidence prediction can still be wrong, and a low confidence prediction can sometimes be right. The mature approach is to test carefully, document known failure cases, and state where the model should and should not be trusted. That habit protects users, improves your work, and turns object detection from a flashy demo into a practical tool used with good judgment.
1. What is a better beginner habit than judging a detector by a few impressive examples?
2. In this chapter, what does “good enough” mainly depend on?
3. How should a beginner use confidence scores?
4. Which repeated failure pattern does the chapter specifically suggest tracking?
5. If a detector struggles, what sensible beginner improvement should usually come first?
In this chapter, you will bring together the core ideas from the course and turn them into a small, realistic object detection project. Up to this point, you have learned that object detection is different from image classification because it does not only say what is in an image. It also points to where the object is, usually with a bounding box, a class label, and a confidence score. You have also seen that video detection works by examining frames one at a time, which means the same object may be detected slightly differently from frame to frame. Now the goal is to use that knowledge in a practical way.
A beginner project should be simple enough to finish, but real enough to teach good habits. That means choosing a clear task, gathering a manageable set of photos or short clips, running a beginner-friendly detector, and reviewing the results with honest judgement. You do not need a large dataset or advanced coding skills to learn a great deal. In fact, small projects are often better for beginners because they make it easier to see what is working, what is failing, and why.
This chapter focuses on engineering judgement as much as tool use. In real computer vision work, success often comes from defining the problem clearly rather than using the most advanced model. If the goal is vague, the results will be hard to interpret. If the images are poor, the detector may seem weak even when it is behaving normally. If the review process is rushed, you might miss patterns such as false detections in cluttered scenes or missed objects when lighting changes. A good beginner practitioner learns to slow down, set a clear goal, and explain results in simple language.
You will plan a small real-world object spotting task, choose suitable images or short videos, run detections, review the output, and summarize what you found. By the end of the chapter, you should have a roadmap for your next step in computer vision. The project does not need to be perfect. The main outcome is that you understand the complete beginner workflow from idea to explanation.
Think of this chapter as your first mini field exercise in computer vision. You are not trying to build a production system. You are learning how to make practical decisions, review evidence, and talk about AI output responsibly. That skill will help whether you continue with no-code tools, coding projects, or more advanced model training later on.
Practice note for Plan a simple real-world object detection project: document your objective, define a measurable success check, and run a small experiment before scaling. Capture what changed, why it changed, and what you would test next. This discipline improves reliability and makes your learning transferable to future projects.
Practice note for Choose images or short video clips for a clear goal: document your objective, define a measurable success check, and run a small experiment before scaling. Capture what changed, why it changed, and what you would test next. This discipline improves reliability and makes your learning transferable to future projects.
Practice note for Run, review, and explain results like a beginner practitioner: document your objective, define a measurable success check, and run a small experiment before scaling. Capture what changed, why it changed, and what you would test next. This discipline improves reliability and makes your learning transferable to future projects.
Practice note for Leave with a roadmap for the next step in computer vision: document your objective, define a measurable success check, and run a small experiment before scaling. Capture what changed, why it changed, and what you would test next. This discipline improves reliability and makes your learning transferable to future projects.
The best beginner object detection project is not the most exciting idea. It is the idea you can complete in a short time with a clear result. Many beginners choose projects that are too broad, such as detecting everything in street scenes or tracking every item in a busy room. A better approach is to pick one narrow task, such as spotting cups on a desk, bicycles in outdoor photos, or parked cars in a short driveway video. A focused project gives you a fair chance to collect suitable data and judge the output without confusion.
When choosing the project, ask three practical questions. First, can you easily obtain images or short clips? Second, are the objects visible and reasonably common in those scenes? Third, can you tell whether the detector did a useful job? If the answer to any of these is no, simplify the idea. For example, detecting a pet in well-lit living room photos is easier than detecting many small toys scattered across the floor. Detecting a person near a doorway in a short clip is easier than detecting multiple moving people at a crowded station.
It also helps to choose a project that matches common labels already supported by beginner-friendly tools. If your detector already knows classes like person, car, dog, bottle, or chair, you can spend time learning the workflow instead of fighting with unsupported labels. This is an important engineering judgement: beginners should reduce complexity where possible. There is no advantage in choosing a rare object if your tool cannot recognize it.
Common mistakes at this stage include choosing too many classes, mixing photos and video without a plan, and using scenes with poor lighting or heavy clutter before you understand the basics. Start with one scene type and one or two object classes. A good mini project might be: detect bicycles in 20 outdoor photos, or detect people entering a room in three 10-second clips. That is enough to learn from and small enough to finish.
A finished simple project teaches more than an unfinished ambitious one. Your aim is to build confidence and develop a repeatable process. Once you can complete one small object spotting task from beginning to end, you will be ready for more realistic challenges.
After choosing the project idea, define exactly what you want the detector to find. This sounds obvious, but it is where many projects become messy. If your goal is “detect objects in my kitchen,” the task is too vague. Do you care about people, cups, bottles, chairs, or appliances? Are you checking whether objects appear at all, or whether every object is found correctly? A beginner project becomes much easier when the object classes and success goal are written in plain language.
Suppose your mini project is about spotting bottles on a table. Your class might be only bottle. Your success goal could be: “The detector should find most clearly visible bottles in good lighting and place boxes roughly around them.” Notice that this goal is realistic. It does not demand perfect detection under every condition. It also gives you a way to review results. You can ask: Did it detect most bottles? Were the boxes roughly correct? Were the confidence scores sensible?
It is useful to separate required output from nice-to-have output. Required output might be the correct label and a reasonable box. Nice-to-have output might be consistently high confidence scores or stable detections across every video frame. This distinction helps you avoid unfairly judging a beginner tool. In object detection, confidence can fluctuate. Boxes can shift slightly between frames. Small variations do not always mean failure.
Another smart decision is to write down what will count as a miss and what will count as a false positive. A miss means a real object was present but not detected. A false positive means the system drew a box around something that was not your target class. Beginners often notice wrong labels but forget to define these two failure types clearly. Once you do, your review becomes more objective.
You should also think about the environment. Will your objects be large or small? Still or moving? Centered or partly hidden? A detector that performs well on large, clear objects may struggle with tiny or partially occluded ones. So your success goal must fit the scene. Good engineering judgement means matching the goal to the conditions you expect, not to an imaginary perfect dataset.
By the end of this step, you should have a short project statement, a list of one or two classes, and a simple description of success. That turns a vague idea into a project you can actually test.
Once the goal is clear, gather sample data that fits it. For a beginner mini project, you do not need hundreds of images. A small set of carefully chosen samples is enough to reveal useful patterns. For photos, around 15 to 30 images can work well. For video, a few short clips of 5 to 15 seconds each are often better than one long clip. Short clips are easier to review frame by frame and easier to compare.
Try to collect samples that represent normal conditions, not extreme ones only. If your project is detecting cups on a desk, include different desk layouts, some plain backgrounds, some slightly cluttered scenes, and a few lighting variations. If every image is nearly identical, you may get a false sense of success. But if every image is difficult, you may not learn what the tool can do under reasonable conditions. A balanced beginner dataset includes easy, medium, and slightly challenging examples.
For video, keep camera movement under control at first. A static camera or gentle movement is much easier for beginners to analyze than shaky footage. Since object detection in video happens frame by frame, motion blur, fast camera pans, and sudden lighting changes can create unstable results. Those effects are important to study later, but they can distract from the main lesson if introduced too early.
Organize your files clearly. Use simple folder names such as photos_test and video_clips. Give files meaningful names like desk_bottle_01.jpg or doorway_people_clip_02.mp4. This sounds basic, but project organization matters. When you review detections, you need to know which sample produced which result. Good file naming saves time and prevents confusion.
Avoid common collection mistakes. Do not mix many unrelated scenes in one tiny dataset. Do not include images where the target object is almost impossible to see unless your goal specifically includes hard cases. Do not forget permissions and privacy when using photos or video containing people. A responsible beginner practitioner works with data carefully, even in a small project.
At this stage, your practical outcome is a small, tidy set of samples that match your object classes and goal. That prepares you for testing without making the project feel overwhelming.
Now you are ready to run your object detector on the collected photos or short clips. Use a beginner-friendly tool that shows the key outputs clearly: labels, boxes, and confidence scores. As you review the results, remember that the detector is making predictions, not certainties. Your job is to inspect whether those predictions are useful for the goal you defined.
Start with the easiest images or clips. This gives you a baseline. If the system cannot detect large, clear objects in simple scenes, either the chosen class is unsupported, the tool settings are wrong, or the project setup needs revision. Once simple cases work, move to more challenging examples. For each sample, ask the same questions: Did it find the target object? Was the label correct? Was the box placed reasonably well? Was the confidence score high, medium, or low? Consistent review habits are more valuable than random impressions.
For video, examine a few moments across the clip instead of only the first frame. Since detection runs frame by frame, you may notice flickering boxes, changing confidence scores, or brief missed detections even when the object remains visible. This is normal and is one of the main differences between understanding a photo and understanding video behavior. A beginner should learn to describe this calmly: “The model usually found the object, but the detection was less stable during movement.” That is a stronger observation than simply saying the tool is bad.
Keep notes as you review. A simple table can help: file name, expected object, detected label, confidence, correct or incorrect, and comments. You may quickly discover patterns. For example, bottles may be detected well on plain tables but missed when partly hidden. People may be detected strongly in bright scenes but weakly in shadows. These patterns matter more than one perfect or terrible example.
Common mistakes include trusting confidence scores too much, ignoring false positives, and judging a box as wrong when it is only slightly loose. Confidence is useful, but it is not the full story. A high-confidence false detection is still a problem. A moderate-confidence correct detection may still be useful. Your review should combine numerical output with visual judgement.
The practical outcome of testing is not just a set of screenshots. It is an explanation of quality: what worked, where the tool struggled, and which conditions influenced performance. That is how beginners start thinking like practitioners.
After testing, you should be able to explain your results clearly to someone who is not an expert. This is an important skill in computer vision because technical output can look impressive even when its practical value is limited. A good beginner report does not hide mistakes. Instead, it explains what the detector did, where it helped, and where it struggled.
Use plain language first, then mention technical terms as needed. For example, say: “The system usually found bottles in bright photos and drew boxes around them. It sometimes missed bottles when they were partly hidden, and it occasionally confused reflective objects with bottles.” This sentence is easy to understand and still reflects object detection concepts such as labels, boxes, and errors. You can then add confidence observations, such as: “Correct detections often had medium to high confidence, while uncertain cases had lower confidence.”
It helps to structure your findings into three parts: what worked, what did not work, and why you think that happened. This creates a simple but honest story. You are not only showing outputs; you are interpreting them. For a video task, you might say that detections were strongest when the object was large and centered, but less stable when the camera moved quickly. That shows you understand frame-by-frame behavior rather than treating the video as one single image.
If possible, include a few representative examples instead of every single result. Choose one strong success case, one medium case, and one failure case. This is a practical communication habit. It saves time and reveals the range of system behavior better than a long unfiltered list. If you made a review table, summarize the main patterns instead of reading every row aloud.
Avoid exaggerated claims such as “the model works perfectly” or “the AI understands the scene.” Object detectors do not understand scenes the way humans do. They predict object classes and locations based on learned patterns. Responsible wording is part of good practice, even for a small beginner project.
By presenting findings in simple, balanced language, you demonstrate that you can run a test and explain it responsibly. That is a valuable outcome on its own, and it prepares you for more serious project work later.
Completing a first mini project is an important milestone. You now have a practical view of the full object detection workflow: choose a goal, gather data, run a detector, review labels and boxes, and explain results. The next step is not necessarily to jump into a harder project immediately. A better approach is to improve one part of your existing workflow at a time.
One useful next step is to increase variety in your data. If your first project used only bright, clear photos, try adding dimmer scenes, more angles, or mild background clutter. If you worked only with images, try short videos to study frame-by-frame differences. If you already used video, compare a static-camera clip with a moving-camera clip and note how stability changes. These controlled comparisons teach more than random experimentation.
Another direction is to refine your evaluation habits. You can count how many objects were correctly detected, how many were missed, and how many false positives appeared. Even basic counting helps you move from impressions to evidence. As your skills grow, you may learn more formal metrics, but for now the important lesson is to review systematically.
You might also explore the difference between using a prebuilt model and training or fine-tuning a custom model. Beginners do not need to train a model immediately, but it is useful to know when custom training becomes relevant. If your target object is unusual, or if your environment is very specific, a general-purpose detector may not be enough. That is the point where data labeling and model training start to matter.
In practical terms, your roadmap could look like this:
The key idea is that computer vision progress comes from iteration. Your first project does not need to be impressive. It needs to be complete, understandable, and honest. If you can define a simple task, evaluate outputs sensibly, and explain what happened, you have already taken a strong first step into real-world AI object detection.
1. What makes object detection different from image classification in this chapter?
2. Why is a small beginner project often better than a large one?
3. According to the chapter, what is the best first step when planning a mini object spotting project?
4. What is an important reason to review detection results carefully instead of rushing?
5. What is the main outcome of the chapter’s mini project?
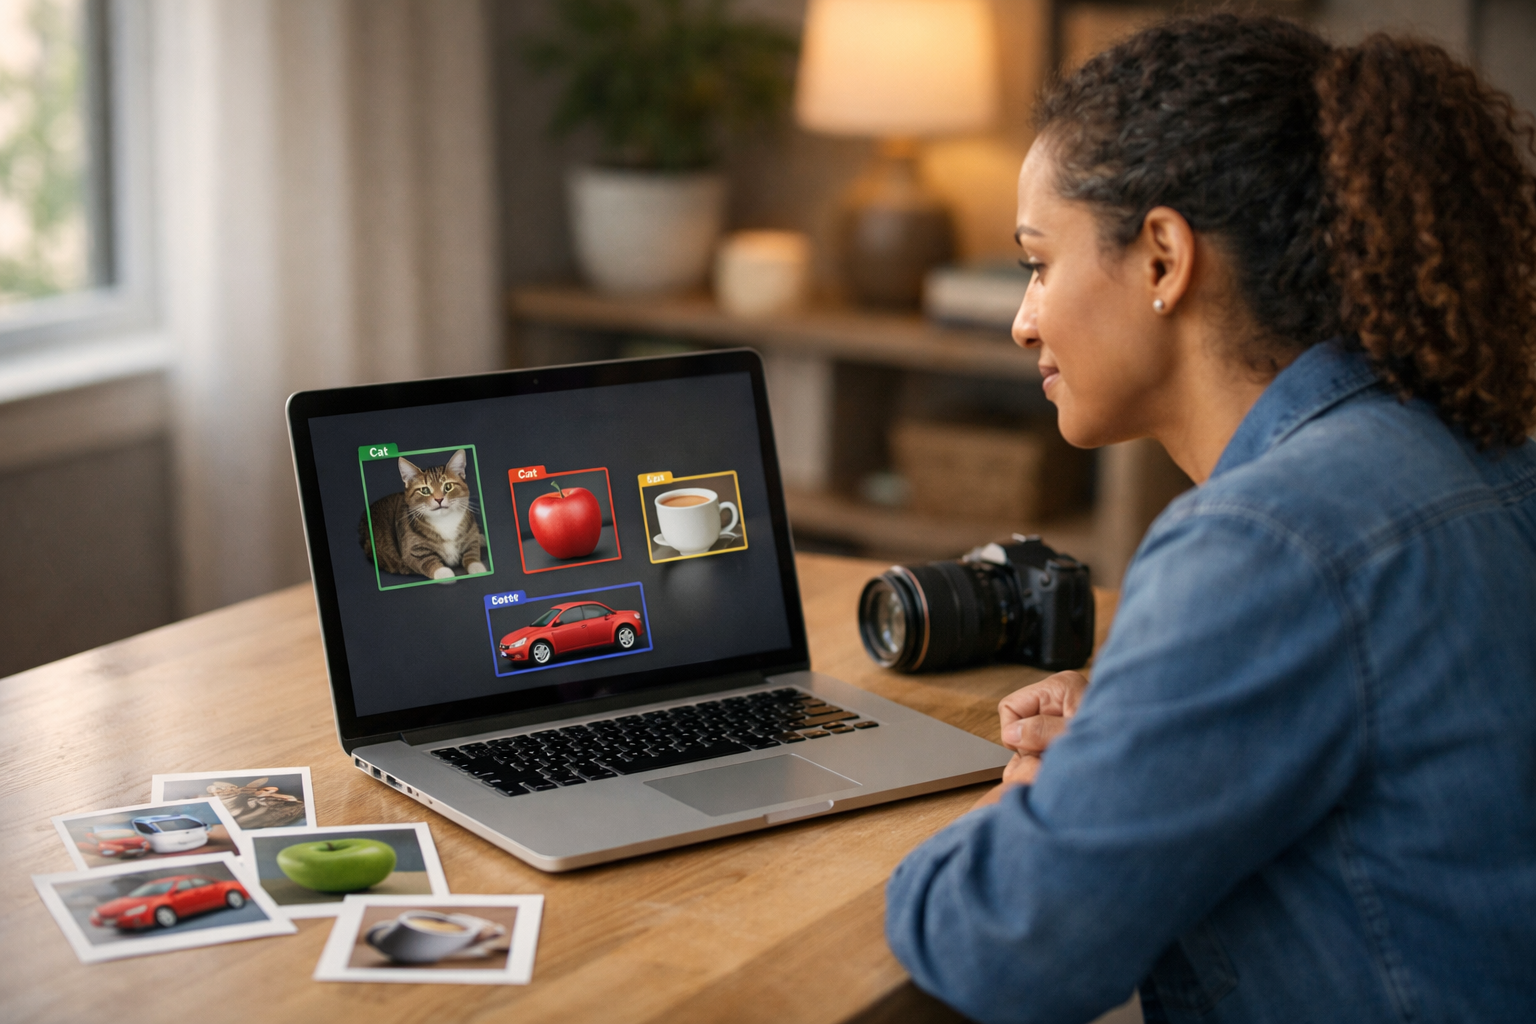
- Learning Evolved.
- Intelligence Amplified.