Computer Vision — Beginner
Learn to spot objects in images and video from zero
This beginner course is a short, book-style introduction to one of the most useful areas of computer vision: object detection. If you have ever wondered how apps can find faces, how cameras can notice people and cars, or how AI can spot items inside a photo or video frame, this course is for you. It is designed for complete beginners, so you do not need any background in artificial intelligence, coding, math, or data science.
The course uses plain language and a step-by-step teaching style. Instead of throwing difficult terms at you, it starts with the basics: what a digital image is, how a computer reads visual information, and what it means for an AI system to recognize and locate an object. By building from first principles, you will understand not just what object detection does, but why it works the way it does.
Many AI courses assume too much. This one does not. Each chapter builds on the previous chapter in a clear sequence, like a short technical book. You will begin with simple ideas, then move into model outputs, data basics, testing tools, result quality, and finally a small end-to-end project. This structure helps you learn with confidence instead of confusion.
By the end of the course, you will understand the main parts of a beginner object detection workflow. You will know the difference between image classification and object detection, how models identify more than one object in a single image, and why outputs often include bounding boxes and confidence values. You will also learn why data quality matters so much and why AI systems can fail when images are blurry, dark, cluttered, or unusual.
You will practice reading model results in a realistic way. This is important because beginners often assume AI is either perfect or useless. The truth is in between. Good object detection depends on the task, the examples used, the image conditions, and the expectations of the user. This course helps you build that practical mindset early.
Object detection is not limited to still images. In later chapters, you will also see how the same basic ideas apply to video. A video is simply a sequence of images shown quickly. Once you understand how AI detects objects in one frame, it becomes much easier to understand detection across many frames. This makes the topic more useful for real-world settings such as security, retail, manufacturing, transport, and smart devices.
This course is suitable for curious individuals, teams exploring AI opportunities, and public sector learners who need a simple introduction to visual AI. It is especially helpful if you want to understand AI concepts before touching more advanced tools or code-based projects. If you are ready to begin, Register free and start learning at your own pace.
Because this course is focused and approachable, it works well as your first step into the wider world of computer vision. It gives you enough foundation to understand real object detection systems without overwhelming you. When you finish, you will be able to discuss object detection clearly, test simple tools with confidence, and complete a small beginner project that proves you understand the workflow.
If you want to continue exploring visual AI after this course, you can also browse all courses for more beginner-friendly topics. Start here, build strong basics, and discover how AI can learn to spot objects in both photos and video.
Computer Vision Engineer and AI Educator
Sofia Chen is a computer vision engineer who designs practical AI systems for image and video analysis. She specializes in teaching beginners how to understand AI with clear, step-by-step explanations and simple hands-on examples.
Object detection sounds technical, but the basic idea is very human. You look at a photo and can quickly say, “There is a dog on the sofa, a cup on the table, and a person near the window.” You are not only recognizing what is in the image. You are also noticing where each thing is. That is the heart of object detection: finding objects and naming them inside an image or video frame.
For complete beginners, this chapter builds the topic from first principles. We start with ordinary images, videos, pixels, and labels. Then we move toward the practical goal of object detection and how it differs from simpler computer vision tasks. Along the way, you will see how AI can find objects in everyday images, why video is really a sequence of pictures, and what common outputs like boxes, labels, and confidence scores actually mean.
This chapter also introduces an engineering mindset. In beginner tutorials, object detection can look magical: upload an image, get colored boxes, done. In real work, however, success depends on judgment. Is the image clear enough? Are the labels consistent? Is the model looking for the right categories? Is a low-confidence prediction useful or misleading? Good object detection is not just about running a model. It is about preparing the right inputs, reading outputs carefully, and understanding what the model can and cannot do.
By the end of this chapter, you should be able to explain object detection in everyday language, distinguish it from image classification, recognize why photos and videos must be converted into pixels and labels for machines, identify familiar real-world uses, and prepare yourself to test beginner-friendly models in later chapters.
Think of this chapter as your foundation. If you understand what detection is really trying to do, the tools and models in later chapters will feel far less intimidating.
Practice note for See how AI can find objects in everyday images: document your objective, define a measurable success check, and run a small experiment before scaling. Capture what changed, why it changed, and what you would test next. This discipline improves reliability and makes your learning transferable to future projects.
Practice note for Understand photos, video, pixels, and labels from first principles: document your objective, define a measurable success check, and run a small experiment before scaling. Capture what changed, why it changed, and what you would test next. This discipline improves reliability and makes your learning transferable to future projects.
Practice note for Learn the basic goal of object detection: document your objective, define a measurable success check, and run a small experiment before scaling. Capture what changed, why it changed, and what you would test next. This discipline improves reliability and makes your learning transferable to future projects.
Practice note for Identify simple real-world uses you already know: document your objective, define a measurable success check, and run a small experiment before scaling. Capture what changed, why it changed, and what you would test next. This discipline improves reliability and makes your learning transferable to future projects.
Practice note for See how AI can find objects in everyday images: document your objective, define a measurable success check, and run a small experiment before scaling. Capture what changed, why it changed, and what you would test next. This discipline improves reliability and makes your learning transferable to future projects.
Practice note for Understand photos, video, pixels, and labels from first principles: document your objective, define a measurable success check, and run a small experiment before scaling. Capture what changed, why it changed, and what you would test next. This discipline improves reliability and makes your learning transferable to future projects.
Artificial intelligence is a broad term for systems that perform tasks that seem intelligent, such as recognizing speech, writing text, or making predictions. Computer vision is the branch of AI that works with images and video. Its job is to help computers interpret visual information. In plain language, computer vision is about teaching a machine to work with pictures the way humans do, even if the machine gets there through math rather than eyesight.
Object detection is one of the most useful computer vision tasks because it combines recognition with location. A system does not simply say “this image contains a bicycle.” It says “there is a bicycle here,” usually by drawing a rectangle around it. That small difference is huge in practice. If a robot needs to pick up a bottle, or a traffic camera needs to notice a car in a lane, location matters as much as identity.
A helpful beginner analogy is this: image classification is like looking at a scene and answering with one overall label, while object detection is like placing sticky notes on each important thing in the scene. If a family photo contains three people and a dog, a classifier might say “people” or “family,” but a detector can mark each person and the dog separately.
One common mistake is assuming AI sees exactly as humans do. It does not. It learns statistical patterns from examples. If a model has mostly seen bright daytime street photos, it may struggle at night or in heavy rain. Good engineering judgment begins with realistic expectations. AI can be impressive, but it is sensitive to data quality, camera angle, lighting, motion blur, and the set of object categories it was trained to recognize.
As you continue through this course, keep your explanation simple: object detection means finding and labeling objects inside pictures or video. That one sentence will guide everything else you learn.
Humans talk about images in terms of scenes, shapes, colors, faces, and objects. Computers begin at a much lower level. A digital image is a grid of tiny picture elements called pixels. Each pixel stores numeric values that represent color. In a common RGB image, each pixel has three values: red, green, and blue. Together, millions of these values form the picture you see.
This matters because AI models do not receive “a cat on a chair” as input. They receive arrays of numbers. During training, the model learns patterns across those numbers. Certain arrangements of edges, textures, color transitions, and shapes become associated with labels like cat, chair, person, or cup. In other words, a model turns low-level pixel patterns into higher-level predictions.
Video works the same way, except it is a sequence of images shown quickly one after another. Each still image is called a frame. If a detector runs on video, it usually processes one frame at a time, sometimes with extra logic to connect detections across frames. For beginners, it is enough to remember that video is not fundamentally different from images. It is many images in order.
When preparing images and video clips for a basic workflow, practical details matter. Very small images may hide important objects. Very large images may slow processing. Blurry frames, poor lighting, and objects cut off at the edge often reduce performance. A beginner-friendly habit is to inspect sample inputs before running any model. Ask: can a human clearly see the object? Is it centered or tiny? Are there unusual reflections or shadows?
Another important concept is the label. A label is the category name attached to an object, such as person, bicycle, dog, or bottle. Labels must be consistent. If one training example uses “car” and another uses “vehicle” for the same kind of object, confusion can follow. Even at the beginner level, clean labels and sensible image quality are part of good machine learning practice.
It is tempting to say that if a model can detect an object, then it understands the image. That is not quite true. Detection is a useful form of visual recognition, but it is not full human-like understanding. A model may identify a person, suitcase, and car in a frame without understanding why the person is there, whether the suitcase belongs to them, or what will happen next.
This distinction helps you avoid overclaiming. In computer vision, seeing usually means extracting patterns from pixels and matching them to learned categories. Understanding is a stronger word. It includes context, relationships, intention, and common sense. Humans bring all of that naturally. AI usually does not, unless extra systems are added.
For example, imagine a photo of a kitchen table with a knife, bread, a plate, and a hand. An object detector can put boxes around each item. That is valuable. But it does not automatically know whether someone is making lunch, cleaning up, or setting the table. The detector sees objects, not the full story. This is why outputs should be interpreted carefully, especially in safety, retail, healthcare, or legal settings.
Another beginner mistake is assuming the most confident prediction is always correct. Confidence scores estimate how certain the model is based on what it has learned, but confidence is not truth. A model can be confidently wrong, especially when the image is unusual or outside the training data. Strong engineering judgment means checking examples visually, adjusting thresholds carefully, and remembering that model output is evidence, not certainty.
So what practical outcome should you aim for? Learn to describe model capability accurately. Say, “The model detects likely objects and their locations,” not, “The model fully understands the scene.” That wording is more precise, more honest, and more useful in real projects.
If image classification gives one overall answer about an image, object detection adds structure. It turns a picture into a list of detected items, each with a location and a label. Most beginner tools display this as a bounding box, which is a rectangle drawn around the object. Alongside the box, you often see the label and a confidence score such as 0.92 or 92%.
This extra information makes many applications possible. If a warehouse system needs to count boxes on a shelf, a single image label is not enough. If a driver-assistance system needs to notice pedestrians, it must know where they are. If a store camera needs to monitor a checkout area, location matters. Object detection gives a machine a workable map of important things inside the scene.
A simple workflow looks like this: choose an image or video frame, send it into a model, receive predicted boxes and labels, then review the results. In beginner-friendly tools, this may happen through a web app or notebook with almost no code. Your job is not only to press run. Your job is to judge whether the output makes sense. Are the boxes tight enough? Did the model miss small objects? Did it detect the same item twice? Did it confuse similar classes such as cat and dog, cup and bottle, or bus and truck?
Common outputs are easy to read once you know the parts:
A practical warning: beginners often focus only on pretty boxes. Do not ignore the confidence threshold, image quality, and category definitions. A detector is only useful if its outputs can support a real task, such as counting, alerting, tracking, or reviewing footage. The box is not the end result; it is the beginning of an action.
You have probably seen object detection already, even if you did not call it that. On phones, camera apps can detect faces and place focus boxes around them. Photo libraries can group pictures with people, pets, or food. Accessibility tools can describe nearby objects for users with visual impairments. Shopping apps can let you point your camera at an item and try to identify it.
In cars, object detection helps with driver assistance. Systems may detect other vehicles, lane-related objects, pedestrians, cyclists, and traffic signs. The exact technology differs between products, and no single detector can handle every condition perfectly, but the basic need is the same: identify important objects early enough to support decisions. In this context, missed detections and false alarms both matter, which is why testing in realistic conditions is essential.
In stores and warehouses, object detection can count products, monitor shelf stock, track packages, or flag activity in certain zones. A detector may help estimate whether a shelf is empty, whether a pallet is present, or whether a checkout area contains items to review. Again, the lesson is practical: the same core method can serve very different goals depending on the labels chosen and the environment in which images are collected.
These examples also reveal a key engineering truth: the “best” model depends on the job. A model that works well on clear phone photos may fail on security cameras with low light and odd angles. A general model trained on everyday objects may not detect specialized products in a warehouse. Beginners often assume there is one universal detector. In reality, model choice depends on use case, data, speed, hardware, and acceptable error rates.
When you notice object detection in the world, ask two questions: what objects must be found, and why does location matter? That habit will help you connect technical outputs to business or user value.
Now that you know what object detection really is, the next step is learning how to work with it in a beginner-friendly way. This course will not assume deep math or advanced programming. Instead, you will build intuition first, then practice simple workflows using accessible tools and readable outputs.
Your roadmap is straightforward. First, get comfortable with the problem definition. Be able to state the target objects clearly: person, car, bottle, package, and so on. Second, learn to inspect inputs before testing a model. Check whether your photos or video clips are clear, well framed, and relevant to the task. Third, run a detector using a simple tool such as a hosted demo, notebook, or beginner interface. Fourth, read the outputs carefully: labels, bounding boxes, and confidence scores. Fifth, compare predictions with what a human observer would expect.
As you practice, remember these engineering habits:
One common beginner mistake is jumping directly to custom training before understanding the basics. You will learn faster by first testing existing models and observing where they succeed or fail. That experience teaches you what “good enough” looks like and when more work is justified.
The practical outcome of this chapter is not just vocabulary. It is readiness. You are now prepared to look at an image or a video clip and think like a computer vision practitioner: What is the target object? How visible is it? What output would be useful? Which errors matter most? Those questions will guide every chapter that follows.
1. What is the basic goal of object detection?
2. How is object detection different from simple image classification?
3. According to the chapter, what is a video from a machine's point of view?
4. Which set of outputs is commonly produced by an object detection model?
5. What engineering lesson does this chapter emphasize about using object detection well?
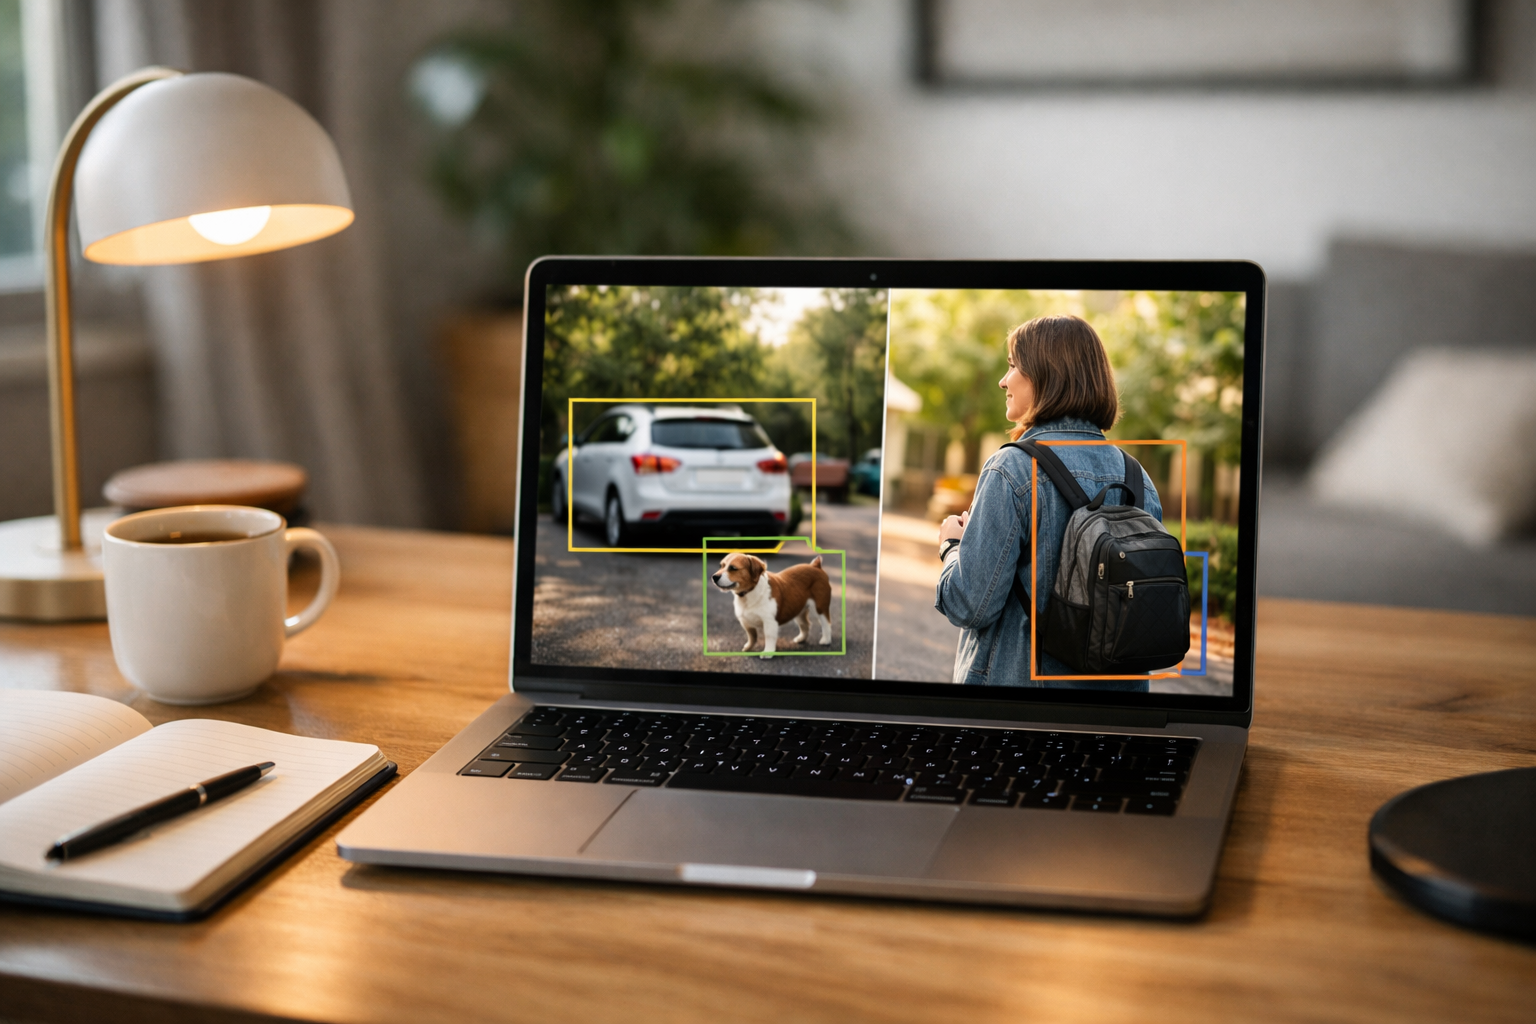
Object detection sounds advanced, but the basic idea is easy to picture. Imagine looking at a family photo and pointing to the dog, the bicycle, and the backpack. You are not only naming what is in the image. You are also noticing where each item is. That is the central job of object detection: find objects, place a box around them, and assign a label to each one. In this chapter, you will build a practical mental model for how this works without needing math-heavy explanations.
A beginner often mixes up three related tasks: classification, localization, and detection. Classification answers the question, “What is in this image?” It might say “cat” for an image that mainly shows a cat. Localization goes one step further and says, “The object is a cat, and it is roughly here,” usually with one box. Detection handles a more realistic scene and says, “There are three objects here: a cat on the sofa, a cup on the table, and a person in the background.” In real photos and video, there are usually several objects, not just one, so detection is the more flexible task.
To understand how an AI model finds objects, it helps to think in terms of patterns. The model does not see a “dog” the way a person does. It sees visual signals such as edges, shapes, textures, colors, and repeated arrangements of pixels. Over many training examples, it learns that certain patterns often appear together. A wheel shape beside another wheel shape and a metal frame pattern may suggest a bicycle. A face-like region, body outline, and clothing patterns may suggest a person. The model gradually learns useful visual clues from data.
When a model processes a photo, it scans the image and tries to match what it sees to patterns it has learned before. It may look at many possible regions and ask: does this area contain an object? If yes, which object category is most likely? Where should the box start and end? How sure am I? This is why object detection output usually contains three core parts: a label, a bounding box, and a confidence score. These three pieces together let a beginner read the result correctly.
In practical workflows, your job is not only to run a model. You also prepare images and videos so the model has a fair chance to succeed. Clear lighting, visible objects, sensible camera angles, and enough detail matter. Tiny, blurry, or heavily blocked objects are harder to detect. If you test a beginner-friendly detection tool and get poor results, that does not always mean the model is “bad.” Sometimes the image is too dark, the object is too small, or the object category was never part of the model’s training set.
Engineering judgment starts here. If you are checking whether a model can detect cars in street photos, make sure the cars are visible and not just distant dots. If you are testing a video clip, pick frames where the object is actually present and not hidden by motion blur. If the same object appears many times, expect multiple boxes. If the scene is crowded, boxes may overlap. Reading results carefully matters as much as producing them.
Another common beginner mistake is trusting every box equally. A model may produce several guesses with different confidence scores. Some boxes are strong predictions. Others are weak hints. A practical user learns to ask: Does the box actually cover the object? Is the label sensible? Is the confidence high enough for my task? In a casual demo, a lower-confidence guess may be acceptable. In a business workflow, such as counting helmets or finding packages, you may require stricter confidence thresholds and cleaner images.
By the end of this chapter, you should be able to look at a simple detection result and explain what the model believes is present, where it is located, and how certain the model appears to be. That skill is the foundation for using beginner-friendly tools well. You do not need to build a model from scratch yet. First, you need to become comfortable reading what the model is telling you and noticing when its answer makes practical sense.
An object detection model begins with patterns, not human concepts. When you look at a photo, you can instantly say, “That is a dog near a chair.” A model reaches a similar result in a very different way. It analyzes pixel patterns: light and dark regions, edges, curves, repeated textures, and shapes that frequently appear together. During training, the model sees many labeled examples. Over time, it learns that certain combinations of visual features often belong to the same object category.
Think of the model as building a library of visual clues. For a bicycle, useful clues might include two circular wheel-like patterns, a frame structure between them, and handlebars above. For a face, clues may include eyes, nose, mouth, and an oval arrangement. The model does not memorize one exact picture. Instead, it learns flexible patterns that can still work when the object is larger, smaller, partly turned, or seen in different lighting.
When you run detection on a new image, the model checks many areas and asks practical questions: is there an object here, what object might it be, and where are its boundaries? This is why detection can feel more advanced than simple classification. A classification model may only answer “dog,” but a detection model can say, “There is a dog in the lower-left area, and a chair near the center.”
For beginners, a helpful habit is to inspect the image the way a model might. Is the object clear? Is it large enough? Does it stand out from the background? If the object is tiny, blurry, or hidden, detection becomes harder. Good testing starts with good inputs. Choose images where objects are visible and categories are realistic for the model you are using.
A bounding box is the rectangle drawn around an object to show its location. It is one of the most recognizable parts of an object detection result. If the model detects a cat, it usually places a box around the cat and adds a label nearby. The box is not magic. It is simply a practical way to say, “The model believes the object is in this area.”
Bounding boxes are useful because they are simple and fast to create, store, and display. In many beginner tools, the box is defined by four values: the left edge, top edge, width, and height. Some systems store the top-left and bottom-right corners instead. You do not need deep math to read this. Just remember that the box marks location, not identity. The label tells you what the object is supposed to be.
A common beginner mistake is assuming a box must be perfectly tight to be correct. In reality, boxes are often approximate. One box may include a little background around the object. Another may miss a small part, such as the tail of an animal or the handle of a mug. Small imperfections do not always mean failure. The main question is whether the box covers the object clearly enough to be useful.
In practical work, box quality matters. If you are counting products on a shelf, loose boxes may still be acceptable. If you are measuring where an object begins and ends very precisely, a rough box may not be enough. This is where engineering judgment comes in. Ask whether the box is fit for your task, not whether it is visually perfect in every case.
A label is the model’s name for the detected object category. Common labels include person, car, dog, cup, or bicycle. The label tells you what the model thinks the object is, based on the categories it was trained to recognize. This is important: a model cannot reliably label categories it never learned. If a model was trained to detect cars, people, and buses, it may completely miss a skateboard or mislabel it as something else.
Beginners often expect labels to match everyday language exactly. But model labels depend on the dataset and tool. One system may use “cell phone,” another may use “mobile phone,” and another may use a broader category like “phone.” This does not mean one is wrong. It means labels come from the model’s training setup. When you test beginner-friendly tools, always check which categories are supported before judging the result.
Another practical point is that labels can be confused when objects look similar. A wolf statue might be labeled as a dog. A toy car might be labeled as a car. A backpack viewed from an unusual angle might be missed entirely. The model is making a best guess from visual patterns, not understanding the full scene the way a person does.
When reviewing results, do two checks. First, is the label in the model’s known category list? Second, does the visible object reasonably match that label? This simple habit prevents many misunderstandings. Good users of object detection do not just accept labels; they compare them with what is actually visible in the image and the known limits of the model.
A confidence score is the model’s estimate of how likely a prediction is to be correct. It is usually shown as a decimal such as 0.92 or a percentage such as 92%. In plain language, it means, “I am fairly sure this box contains this object.” A higher score usually suggests a stronger prediction, while a lower score suggests more uncertainty.
This does not mean confidence is the same as truth. A model can be highly confident and still be wrong. It can also be less confident and still be correct. That is why confidence should guide your judgment, not replace it. Beginners sometimes assume that anything above 50% is good and anything below is bad. Real use is more thoughtful than that. The right threshold depends on your goal.
For a casual demo, you may want to show more possible detections, even weak ones, so a lower confidence threshold is acceptable. For a practical workflow, such as monitoring safety equipment or counting inventory, you may want fewer false alarms, so you raise the threshold. This reduces weak guesses but may also hide some true objects. There is always a trade-off.
When using beginner-friendly tools, try running the same image at different thresholds. Notice what changes. At a low threshold, you may see more boxes, including some wrong ones. At a high threshold, you may see cleaner results but miss small or unclear objects. This simple experiment teaches an important lesson: object detection is not only about the model. It is also about choosing settings that match your task and your tolerance for mistakes.
This section is where the difference between classification, localization, and detection becomes especially clear. If an image shows one large apple on a plain background, a classification model may simply say “apple.” A localization model may say “apple” and draw one box around it. But if a kitchen photo contains apples, bananas, mugs, and a person’s hand, object detection is the better fit because it can identify multiple objects at once.
Real-world images are usually messy. Objects overlap, appear at different sizes, and sit in cluttered backgrounds. A dog may be partly behind a sofa. A person may hold a phone that is very small in the frame. A shelf may contain many similar items close together. Detection models are designed for these situations, but they are not perfect. Crowded scenes are harder than simple scenes.
When reading outputs, remember that one image can contain several valid detections of the same category. A street image may contain five cars and three people, each with its own box and score. Beginners sometimes think the model should return only one best answer, but that is classification thinking. Detection is about finding multiple instances.
Video follows the same idea, frame by frame. The model examines each frame or selected frames and predicts objects in each one. In practice, prepare video clips that are stable enough to view clearly. Strong motion blur, poor lighting, or fast camera movement can reduce detection quality. If you are testing a model, short clips with clear, visible objects are better than long chaotic footage.
Reading a detection result correctly is a skill. Start with the image itself before looking at the model output. Ask: what objects are clearly visible to a human? Next, look at each predicted box one at a time. For every box, read the label, inspect the box position, and note the confidence score. This simple order helps prevent rushed conclusions.
Suppose a result shows “person 0.95” around someone standing near a bike, “bicycle 0.88” over the frame and wheels, and “dog 0.41” near a shadow on the ground. A practical reading would be: the model is strongly confident about the person and bicycle, but only weakly suspects a dog. You would not treat all three predictions as equally trustworthy. The low-score detection deserves extra caution.
Then check whether the boxes fit the visible objects. Does the bicycle box cover most of the bike, or only one wheel? Does the person box include the whole person, or is it shifted into the background? A correct reading combines all three signals: the label, the box quality, and the confidence. Looking at only one of these can lead to mistakes.
Finally, connect the output to your purpose. If your goal is simply to demonstrate that the model can recognize common objects, the result may be good enough. If your goal is to count items accurately or trigger an action in software, weak or messy detections may not be reliable enough. This final step is the heart of engineering judgment: not just asking whether the model predicted something, but whether the prediction is useful for the job you want done.
1. What is the main job of object detection?
2. How is detection different from classification?
3. According to the chapter, what does a model learn to look for in images?
4. Which set of outputs is the core of a typical object detection result?
5. A model gives a box around a possible helmet with low confidence. What is the best beginner response based on the chapter?
When beginners first hear about object detection, they often imagine the model as the star of the show. In practice, data is usually the real foundation. A model can only learn from the examples you give it. If those examples are clear, varied, and correctly labeled, even a beginner-friendly workflow can produce useful results. If the examples are confusing, inconsistent, or too limited, the model will struggle no matter how advanced the software sounds.
In this chapter, we move from the idea of object detection into the practical question of what the system learns from. Think of training data as a stack of examples that teaches the AI what to notice. If you want a model to detect cups, helmets, or cars, you must show it many images of those objects in different sizes, angles, backgrounds, and lighting conditions. This is why AI needs examples to learn: it does not understand objects the way a person does. It finds patterns in pixels and links those patterns to labels you provide.
For object detection, the data is more than just pictures. It also includes the labels and locations of the objects in those pictures. That is what makes object detection different from simple image classification. In image classification, one image might be labeled only as cat or dog. In object detection, the system must say what is present and where it appears. The quality of both the image and the labeling matters.
A beginner should also develop engineering judgment early. More data is often helpful, but not all data is equally useful. A hundred repetitive images taken from the exact same angle may teach less than twenty carefully varied examples. Good datasets usually include realistic variety and consistent labeling. They also reflect the conditions where the model will eventually be used, such as indoor scenes, outdoor scenes, mobile phone photos, security camera frames, or short video clips.
Another key idea in this chapter is annotation. Annotation simply means marking the objects you want the AI to learn. In object detection, this is usually done by drawing a box around each object and attaching the correct class label. It sounds simple, but small mistakes here can create big problems. If one image labels a mug as cup and another labels a similar object as mug, the model receives mixed signals. If the boxes are too loose, too tight, or missing half the objects, the model learns inaccurate patterns.
We will also look at how to prepare a tiny beginner dataset. You do not need thousands of images to understand the workflow. A small practice dataset can teach the full pipeline: collecting examples, reviewing image quality, annotating objects, and splitting the data into training, validation, and test sets. This gives you hands-on experience before you ever touch a larger project.
By the end of this chapter, you should be able to judge whether a set of images is useful for learning, explain what annotation does, and organize a small dataset in a way that supports beginner object detection experiments. That practical foundation will make later chapters much easier, because you will understand that successful computer vision starts with disciplined data preparation rather than mystery or magic.
Practice note for Understand why AI needs examples to learn: document your objective, define a measurable success check, and run a small experiment before scaling. Capture what changed, why it changed, and what you would test next. This discipline improves reliability and makes your learning transferable to future projects.
Practice note for Explore good and bad image data: document your objective, define a measurable success check, and run a small experiment before scaling. Capture what changed, why it changed, and what you would test next. This discipline improves reliability and makes your learning transferable to future projects.
Practice note for Learn the idea of annotation in simple terms: document your objective, define a measurable success check, and run a small experiment before scaling. Capture what changed, why it changed, and what you would test next. This discipline improves reliability and makes your learning transferable to future projects.
Many beginners approach AI as if the model contains hidden intelligence that can recognize anything automatically. In reality, object detection systems are trained from examples. The model does not begin with common sense. It does not know that a bicycle still counts as a bicycle when partly hidden behind a car, or that a bottle photographed at night is the same object as a bottle photographed in daylight. It learns those patterns only if the training data includes enough examples.
This is why data often matters more than model hype. If your images are badly chosen or poorly labeled, the model learns the wrong lessons. A fancy tool cannot fully rescue weak data. On the other hand, clear and consistent examples can make beginner-friendly tools perform surprisingly well. In engineering terms, the dataset defines the task. It tells the model what objects matter, what counts as a correct example, and which visual situations it should expect.
A useful way to think about data is to compare it to teaching a child with flashcards. If every flashcard shows the same red apple on a white table, the child may struggle to recognize green apples, apples in a bag, or apples under dim light. The lesson is too narrow. AI behaves in a similar way, except it is even more literal. If the examples are unbalanced or repetitive, the model may memorize details that do not actually define the object.
For object detection, the need for examples is even stronger than for image classification. The model must not only learn the appearance of an object, but also learn how to locate it inside an image. That means your examples should include different positions, sizes, partial views, crowded scenes, and clean scenes. A dataset with only centered, large objects will not prepare the model well for real-world images where objects are small or near the edge of the frame.
As a beginner, the practical outcome is simple: spend real time looking at your data before you think about training settings. Ask yourself what the model will see, what it might miss, and whether the examples reflect the actual situation you care about. That habit is one of the best early skills in computer vision.
To build even a tiny object detection project, you need to understand three basic pieces: images, classes, and examples. The images are the actual photos or video frames. The classes are the object categories you want the model to detect, such as person, car, dog, or helmet. The examples are the labeled instances of those classes inside the images.
Beginners sometimes confuse the number of images with the number of examples. One image can contain many examples. A street photo might include five cars, three people, and two bicycles. In object detection, each visible object that you label becomes an example. This matters because a small number of images can still produce a useful number of examples if the scenes are rich and varied.
Choosing classes is also an exercise in clarity. Your labels should be simple, distinct, and consistent. If you are building a beginner dataset, it is better to detect bottle than to split the category into plastic bottle, glass bottle, and sports bottle too early. More classes make the problem harder and increase the chance of labeling confusion. Start with categories that are easy to tell apart visually and meaningful for your goal.
Examples should cover normal variation. If your class is cup, collect cups that look different from one another. Include different colors, shapes, sizes, camera angles, and backgrounds. Include close-up views and distant views. Include clean scenes and cluttered scenes. This helps the model learn the general visual idea of the class rather than memorizing one object.
It is also worth noting that video clips can be turned into image examples. A short clip contains many frames, and those frames may give you different positions and object scales. However, frames taken one after another can be almost identical. That means you should sample thoughtfully instead of extracting every frame. Otherwise, you may create a dataset that looks large but contains very little real variety.
In practical terms, if you can name your classes clearly and collect examples that show variety, you are already doing an important part of the engineering work that supports strong object detection.
Not all images are equally useful. Good data helps the model focus on the true visual patterns of an object. Messy data hides those patterns or introduces confusion. As a beginner, you do not need perfect images, but you do need images that match your task and are labeled consistently.
Good image data usually has enough diversity to represent real use. For example, if you want to detect packages on a warehouse floor, useful images might include bright and dim lighting, different box sizes, partial overlap, different camera heights, and some empty scenes. Empty scenes can be valuable because they teach the model that not every image contains the target object. This reduces false alarms.
Messy data often appears in a few common forms. First, there are blurry, dark, or extremely low-resolution images where the object is barely visible. Second, there are irrelevant images that do not match the task at all. Third, there are repeated near-duplicate images that add volume without adding variety. Fourth, there are class mistakes, such as labeling the same kind of object with different names. Finally, there is selection bias, where the dataset includes only easy examples and ignores realistic difficulty.
Engineering judgment matters here. You do not automatically throw away every imperfect image. If your real environment includes motion blur or low light, then some imperfect images may actually be useful. The goal is not to make the dataset beautiful. The goal is to make it representative. Beginners often make the mistake of collecting only the clearest images, then wonder why the model struggles on ordinary phone photos or surveillance frames.
A simple review process helps. Open your image folder and scan through it manually. Ask whether the object is visible, whether the scene matches the intended use, and whether the collection feels repetitive. This quick quality check can prevent many downstream problems.
Annotation is the process of telling the AI what is in each image and where it is located. In beginner object detection projects, this usually means drawing a bounding box around each object and assigning it a class label. For example, you might draw a rectangle around a bottle and label it bottle. That annotation becomes the learning signal.
This step may sound mechanical, but it strongly affects model quality. A model can only be as precise as the supervision it receives. If boxes are sloppy, labels are inconsistent, or objects are missed, the model learns mixed rules. Imagine one image where the box covers the full dog, another where it includes half the background, and another where the tail is cut off. The model now sees three different definitions of what a correct dog box looks like.
Good annotation follows a few practical principles. First, use one consistent class name for each object type. Do not switch between near-synonyms. Second, make boxes tight enough to cover the object without too much empty background. Third, label all relevant visible objects, not only the largest or easiest ones, unless your project has a deliberate rule to ignore small instances. Fourth, decide early how to handle difficult cases such as heavy occlusion, reflections, or truncated objects at the edge of the image.
Beginners should expect annotation to be slower than collecting images. That is normal. It is careful work. Many beginner-friendly tools make this easier with click-and-drag interfaces, class lists, and export options. The tool matters less than the consistency of your decisions.
Common mistakes include forgetting objects, using different labels for similar items, drawing oversized boxes, and changing annotation rules halfway through a dataset. A useful habit is to annotate a small batch first, review it, and only then continue. If possible, look back at your labels after a short break. Errors become easier to spot with fresh eyes.
The practical outcome is important: annotation turns a folder of pictures into a teachable object detection dataset. Without annotation, your images are just raw material. With annotation, they become examples the model can learn from.
Once you have images and annotations, you need to organize them into three groups: training, validation, and test sets. Beginners sometimes place all images into one folder and assume the tool will handle the rest. It is better to understand the purpose of each split.
The training set is the data the model learns from directly. During training, the model adjusts itself based on these examples. The validation set is used during development to check how well the model is performing on data it has not trained on. This helps you compare settings and notice when the model starts memorizing rather than generalizing. The test set is kept aside until the end for a more honest final evaluation.
A simple rule is that the validation and test images should not be near-duplicates of training images. If you extract many frames from one short video, similar frames can easily leak across splits. Then the model appears to perform well simply because it sees almost the same scene in all sets. This is a common beginner mistake.
For a small project, exact percentages are less important than clean separation. Many beginners use something close to 70% training, 20% validation, and 10% test, or 80%, 10%, and 10%. The key is balance. Try to make sure each class appears in each split, and that each split reflects the range of conditions in your dataset.
Think of the three sets as different roles in a workshop. Training is for practice, validation is for checking progress, and test is for the final demonstration. If you use the test set repeatedly to adjust your choices, it stops being a true test. Save it for the end.
The practical benefit of proper splitting is trust. When the model performs well on validation and test data, you can be more confident that it learned useful visual patterns rather than memorized your examples.
You do not need a huge project to learn the workflow. A small practice dataset is one of the best ways to understand object detection from end to end. Choose one or two simple classes that are easy to find around you, such as cup and bottle. Keep the scope small so you can focus on doing the basics well.
Start by collecting a modest set of images, perhaps 30 to 60 photos. Use a phone camera if needed. Take pictures from different distances and angles. Include different backgrounds such as a desk, kitchen counter, shelf, or floor. Vary the lighting: daylight, indoor light, and slightly dim scenes. Include some images with no target object at all if your tool supports that workflow, because those images teach the model not to detect objects everywhere.
Next, review the images and remove the least useful ones. Throw out images that are accidentally too dark, fully blurred, or nearly identical to others unless those conditions match your real goal. Then annotate each target object carefully using a beginner-friendly annotation tool. Use consistent labels and box sizes. If you have both cups and bottles in one image, label them both.
After annotation, split the dataset into training, validation, and test sets. Keep similar shots together when possible so near-duplicate images do not leak across splits. Then check class balance. If nearly all bottle images are in training and only one appears in validation, your validation result will not be very informative.
This tiny project teaches the full beginner workflow: examples, image quality, annotation, and dataset splitting. Just as importantly, it builds intuition. You begin to see why object detection depends on disciplined data preparation. Later, when you use models and read outputs like labels, boxes, and confidence scores, you will understand where those outputs come from and why good input data makes them more reliable.
1. Why does an object detection model need many examples of the same object in different conditions?
2. What makes object detection different from simple image classification?
3. Which dataset would likely be more useful for beginner object detection practice?
4. In this chapter, what does annotation mean?
5. What is the main benefit of preparing a tiny beginner dataset?
Now that you understand the basic idea of object detection, this chapter moves from concept to hands-on testing. This is where object detection starts to feel real. Instead of only talking about labels and boxes, you will use a beginner-friendly tool to run detections on images and short video clips, inspect what the model predicts, and notice where the model behaves well or poorly. For a beginner, testing is one of the most useful stages because it quickly shows what a model can actually do in practice.
When people first try object detection, they often expect the model to behave like a perfect digital pair of eyes. In reality, even good models make mistakes. They may miss small objects, place boxes loosely around items, or assign labels with low confidence when a scene is dark or crowded. Testing helps you build engineering judgment. That means learning to ask practical questions: Was the image clear enough? Was the object too far away? Did the model confuse two similar categories? Is the confidence score high enough to trust?
In this chapter, you will follow a simple workflow. First, choose a tool that lets beginners upload media and see predictions without complicated setup. Next, run detection on one photo to understand the basic output. Then compare several photos to see how lighting, angle, distance, and clutter affect the results. After that, try a short video clip so you can observe how detections change from frame to frame. Finally, save your findings and review them in an organized way. This is how you move from casual experimenting to purposeful model testing.
As you read, keep one important idea in mind: testing is not only about proving a model works. It is also about discovering the limits of the model. Those limits matter just as much as the successful detections. If you can clearly describe both strengths and weaknesses, you are already thinking like a computer vision practitioner.
A practical beginner workflow usually includes the following steps:
By the end of this chapter, you should be able to use beginner-friendly tools to test an object detection model, upload images and inspect predictions, try detection on short video clips, and explain common model behavior in simple terms. These skills connect directly to real-world computer vision work because every model, from a small demo to a production system, must be tested before it can be trusted.
Practice note for Use a simple beginner-friendly tool to run detections: document your objective, define a measurable success check, and run a small experiment before scaling. Capture what changed, why it changed, and what you would test next. This discipline improves reliability and makes your learning transferable to future projects.
Practice note for Upload images and inspect predictions: document your objective, define a measurable success check, and run a small experiment before scaling. Capture what changed, why it changed, and what you would test next. This discipline improves reliability and makes your learning transferable to future projects.
Practice note for Try detection on short video clips: document your objective, define a measurable success check, and run a small experiment before scaling. Capture what changed, why it changed, and what you would test next. This discipline improves reliability and makes your learning transferable to future projects.
Practice note for Notice strengths and weaknesses in model behavior: document your objective, define a measurable success check, and run a small experiment before scaling. Capture what changed, why it changed, and what you would test next. This discipline improves reliability and makes your learning transferable to future projects.
Practice note for Use a simple beginner-friendly tool to run detections: document your objective, define a measurable success check, and run a small experiment before scaling. Capture what changed, why it changed, and what you would test next. This discipline improves reliability and makes your learning transferable to future projects.
The easiest way to begin testing object detection is to use a tool that removes as much setup as possible. For beginners, the best platform is usually one with a web interface, drag-and-drop upload, and immediate visual output. Instead of writing code first, you can focus on understanding what the model is seeing. A good beginner tool typically shows the image, draws bounding boxes around detected objects, lists predicted labels, and displays confidence scores next to each result.
When choosing a platform, keep your goal simple: you want to observe model behavior clearly. That means the interface should help you inspect predictions instead of hiding them. If the platform makes it hard to zoom in, compare images, or review confidence values, it becomes harder to learn from the test. For this chapter, imagine using any beginner-friendly detection demo, cloud tool, or educational notebook that lets you upload your own image or short video and view the outputs visually.
There are a few practical features worth looking for. First, make sure the tool supports common file types such as JPG, PNG, and MP4. Second, check whether it uses a pre-trained model with everyday object categories, because that gives you a better chance of seeing recognizable labels. Third, look for controls such as confidence threshold sliders, because these help you understand why some detections appear and others disappear. Fourth, make sure the platform responds quickly enough that testing feels interactive.
A common beginner mistake is choosing a tool that is technically powerful but too complex. If you spend all your time installing libraries or debugging file paths, you are not yet learning object detection itself. Start with the simplest working option. Once you can comfortably interpret outputs, you can move to more advanced tools later.
Good engineering judgment starts here. Choose a platform that matches your current skill level and testing purpose. If your task is basic exploration, prioritize clarity and convenience. If your task later becomes dataset evaluation or model comparison, then stronger reporting features may matter more. For now, the right tool is the one that lets you run a detection in minutes and understand what the model predicted without confusion.
Testing one clear photo is the best place to start because it reduces variables. Pick an image with one or two obvious objects, such as a car on a road, a dog in a yard, or a person holding a bicycle. Upload the image into your chosen tool and run the model. In a few seconds, you should see boxes drawn around recognized objects, label names such as person or car, and confidence scores such as 0.92 or 92% depending on the interface.
At this stage, slow down and inspect the prediction carefully. Do not just look at whether the label seems correct. Also examine the box itself. Does it cover most of the object, or is it too large or too small? Is the label exactly right, or only approximately right? Is the confidence high enough to feel reliable? These are the core outputs of beginner object detection: labels, boxes, and confidence scores. Reading them accurately is one of the course outcomes, so this first photo matters more than it may seem.
Suppose the model detects a dog with 95% confidence and the box closely matches the dog’s body. That is a strong result. Suppose instead it labels the dog as a cat with 52% confidence. That lower score is a clue that the model is less certain. Confidence does not guarantee truth, but it gives you a practical signal about how strongly the model believes its own prediction.
One useful beginner habit is to ask three questions every time you test a photo: What did the model detect? How sure was it? How well did the box fit? This habit helps you move from passive viewing to active evaluation. Another good habit is to zoom in on small objects. Many errors become easier to understand once you notice that the object was tiny, partly hidden, or blurred.
Common mistakes in single-photo testing include using a cluttered image too early, ignoring confidence values, and assuming a wrong output means the entire model is bad. A single image is only one example. The purpose here is to learn the interface and understand how to inspect predictions, not to reach a final judgment about the whole model.
After testing one image, the next step is comparison. Object detection becomes much easier to understand when you run the same model on several photos that vary in clear ways. For example, you might test one bright outdoor image, one dim indoor image, one close-up object, and one scene where the object appears far away. By comparing the outputs, you begin to see patterns rather than isolated successes or failures.
This is where practical workflow matters. Try to change one condition at a time when possible. If you want to study distance, use photos of the same type of object at different distances. If you want to study lighting, compare a well-lit image with a darker version. If you want to study background clutter, compare a simple plain background with a crowded scene. This approach helps you identify why the model behaved differently.
As you inspect predictions, notice the strengths and weaknesses. A model may perform well on large centered objects but struggle when objects are small or partially hidden. It may detect people reliably but miss less common categories. It may produce accurate boxes in one image and messy overlapping boxes in another. These observations are not random details. They are evidence about the model’s operating conditions.
For beginners, comparison testing is often the moment when model behavior becomes intuitive. You start seeing that object detection is not magic. It depends heavily on image quality, viewpoint, object size, and similarity between the test image and the data the model likely learned from. If your photo looks unusual compared with common internet photos, the model may be less reliable.
A practical way to compare several photos is to keep a short testing log. For each image, write the file name, the main objects present, whether the detections were correct, and any likely reason for errors. Over time, this builds a simple but valuable record. Good engineering judgment grows from repeated structured observation, not from one impressive screenshot.
Images are a great starting point, but short video clips reveal something extra: consistency over time. In a video, the model does not just detect once. It must detect object after object across many frames as motion, angle, and lighting shift slightly. Upload a short clip, ideally only a few seconds long, showing one or two visible objects moving slowly or being viewed by a moving camera. A simple clip is better than a chaotic one for first tests.
When the model runs on video, the platform may process the clip frame by frame and draw boxes on each frame. Watch for whether the boxes remain stable or flicker. A stable box that follows the same object across frames suggests the model is handling the scene reasonably well. A flickering box, disappearing label, or rapidly changing confidence score can suggest that the object is borderline difficult for the model to recognize.
Short video testing teaches an important lesson: a model can appear correct in one frame and still feel unreliable in motion. For example, a bicycle might be detected clearly when fully visible but lost when partly hidden by a person or turned sideways. A car may be detected strongly in bright sunlight but weakly when entering shadow. Video makes these transitions visible.
There are also practical constraints. Video takes longer to process than a single photo, and some beginner tools sample only selected frames instead of every frame. That is fine for learning, as long as you understand what the tool is doing. If detections seem inconsistent, ask whether the inconsistency comes from the model, the video quality, or the platform’s processing method.
A common beginner mistake is choosing a video that is too long, too shaky, or too crowded. Start with a short, simple clip so you can focus on the model’s outputs rather than the complexity of the scene. Video testing is not about making the task difficult immediately. It is about learning how detections behave as conditions change from moment to moment.
One of the most valuable beginner skills is learning to explain model behavior calmly and clearly. When the model gets a detection right, ask why it was likely easy. Usually the object was large enough, clearly visible, well lit, and similar to examples the model has likely seen before. When the model gets a detection wrong, resist the urge to call it random. Most errors have understandable causes.
Common reasons for correct detections include sharp images, familiar object categories, clean backgrounds, and limited overlap between objects. Common reasons for mistakes include blur, low resolution, unusual viewing angles, partial occlusion, shadows, reflections, or confusingly similar objects. A model may also detect an object but assign the wrong label because two categories share visual features. For example, a truck might be labeled as a bus, or a cup might be missed when partly hidden behind a hand.
It is also important to separate different kinds of errors. Sometimes the label is right but the box is poor. Sometimes the box is reasonable but the confidence is low. Sometimes the model misses the object entirely. Sometimes it detects something that is not really there at all. These are different failure types, and each tells you something different about model performance.
Engineering judgment means not overreacting to either successes or failures. A few good detections do not prove the model is dependable in all settings. A few mistakes do not mean the model is useless. Instead, look for repeatable patterns. Does the model often miss small objects? Does it do better outdoors than indoors? Does confidence drop in dim lighting? Pattern-based thinking is much more valuable than emotional reactions to single examples.
As a beginner, your goal is not to debug the model internals. Your goal is to observe carefully and describe practical strengths and weaknesses in plain language. That skill is essential because every later improvement in computer vision starts with clear testing observations.
Testing becomes much more useful when you save your results instead of relying on memory. Many beginner tools let you download annotated images or videos with boxes already drawn on them. If that option exists, use it. Save the original file and the detected version together. This makes side-by-side review much easier later. If downloading is not supported, take screenshots and name them carefully.
Organization matters more than beginners often expect. Create a simple folder structure such as single-photo-tests, photo-comparisons, and video-tests. Inside each folder, use descriptive file names that capture the test condition, such as dog-bright-outdoor or car-low-light. Alongside the media, keep a small note file or spreadsheet with columns for object present, model detections, confidence values, and your comments. This turns casual testing into a lightweight evaluation process.
When reviewing saved results, look for patterns rather than isolated examples. You may notice that boxes are consistently too loose around certain objects, or that confidence scores are lower in indoor scenes. You may find that video detections drop when motion becomes fast. These patterns help you form practical conclusions about model strengths and weaknesses.
Another good habit is to record threshold settings and tool version if the platform exposes them. If you later change the confidence threshold, your results may look different. Without notes, it becomes hard to compare runs fairly. Even simple beginner experiments benefit from repeatability.
The practical outcome of saving and reviewing results is confidence in your own observations. You are no longer saying, "I think the model struggled a bit." You can say, "Across five dim indoor images, the model missed small objects and confidence dropped below 60%." That is a much stronger statement. It shows that you used a beginner-friendly tool, inspected predictions on images and video, and learned to evaluate model behavior with evidence. That is exactly the testing mindset this chapter is meant to build.
1. What is the main purpose of testing a beginner object detection model in this chapter?
2. Why should a beginner start by testing with a clear photo first?
3. Which factor does the chapter say can affect detection results when comparing several photos?
4. What is the value of testing a short video clip?
5. According to the chapter, what does thinking like a computer vision practitioner involve?
By this point, you have seen that object detection can label items in an image and place boxes around them. That sounds simple when the examples are clean, bright, and carefully chosen. In real use, however, results are rarely perfect. A model may detect one object well and completely miss another. It may place a box slightly off target, confuse two similar items, or report an object that is not really there. This chapter helps you understand why that happens and what a beginner can do about it.
A useful way to think about object detection is this: the model is making its best guess based on patterns it learned before. It does not truly understand the scene like a person does. It notices shapes, textures, colors, edges, and common arrangements. When those patterns are clear, detection often works well. When the scene becomes messy, dark, blurry, crowded, or unusual, the model has a harder job. That is why testing only on perfect sample images can give a false sense of success.
Many beginner mistakes come from assuming that one good result means the model is generally reliable. Another common mistake is focusing only on whether a label appears, without checking the box position, the confidence score, and the situation around the object. Good practice means looking at results more carefully and judging them realistically. You want to ask: Was the object large enough to see? Was the lighting harsh or dim? Was the object partly hidden? Did the background contain distracting shapes? These simple questions lead to better testing and better decisions.
Improving results does not always require advanced math or coding. In beginner workflows, the biggest gains often come from better images, more varied test examples, and more thoughtful review of outputs. If your goal is to detect cups, people, cars, or animals, then you should test those objects under different conditions instead of repeating the same easy example. In practice, lighting, angle, clutter, blur, and distance matter a lot. So does your own engineering judgment: knowing when a model is good enough for a basic demo and when it is too unreliable for real use.
In the sections that follow, you will learn to spot the most common beginner mistakes in object detection, understand why image conditions affect performance, and use simple methods to improve your workflow. Most importantly, you will learn to read model outputs with more care. That mindset will help you avoid overconfidence and make better choices when using beginner-friendly detection tools.
Practice note for Spot the most common beginner mistakes in object detection: document your objective, define a measurable success check, and run a small experiment before scaling. Capture what changed, why it changed, and what you would test next. This discipline improves reliability and makes your learning transferable to future projects.
Practice note for Learn why lighting, angle, and clutter affect results: document your objective, define a measurable success check, and run a small experiment before scaling. Capture what changed, why it changed, and what you would test next. This discipline improves reliability and makes your learning transferable to future projects.
Practice note for Understand simple ways to improve data and testing: document your objective, define a measurable success check, and run a small experiment before scaling. Capture what changed, why it changed, and what you would test next. This discipline improves reliability and makes your learning transferable to future projects.
Practice note for Judge model output more carefully and realistically: document your objective, define a measurable success check, and run a small experiment before scaling. Capture what changed, why it changed, and what you would test next. This discipline improves reliability and makes your learning transferable to future projects.
Practice note for Spot the most common beginner mistakes in object detection: document your objective, define a measurable success check, and run a small experiment before scaling. Capture what changed, why it changed, and what you would test next. This discipline improves reliability and makes your learning transferable to future projects.
Not all objects are equally easy for an AI model to detect. Some objects have strong, distinctive features. A stop sign, for example, often has a clear shape, bold color, and familiar appearance. A person is also a common target because many models are trained on large numbers of people in different poses and settings. These objects appear often in training data, so the model becomes better at recognizing them.
Other objects are harder because they are small, oddly shaped, reflective, flexible, partly hidden, or visually similar to something else. A plastic bag can look different depending on how it is folded. A cat curled up on a dark chair may blend into the background. A phone on a cluttered desk may be difficult to separate from nearby items. In these cases, the model has less clear visual evidence to work with.
Beginners often assume that if the model detects a car well, it should detect every other object just as well. That is not realistic. Detection quality depends on object size, shape, contrast, typical viewing angle, and how much similar data the model saw during training. Even a good model may perform unevenly across categories.
A practical habit is to test each object class separately and note which classes are stable and which are weak. Look for patterns. Are failures happening with small objects? Similar-looking objects? Rare items? This helps you understand whether the problem is the model, the image, or the object category itself. Good judgment starts with accepting that some targets are naturally easier than others.
Three of the most common reasons for poor detection are blur, distance, and lighting. These factors reduce visual detail, and object detection depends heavily on detail. If the image is blurry because the camera moved, the sharp edges of the object may disappear. If the object is far away, it may occupy only a few pixels. If the lighting is too dark, too bright, or uneven, the object may lose its visible features.
Imagine trying to detect a bicycle at night under a streetlamp. The bike may be partly visible, but the wheels and frame are difficult to separate from shadows. Now imagine the same bike in daylight, filling more of the frame, with a steady camera. The second case is much easier for both a person and a model. This is why a model that works on sample photos may struggle in live video or casual phone images.
Beginners sometimes test with only one image per object and conclude too quickly that the system works or fails. A better approach is to test the same object under several conditions:
This simple test set teaches you far more than a single perfect image. If blur is the issue, use steadier shots. If distance is the issue, crop more tightly or record closer views. If lighting is poor, add light, avoid strong shadows, or change camera position. Small improvements in image quality often produce large improvements in results.
Object detection becomes harder when multiple objects overlap or when the background contains many distracting patterns. In a clean image with one object on a plain surface, the model can focus more easily on the target. But in real scenes, objects often touch, block, or partially cover each other. A bowl may hide part of a spoon. A person may stand in front of a bicycle. Products on a shelf may be packed tightly together.
Busy backgrounds add another challenge. Wallpaper, grass, shelves, wires, reflections, signs, and shadows can all create visual noise. The model may struggle to decide where one object ends and another begins. In some cases, it may place one large box around several objects. In others, it may fail to detect the target because the background is too similar in color or texture.
A common beginner mistake is blaming the model immediately, without noticing that the scene itself is difficult. Better testing means comparing simple scenes and complex scenes. If detection works on a plain table but fails in a messy room, that tells you clutter is affecting performance.
Practical improvements include separating objects when possible, choosing cleaner backgrounds for demos, and collecting test images with realistic clutter so you can judge performance honestly. If your use case involves crowded scenes, then your testing must include crowded scenes. Otherwise, you are measuring an easy version of the problem instead of the real one.
Two important types of error appear again and again in object detection: false positives and missed detections. A false positive means the model says an object is present when it is not. A missed detection means a real object is there, but the model fails to report it. Both matter, and beginners should learn to notice them clearly.
False positives often happen when the model sees something that resembles a learned pattern. A round lamp may be mistaken for a ball. A printed picture of a dog may be labeled as a real dog. A textured bag may be confused with another object class. Missed detections often happen when the object is small, dark, partly hidden, blurred, or shown from an unusual angle.
Confidence scores can help, but they do not solve everything. A high confidence score is not a guarantee that the prediction is correct. A low confidence score is not always worthless either. Sometimes a low score points to a real object in a difficult image. This is why you should always inspect the image and box together instead of trusting the number alone.
A practical review method is to sort results into three groups: clearly correct, clearly wrong, and uncertain. This teaches you to judge model output more carefully and realistically. It also helps you decide whether to raise or lower a confidence threshold in a beginner tool. Raising the threshold may reduce false positives but increase missed detections. Lowering it may catch more objects but add more mistakes. There is always a trade-off.
You do not need an advanced research setup to improve object detection results. A few simple workflow habits can make your testing much more useful. First, create a small but varied test collection instead of using random images one at a time. Include easy, medium, and difficult examples. Use different lighting, distances, angles, and backgrounds. This gives you a more realistic picture of performance.
Second, keep notes. For each test image or clip, write down what happened: correct label, wrong label, missing box, low confidence, duplicate boxes, or poor box placement. Patterns will appear quickly. You may discover that the model fails mostly in dim light, or only for side views, or only when objects overlap. These notes turn guessing into observation.
Third, improve the input before blaming the model. Try better framing so the object fills more of the image. Reduce camera shake. Avoid extreme shadows. Remove unnecessary clutter if your goal is a simple demonstration. If you are using video, test a few still frames as well to separate motion blur from general detection quality.
Finally, compare results across several examples before making conclusions. One excellent image and one terrible image are not enough. Good beginner workflow means repeated testing, simple record keeping, and realistic interpretation. These habits prepare you for more advanced work later because they teach discipline, not just tool usage.
The most valuable skill in this chapter is not a software feature. It is the ability to think critically about AI results. When you see a box and a label, do not stop at asking, "Did it detect something?" Ask stronger questions: Was it the right object? Was the box tight enough to be useful? Would this result still happen in poor lighting or a crowded scene? Is this success repeatable, or was it just a lucky example?
Critical thinking also means understanding that model output is not a final truth. It is evidence that must be interpreted. In beginner-friendly tools, it is easy to become impressed by fast visual results. But practical use requires caution. A model that detects a bottle on a desk may not detect it in a hand, in a bag, or at the edge of a frame. A system that works on demo images may struggle in ordinary user photos.
A helpful mindset is to treat object detection as probability, not certainty. The model offers likely answers based on prior patterns. Your job is to judge whether those answers are reliable enough for your purpose. For a classroom experiment, "mostly correct" may be fine. For anything safety-related, that standard is far too weak.
As you continue learning, remember this chapter's main lesson: better results come from better testing, better observation, and more realistic expectations. When you understand common mistakes and image conditions, you become much better at using object detection tools wisely rather than simply trusting them.
1. Why can testing only on clean, bright sample images be misleading?
2. According to the chapter, what is a model doing when it detects objects?
3. Which beginner mistake does the chapter warn about most directly?
4. When reviewing object detection output, what should you check besides whether the label appears?
5. What simple approach is most likely to improve beginner object detection results?
This chapter brings together everything you have learned so far and turns it into a simple, real project. Up to this point, you have seen what object detection means, how it differs from image classification, and how a model can return labels, boxes, and confidence scores. Now the goal is to do what beginners often find most exciting: take an idea from everyday life, collect a few examples, run a beginner-friendly detection model, and explain the results in clear language.
An end-to-end project does not need to be large or advanced. In fact, the best first project is small enough to finish in a short time and focused enough that you can understand each step. You are not trying to build a perfect product. You are learning the workflow. That workflow usually looks like this: choose a practical problem, define the objects you care about, gather images or video clips, test a model, inspect the outputs, and summarize what happened. Even if the model makes mistakes, that is still a successful project because you learn how object detection behaves in realistic conditions.
A good beginner project also teaches engineering judgment. This means making sensible choices instead of chasing complexity. For example, it is often smarter to detect only two or three object types clearly than to attempt ten categories with messy data. It is also wiser to use daylight photos, simple backgrounds, and common objects before trying crowded scenes or fast-moving video. These decisions are not shortcuts. They are part of good project planning.
As you work through this chapter, keep one simple question in mind: what do I want the model to notice, and how will I know whether it did a useful job? That question helps you stay practical. If your project is about detecting bottles on a desk, then your success is not measured by whether the model knows everything in the room. It is measured by whether it finds the bottles often enough, places boxes in roughly the right place, and gives confidence scores that make sense.
You will also practice presenting your findings in a non-technical way. In many real situations, the people reading your results are not AI experts. They may be teachers, managers, teammates, or friends. They want to know what was tested, what worked, what failed, and what the next step should be. Learning to communicate clearly is part of doing computer vision well.
By the end of this chapter, you should be able to plan a small beginner project from idea to result, choose target objects, collect examples, test a model, read its outputs, and explain the outcome simply. That is a strong first step into hands-on computer vision.
Think of this chapter as your bridge from learning concepts to doing actual work. The project may be small, but the habits you build here are the same habits used in larger AI systems: define the task clearly, use sensible data, inspect outputs carefully, and report results honestly. That mindset will serve you well in every later stage of object detection learning.
Practice note for Plan a small beginner project from idea to result: document your objective, define a measurable success check, and run a small experiment before scaling. Capture what changed, why it changed, and what you would test next. This discipline improves reliability and makes your learning transferable to future projects.
Practice note for Choose objects, gather examples, and test a model: document your objective, define a measurable success check, and run a small experiment before scaling. Capture what changed, why it changed, and what you would test next. This discipline improves reliability and makes your learning transferable to future projects.
The easiest way to begin an object detection project is to choose a problem from daily life. A simple project idea should answer a clear question such as: can a model detect cups on my kitchen table, parked cars on my street, or backpacks in classroom photos? The best first projects are small, visible, and easy to understand without special knowledge. If you need to explain your project in one sentence, that is a good sign. If it takes several minutes to describe the goal, the project is probably too broad for a beginner.
When choosing your idea, focus on objects that are common and easy to photograph. This matters because beginner-friendly models often perform best on familiar categories such as person, car, dog, bottle, chair, or cup. Starting with unusual objects may create confusion, because poor results could come from the model, the data, or the object choice itself. You want your first project to teach the workflow, not overwhelm you with too many unknowns.
A practical way to choose is to ask three questions. First, can I easily collect examples of this object? Second, will the object usually be visible and large enough in images or video? Third, can I tell whether the model succeeded just by looking at the output? If the answer is yes to all three, the project is likely suitable. For example, detecting bicycles in neighborhood photos is easier than detecting tiny keys in messy drawers.
Good engineering judgment means limiting the scope. Many beginners make the mistake of trying to detect everything in a scene. Instead, choose one main target or at most a few related targets. A project called “detect bottles and cups on a desk” is clear. A project called “understand everything in my room” is not. Narrow goals help you evaluate the model fairly and keep your testing organized.
It also helps to define what success looks like before you test. You do not need a formal metric at this stage. A simple statement is enough, such as: “If the model finds most cups in good lighting and places boxes around them reasonably well, the project is useful.” This gives you a realistic standard. It reminds you that beginner projects are about practical usefulness, not perfection.
Finally, pick a project that feels interesting to you. Motivation matters. If the project connects to your home, hobbies, school, or work, you will be more willing to collect examples carefully and review the outputs thoughtfully. That personal connection often makes the learning process smoother and more memorable.
Once you have a project idea, the next step is to define exactly which objects matter. This sounds obvious, but it is one of the most important parts of an object detection workflow. If your definition is vague, your testing will also be vague. For example, saying “I want to detect things on a table” is unclear. Saying “I want to detect cups, bottles, and phones on a table” is much better. Clear object definitions help you choose images, interpret outputs, and explain results.
You should also think about whether your chosen model is likely to know these objects already. Many beginner-friendly object detection tools are trained on standard object categories. That means they may detect a bottle but not a very specific item such as “my red water flask” as its own special class. In a first project, it is smart to work with common object labels that a pre-trained model is likely to recognize. This keeps your experiment realistic and avoids a common beginner mistake: expecting the model to know labels it was never trained to predict.
Try writing a small object list before testing. Include the object name, a short visual description, and any confusing cases. For instance, if your project is about cups, ask yourself whether mugs count as cups. If your project is about cars, do vans count? These small decisions matter because they affect how you judge the model. Without clear rules, you may think the model is wrong when it is actually using a broader or narrower category than you expected.
Another useful habit is to think about object conditions. Will the objects appear large or small? Will some be partly hidden? Will the lighting change? Will similar-looking items be nearby? These conditions influence model performance. If you know in advance that your target objects may be partially blocked or seen from unusual angles, you will be less surprised by missed detections later. This is part of practical engineering thinking: predicting where the system may struggle before the test begins.
You should also decide whether detection quality will depend more on finding the object at all or on placing a very accurate box around it. In many beginner projects, simply finding the correct object category is the main goal. Slightly imperfect box placement may still be good enough. Knowing this helps you judge outputs fairly. A model that labels the right object but draws a box that is a little too large may still be useful for a first experiment.
By clearly defining your objects, you create a stable foundation for the rest of the project. You know what you are testing, what counts as success, and what kinds of mistakes you expect to see. That clarity makes every later step easier.
Now it is time to gather examples for your project. In a beginner workflow, this usually means taking your own photos, selecting a few short video clips, or using a small set of public sample images. You do not need hundreds of files for a first project. A small, varied set is enough to reveal useful patterns. For example, you might collect ten to twenty photos and two or three short videos showing your target objects in different situations.
The key idea is variation with control. You want enough variety to test the model honestly, but not so much chaos that you cannot understand the results. Try collecting examples under different lighting conditions, from slightly different angles, and with different distances from the camera. Include a few easy cases and a few harder ones. An easy case might be a single bottle in bright light on a clean desk. A harder case might be two bottles partly hidden behind other items.
Video clips are especially useful because they show how detection behaves frame by frame. A model may detect an object clearly when it is still, then lose it for a moment when the camera moves. Watching this happen teaches you that object detection is not just about one perfect image. It is about stability across changing scenes. Even a short five- or ten-second clip can teach a lot.
There are also practical data collection habits worth following. Keep your files organized with simple names and folders. Separate photos from video clips. If possible, keep a short note about what each example contains, such as “two cups, window light” or “one backpack partly hidden.” This makes your later review much easier. Beginners often skip organization, then struggle to remember which examples caused which results.
Be careful about common mistakes. Do not collect only perfect examples, because that gives a false sense of success. Do not collect only difficult examples either, because that makes the model look worse than it may be in normal use. Also avoid images where the object is so tiny or blurry that even a human would struggle to identify it. If the input is poor, weak output is not surprising.
Finally, remember that the point of collection is not to build a huge dataset. It is to create a thoughtful test set for your first end-to-end project. A small, balanced collection lets you see how object detection works in practice and gives you enough evidence to talk meaningfully about strengths and weaknesses.
With your project idea defined and your examples collected, you can now run the model and inspect what it produces. This is where the theory becomes visible. A beginner-friendly object detection tool will usually return three main things: a label for each detected object, a bounding box showing where the object is, and a confidence score showing how certain the model seems to be. Your task is not just to look at these outputs but to interpret them carefully.
Start by testing a few easy images first. This gives you a baseline. If the model struggles with simple, well-lit examples, that tells you something important right away. If it performs well on easy cases, move to more challenging images and short videos. Compare how the outputs change. Does the model still find the correct object when the angle changes? Does confidence drop when lighting becomes poor? Does the box shift or disappear when objects overlap? These comparisons are often more valuable than any single result.
When checking outputs, do not focus only on whether the label is correct. Look at box quality too. Is the box roughly centered on the object? Does it cover most of the object or miss half of it? Also watch confidence scores with common sense. A high confidence score does not guarantee correctness, and a lower confidence score does not always mean the detection is useless. Confidence is a clue, not a promise.
Video testing adds another layer of insight. Watch for flicker, where a box appears in one frame and disappears in the next. This is a normal challenge in moving scenes. It shows you that object detection in video must handle changes in camera position, motion blur, and temporary obstruction. If the model detects a bottle consistently in still images but misses it in moving video, that difference is worth noting in your findings.
A practical review method is to keep a simple checklist for each file: correct labels, missing objects, false detections, box quality, and confidence patterns. This gives your project structure. It also helps you avoid a common mistake, which is remembering only the most surprising examples and ignoring the overall pattern. Good testing is systematic, even at a beginner level.
Most importantly, be honest with what you see. If the model misses small or partly hidden objects, write that down. If it performs well in bright light and poorly in cluttered scenes, note that too. The goal of testing is not to prove that AI is magical. The goal is to understand where the model works, where it struggles, and what that means for practical use.
After testing, your next job is to explain the outcome clearly. This is an important skill because object detection projects are often shared with people who are not technical. They do not need every internal detail of the model. They need a simple summary of what was tested, what the model found, what kinds of mistakes happened, and whether the project goal was met. A clear explanation shows maturity and helps others trust your observations.
A good summary can follow a simple structure. First, state the project goal in plain language. For example: “I tested whether a beginner object detection model could find bottles and cups in desk photos and short room videos.” Second, describe the examples you used. Mention the number of photos or clips, the kinds of scenes, and whether they included easy and difficult cases. Third, report the main findings. You might say the model detected bottles reliably in bright light but missed cups when they were partly blocked.
Try to avoid technical wording when a simpler phrase works. Instead of saying “the model exhibited reduced robustness under occlusion,” say “the model often missed objects when they were partly hidden.” Instead of “confidence calibration varied,” say “some wrong detections still had high confidence scores.” Clear language makes your results useful to a wider audience.
It is also helpful to separate strengths from limitations. A balanced summary might include points like these:
Do not be afraid to include mistakes and weak points. Honest reporting is more valuable than trying to make results sound better than they are. In real AI work, understanding failure cases often matters more than showing a few perfect detections. If your model confused a mug with a cup, or missed a bottle in shadow, that is useful information.
End your summary with a simple conclusion and a next step. For example: “This model is useful for basic detection of common desk objects in clear images, but it needs better handling of clutter and movement.” That kind of conclusion is practical, understandable, and grounded in your observations. It shows that you can not only run a test but also communicate its meaning.
Finishing your first end-to-end object detection project is a major milestone. You now understand the basic workflow from idea to result. You can choose a simple detection task, prepare example images and video clips, run a model, inspect labels and boxes, and explain the findings clearly. That is real practical progress. The next step is not to rush into the most advanced techniques. It is to build depth gradually.
One smart direction is to repeat the same workflow with a slightly harder project. You could test more difficult lighting, busier backgrounds, smaller objects, or a wider range of camera angles. This helps you develop intuition about how input conditions affect model performance. Another useful next step is to compare two beginner-friendly models on the same data. Even without deep math, this teaches you that different systems can behave differently on the same scene.
You may also want to learn more about annotation and training data. In this course, you mainly used existing models and interpreted their outputs. Later, you can explore what it means to label your own images with bounding boxes and prepare data for custom training. That path helps answer an important question: what if the object I care about is not one of the model's built-in categories? Learning how custom datasets work is often the doorway to more advanced computer vision projects.
Another natural next area is evaluation. Beginners often judge results visually, which is a good starting point. Over time, you can learn simple performance measures and compare outputs more systematically. You do not need to become an expert in metrics immediately, but understanding that AI systems should be measured consistently is an important habit.
If you enjoy the video side of detection, you might explore related topics such as object tracking, where the system follows the same object across frames. If you are more interested in practical use, you could look at applications in retail, traffic scenes, home monitoring, sports, or robotics. The point is to connect the basic skills you now have to an area that feels meaningful.
Most of all, keep your beginner mindset in a positive sense: stay curious, test small ideas, inspect outputs carefully, and learn from mistakes. Computer vision becomes much easier when you build experience step by step. Your first project is not the end of the course in spirit. It is the start of your ability to experiment independently and keep learning with confidence.
1. What is the main goal of a beginner’s end-to-end object detection project in this chapter?
2. Which project plan best matches the chapter’s advice for beginners?
3. According to the chapter, how should you judge whether your project was useful?
4. Why does the chapter encourage explaining results in non-technical language?
5. What mindset does the chapter say carries over from small beginner projects to larger AI systems?
- Learning Evolved.
- Intelligence Amplified.


