AI Robotics & Autonomous Systems — Beginner
Learn how beginner robots sense, map, think, and move
This beginner course is designed like a short technical book that teaches one idea at a time. If you have ever wondered how robots know where they are, avoid obstacles, or move toward a target, this course gives you a simple and practical starting point. You do not need coding experience, an engineering background, or prior knowledge of artificial intelligence. Everything is explained in plain language from first principles.
The course focuses on three core ideas that sit at the heart of mobile robotics: sensors, maps, and movement. These ideas help a robot notice the world, build a useful picture of its surroundings, and choose actions that are safe and effective. By the end, you will understand the full beginner workflow of how a small autonomous robot senses, thinks, and acts.
Many robotics resources are hard for new learners because they start with heavy math, advanced programming, or unfamiliar technical terms. This course takes the opposite approach. It starts with the simplest question: what is a robot? From there, it builds a strong foundation chapter by chapter so you can connect each idea to the next one.
This course will help you see robotics as a chain of connected decisions rather than a confusing mix of hardware and software. You will understand why a robot needs sensors, how movement changes position, why mapping is difficult, and how planning turns a destination into a route. You will also learn simple ways to judge whether a robot is behaving well, such as checking safety, reliability, and accuracy.
Because this is a book-style course, the learning path is coherent and cumulative. Chapter 1 gives you the core mental model. Chapter 2 shows how robots gather data from the world. Chapter 3 explains how they turn commands into motion. Chapter 4 introduces mapping as a way to organize space. Chapter 5 adds path planning so the robot can travel with purpose. Chapter 6 combines all of these ideas into one complete beginner project.
This course is for absolute beginners who want a clear introduction to AI robotics and autonomous systems. It is a good fit for students, career changers, hobby learners, educators, and curious professionals who want a solid overview before moving to more advanced tools or coding projects. If you want a practical understanding of how robots work in the real world, this course is for you.
You do not need to install complex software or build a physical robot to benefit from the course. The goal is to help you think like a beginner roboticist first. Once you understand the logic of sensing, mapping, movement, and planning, advanced study becomes much easier.
Whether you want to explore autonomous machines, prepare for deeper robotics study, or simply understand the technology shaping modern automation, this course gives you a strong and approachable foundation. If you are ready to begin, Register free and start learning step by step.
You can also browse all courses to continue your path into AI, automation, and intelligent systems after completing this one. With a clear structure, simple explanations, and a practical beginner focus, this course helps you move from curiosity to real understanding.
Robotics Engineer and AI Systems Educator
Sofia Chen designs beginner-friendly robotics learning programs that turn complex ideas into clear, practical steps. She has worked on mobile robot sensing, navigation, and applied AI projects for education and industry. Her teaching style focuses on first principles, hands-on thinking, and simple real-world examples.
When people first hear the word robot, they often imagine a human-shaped machine that talks, waves, and makes dramatic decisions. In beginner robotics, the reality is simpler and more useful. Your first robot will most likely be a small mobile machine with wheels, a battery, a controller board, a few sensors, and motors. It may not look like a movie robot, but it still performs the core job of robotics: it senses the world, makes limited decisions, and acts on those decisions to move or respond.
This chapter gives you a practical mental model for how robots work. You will learn what makes a machine a robot, what makes a robot autonomous, and why AI in robotics is usually about small, repeated decisions rather than magic intelligence. You will also begin to recognize the major parts of a mobile robot: sensors for measuring the environment, motors for motion, controllers for processing information, and power sources for keeping the system alive. These parts matter because nearly every robotics project is built from the same basic pattern.
A useful way to think about robotics is as a workflow with four linked jobs: sensing, mapping, planning, and acting. First, the robot gathers data from the world. Next, it organizes that data into a simple internal picture, sometimes as a rough map, a distance estimate, or a heading direction. Then it chooses what to do next based on rules or learned behavior. Finally, it sends commands to its motors or other actuators. Even a very simple robot follows this pattern. For example, a wheeled robot might detect a wall with a distance sensor, estimate which side is open, decide to turn right, and then command its motors to rotate.
As a beginner, your goal is not to build the smartest possible machine. Your goal is to build a robot that behaves predictably enough to teach you something. Good beginner robotics is about engineering judgement. You choose sensors that are simple enough to trust, motion goals that are easy to test, and software that is understandable when something goes wrong. A robot that can drive forward, avoid a chair leg, and follow a taped line on the floor is a great first success because it shows the complete chain from sensing to movement.
You will also start using important physical ideas. Robots measure distance with tools such as ultrasonic or infrared sensors. They estimate direction with compasses, gyroscopes, or wheel movement. They infer motion by tracking how far wheels turn over time. None of these measurements are perfect. Sensors are noisy, floors are slippery, and batteries do not provide perfectly constant power. That is why robotics is not only about writing code. It is also about designing systems that keep working when data is imperfect.
By the end of this chapter, you should be able to describe a robot in simple terms, identify its main parts, explain the sense-think-act cycle, and set practical expectations for your first robotics build. That foundation will support everything that comes later, including mapping, navigation, path following, and smarter decision-making.
Practice note for Understand what a robot is and what makes it autonomous: document your objective, define a measurable success check, and run a small experiment before scaling. Capture what changed, why it changed, and what you would test next. This discipline improves reliability and makes your learning transferable to future projects.
Practice note for Recognize the basic parts of a mobile robot: document your objective, define a measurable success check, and run a small experiment before scaling. Capture what changed, why it changed, and what you would test next. This discipline improves reliability and makes your learning transferable to future projects.
A robot is a machine that can interact with the physical world using three basic abilities: it can sense, process information, and act. A calculator processes information, but it does not move or sense its surroundings. A remote-control car moves, but it is not autonomous because a person makes the decisions. A robot brings these pieces together into one system. It uses sensors to collect data, a controller to interpret that data, and actuators such as motors to produce motion or other effects.
In simple terms, a robot becomes more than a machine when it can respond to the world instead of only following a fixed motion. If a small wheeled robot can move forward until it detects an obstacle and then turn away, that is already robotics. If it can do this without a person pushing buttons each time, it has some autonomy. Autonomy does not mean the robot is fully independent or intelligent in a human sense. It means the robot can make limited decisions inside a defined task.
Beginners often make a common mistake: they assume a robot must look advanced to count as real robotics. In practice, a two-wheel robot with a distance sensor teaches more core principles than a flashy machine with many features you do not understand. Another mistake is expecting perfection. Real robots drift, bump into things, and sometimes misread their sensors. Learning robotics means learning how to improve behavior despite those limits.
A helpful engineering question is this: what decision can the robot make by itself? If the answer is “stop when blocked,” “follow the line,” or “turn toward open space,” then you are already working with autonomous behavior. This is the right starting point for a beginner project because it is testable, measurable, and directly connected to the robot’s sensors and motors.
Almost every robot, from a toy rover to a warehouse vehicle, can be understood through the sense-think-act loop. First, the robot senses the world. It measures things such as distance to a wall, wheel rotation, battery level, or whether a line is under the chassis. Second, it thinks. This means the controller processes the sensor data and decides what it means. Third, it acts by sending commands to motors, lights, servos, or other devices.
For beginners, this loop is the single most important mental model in robotics. Imagine a robot moving down a hallway. Its distance sensor reports that an object is getting closer. The software compares the measured distance to a safety threshold. If the object is too close, the robot decides to slow down or turn. Then the controller changes motor speed. A fraction of a second later, the process repeats. Robotics is not one big decision. It is a stream of small decisions happening continuously.
This loop also connects to later topics such as mapping and planning. Sensing gathers raw data. Mapping organizes that data into a simple model of the surroundings, even if it is only “wall on the left, free space ahead.” Planning chooses a next move based on that model, and acting executes it. Beginners should not worry about making these steps too complex at first. A robot can build a very simple map just by remembering where obstacles were recently detected or by counting wheel turns to estimate where it has moved.
A common mistake is trying to jump straight to action without reliable sensing. If sensor readings are poor, the robot’s decisions will also be poor. Another mistake is writing code that reacts too slowly or too aggressively. Good engineering judgement means choosing update rates, speed limits, and turn sizes that match the quality of your sensors. A slow, stable robot is often smarter in practice than a fast robot that crashes.
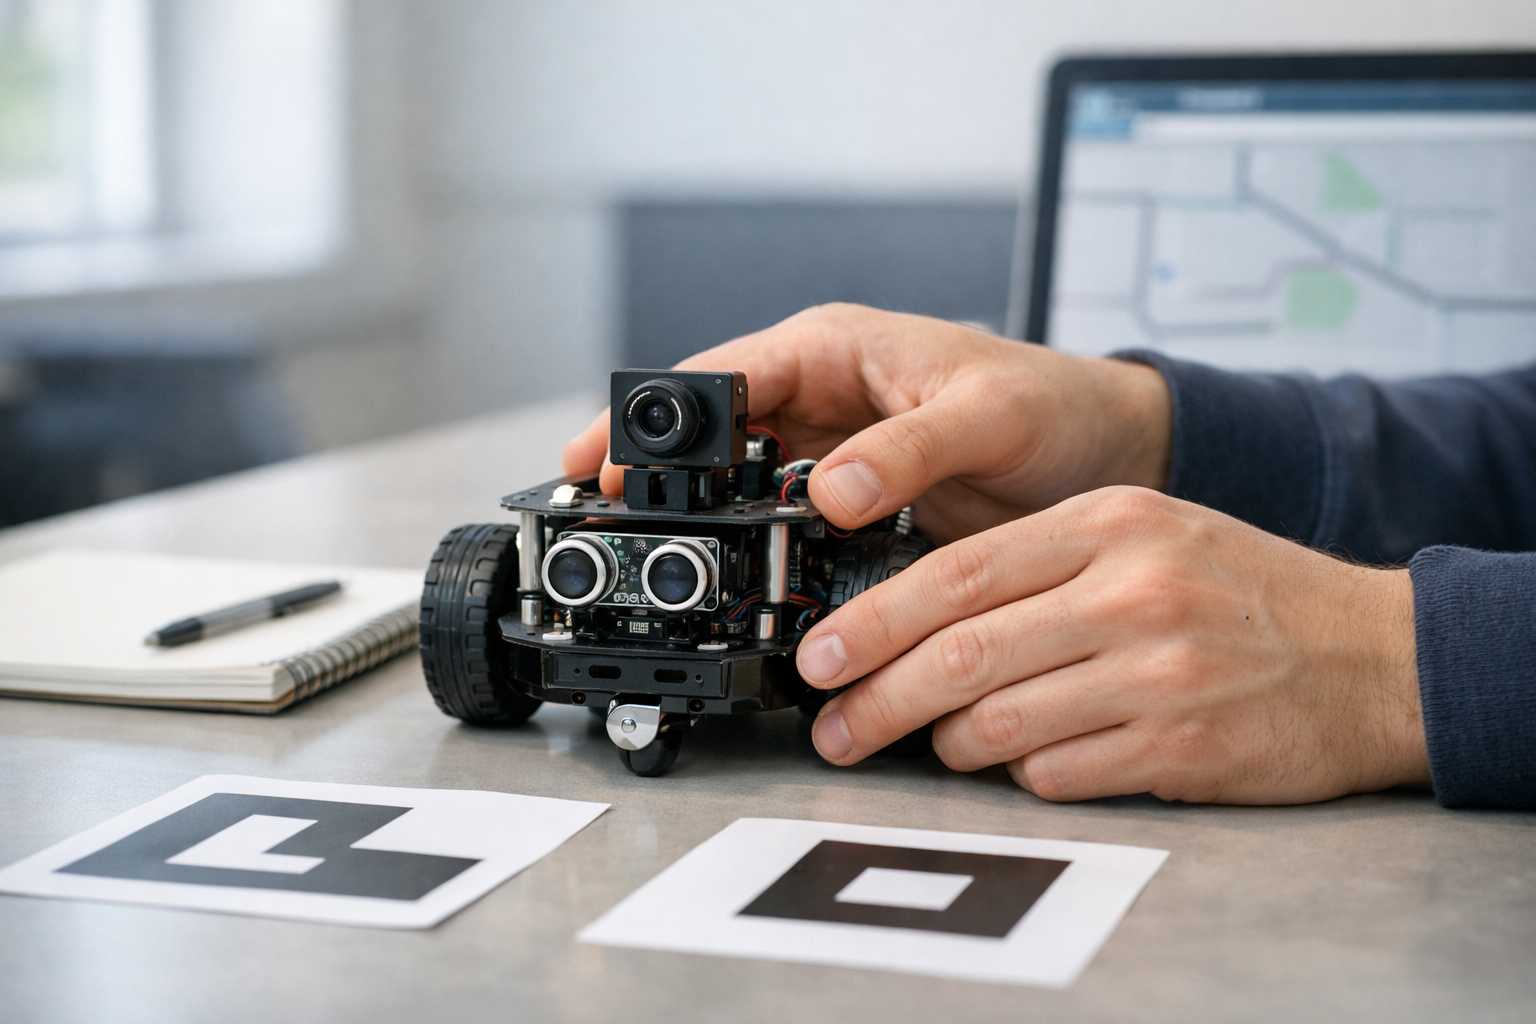
A beginner mobile robot usually has a small set of core parts, and learning these parts will make every future project easier to understand. The first part is the controller, often a microcontroller board or a small computer. This is the robot’s decision center. It reads sensors, runs code, and sends commands to outputs. The second part is the sensors. These provide information about the environment and the robot’s own state. Examples include distance sensors, wheel encoders, gyroscopes, and simple contact switches.
The third part is the actuator system, usually motors. Motors create movement by turning wheels, steering joints, or moving arms. Motors need driver circuits because the controller cannot directly supply enough current for motion. The fourth part is the power system. Batteries, voltage regulators, and wiring keep the robot running. Power problems are extremely common in robotics. A robot that resets unexpectedly, moves weakly, or gives unstable sensor readings often has a power issue rather than a software issue.
There is also the chassis, which is the physical frame that holds everything together. Good mechanical layout matters. A poorly placed sensor may point too high and miss obstacles. Uneven wheel placement can cause drifting. Loose wires can disconnect during motion. These are not minor details. In robotics, hardware placement changes behavior.
When a robot measures distance, it might use ultrasonic pulses or infrared reflection. When it measures direction, it might use a compass or gyroscope. When it measures motion, it often uses encoders that count wheel rotation. By combining these signals, the robot can estimate where it is and how it is moving. That estimate will not be perfect, but it is enough for simple navigation tasks. A practical beginner goal is to learn what each part contributes and how failures in one part affect the whole robot.
AI in robotics is often presented as if robots can instantly understand the world like people do. In beginner projects, AI is much more grounded. It usually means the robot uses sensor data to make better decisions than a fixed timer-based machine. For example, instead of always turning after three seconds, the robot turns when it actually detects an obstacle. Instead of driving in a random pattern, it follows a line or chooses the clearer path based on measurements.
That is already a meaningful form of intelligence. The robot is using information from the world to guide its actions. Some robots do this with simple rule-based logic: “if obstacle ahead, stop and turn.” Others use lightweight machine learning, such as recognizing a color marker or classifying a simple visual pattern. Both approaches are valid. For beginners, rule-based systems are usually the best place to start because they are transparent. You can inspect the condition, observe the sensor value, and understand why the robot behaved a certain way.
AI helps bridge sensing and action. It can clean up noisy measurements, estimate a probable direction of travel, or choose a path through a simple map. But AI does not remove the need for good hardware or careful design. A poor sensor cannot be saved by clever code alone. Likewise, bad motor control will make a smart navigation algorithm look useless. Robotics is a systems problem, and AI is one component inside that system.
Realistic beginner goals matter. A good first AI robot might avoid obstacles, follow walls, or track a path on the floor. These tasks teach the core distinction between sensing, mapping, planning, and acting. Sensing gathers data. Mapping organizes it. Planning picks a next step. Acting moves the robot. If you can explain those four jobs in your own project, you are already learning robotics in the right way.
Not all beginner robots are built for the same learning goal. The simplest type is the obstacle-avoidance robot. It uses one or more distance sensors and basic motor commands to move around a room without hitting things. This is excellent for learning the full cycle of sensing and acting. Another common type is the line-following robot. It uses downward-facing sensors to detect a dark or light path on the floor and adjusts its steering to stay on course. This teaches feedback control and path following.
A third type is a differential-drive rover, usually a platform with two powered wheels and one caster wheel. By changing the speed of the left and right motors, it can move forward, turn, or spin in place. This design is popular because it is mechanically simple but rich enough to teach direction, turning radius, and motion estimation. Some beginners also use small educational car kits with cameras, but camera-based robotics adds complexity quickly. Vision is powerful, but it is harder to debug than a simple distance or line sensor.
When choosing your first robot style, match the project to your current skill level. If you are new to electronics and programming, start with line following or obstacle avoidance. If you already understand basic coding, a rover that estimates its position using wheel encoders is a strong next step. A common mistake is starting with mapping a whole room before the robot can even drive straight. Build competence in layers: stable movement first, reliable sensing second, simple decision-making third, and mapping after that.
The best beginner robot is not the most advanced one. It is the one that gives you clear feedback about what the robot sensed, what it decided, and why it moved the way it did.
Robotics is exciting because code becomes physical action, but that also means mistakes can cause damage. A small robot can fall off a table, tangle its wheels in wires, or drain a battery improperly. Good safety habits should begin with your very first project. Always test on the floor or in a protected area, not on a desk edge. Keep loose clothing, cables, and fingers away from moving parts. Turn off power before changing wiring. If motors behave unexpectedly, disconnect the battery before troubleshooting the software.
Your learning setup should be simple and repeatable. Use a clear test area with enough space for the robot to move. Mark zones on the floor with tape for line-following or turning tests. Keep a notebook or digital log of what you changed in code and hardware. This is a powerful beginner habit because robotics problems are often caused by multiple small factors at once. If you change everything at the same time, you will not know what fixed the issue.
Set realistic goals. A strong first milestone is “the robot drives forward for two seconds.” The next might be “the robot stops when an obstacle is within 20 centimeters.” Then “the robot turns and continues.” These goals may sound modest, but they build real engineering confidence. Each one proves that sensing, decision-making, and action are connected properly.
Finally, remember that failure in robotics is normal and informative. A robot that turns too late is teaching you about sensor range, timing, or speed. A robot that drifts sideways is teaching you about motor imbalance or friction. If you approach these outcomes as data rather than disappointment, you will learn quickly. Safe testing, clear goals, and patient iteration are the real foundation of successful robotics.
1. According to the chapter, what makes a machine a robot?
2. What makes a robot autonomous?
3. Which sequence best matches the workflow described in the chapter?
4. What is a realistic goal for a beginner robotics project?
5. Why does the chapter say robotics is not only about writing code?
A robot cannot move intelligently by motor power alone. Motors create action, but sensors provide awareness. In beginner robotics, this idea is one of the most important foundations: before a robot can decide, it must first detect something about the world around it. A robot that drives forward without sensing is not truly responding to its environment. It is simply following a command. As soon as we add sensors, the robot can begin to notice distance, contact, light, direction, and motion, and that is where useful autonomy starts.
In this chapter, we will study why robots need sensors to understand surroundings, compare several common sensor types, and learn how simple sensor outputs turn into simple decisions. We will focus on practical beginner-friendly examples: distance sensors that warn about obstacles, touch sensors that confirm collision, light and line sensors that help a robot follow markings, and motion sensors such as wheel counts and gyros that estimate movement. We will also look at a real engineering issue that appears immediately in robotics: sensor data is often noisy, imperfect, delayed, or misleading. A good robot system does not assume every reading is correct. It checks, compares, filters, and calibrates.
Robotics is often described as a loop: sense, think, act. In later chapters, that loop grows into sensing, mapping, planning, and acting. For now, this chapter emphasizes the first step. If sensing is weak, every later step becomes less reliable. A robot may think it is clear to move when a chair is in front of it, believe it is traveling straight while drifting sideways, or mistake a dark shadow for a black line to follow. Understanding sensors helps beginners see why robot behavior sometimes looks smart and sometimes fails in very ordinary ways.
A useful mindset is to ask four questions whenever you look at a robot sensor. What does it measure? How often does it update? What can confuse it? How should the controller react to the reading? These questions build engineering judgment. Choosing a sensor is not just about technical capability. It is about matching the sensor to the task, the environment, the cost, and the consequences of mistakes.
As you read, connect each sensing method to a decision. If the front distance sensor reads too small, slow down or stop. If the bumper is pressed, back up. If the line sensor sees dark tape under the left side, steer left to recenter. If the wheel counts increase evenly, the robot is probably moving straight. This connection between sensor input and robot action is the bridge from hardware to intelligence. Even a very simple robot can appear purposeful when it turns sensor readings into consistent behavior.
By the end of this chapter, you should be able to identify common sensing options and explain what kinds of decisions each one supports. You should also recognize that no single sensor gives the whole truth. Practical robots combine sensor types so that one reading supports, checks, or corrects another. That habit of combining evidence is a major step toward reliable autonomous systems.
Practice note for Learn why robots need sensors to understand surroundings: document your objective, define a measurable success check, and run a small experiment before scaling. Capture what changed, why it changed, and what you would test next. This discipline improves reliability and makes your learning transferable to future projects.
Practice note for Compare distance, touch, light, and motion sensors: document your objective, define a measurable success check, and run a small experiment before scaling. Capture what changed, why it changed, and what you would test next. This discipline improves reliability and makes your learning transferable to future projects.
Robots act in the physical world, and the physical world is uncertain. Floors are not always flat, objects are not always where we expect them, and lighting changes from place to place. Because of this, action without sensing is fragile. A robot may be programmed to drive forward for three seconds, but if a box appears in its path, timing alone will not protect it. Sensing comes first because a robot needs evidence about the current situation before choosing what to do next.
This is the difference between automation and responsive autonomy. An automated toy may repeat the same movement every time. A sensing robot changes behavior when conditions change. For example, a hallway robot might move forward when the path is open, turn when a wall is near, and stop when a bumper confirms a collision. Those actions are simple, but they demonstrate a core robotics workflow: measure, interpret, decide, and act.
Beginners often imagine AI in robotics as something advanced and mysterious. In practice, AI starts with very basic decision rules connected to sensor input. If the measured distance is less than 20 centimeters, stop. If the left line sensor sees dark ground and the right sensor sees bright ground, steer left. These are simple decisions, but they only work if the robot first senses the world. In other words, sensing is the foundation that allows planning and acting to make sense.
There is also an engineering reason to prioritize sensing. Motors and movement create risk. A moving robot can hit furniture, fall from an edge, or become lost. Sensors reduce uncertainty and improve safety. They help the controller estimate where the robot is, what is nearby, and whether the last action had the expected result. If the robot commanded forward motion but the wheel counts did not increase, something may be stuck. If the robot expected open floor but the distance sensor suddenly reports a close obstacle, the plan should change.
A common mistake is to think that one good movement program is enough. In reality, movement becomes reliable only when it is continuously checked by sensing. Good robot design does not separate movement from perception. It links them tightly, so each action can be adjusted using fresh data from the environment.
Distance sensors help a robot estimate how far away an object is. For beginners, they are one of the most useful sensor types because obstacle detection is a basic requirement for safe movement. A distance sensor mounted at the front of a robot can tell the controller whether the path ahead looks open or blocked. This supports simple behaviors such as stopping before impact, slowing near walls, or turning toward a more open direction.
Several kinds of distance sensors are common in educational robotics. Ultrasonic sensors send out sound waves and measure how long echoes take to return. Infrared distance sensors estimate range using reflected light. More advanced systems may use lidar, which scans distances with laser light. At the beginner level, the main lesson is not the internal physics but the practical trade-off: every sensor has a useful range, a field of view, and conditions where it performs poorly.
For example, an ultrasonic sensor may work well for large flat surfaces but struggle with soft materials or angled objects that reflect sound away from the receiver. An infrared sensor may be affected by surface color, sunlight, or reflective materials. This means a reading is not a guaranteed truth. It is evidence that must be interpreted carefully.
A simple obstacle-avoidance rule might look like this: if distance is greater than 40 centimeters, continue forward; if distance is between 20 and 40 centimeters, slow down; if distance is less than 20 centimeters, stop and turn. This kind of threshold-based control is easy to implement and very common in beginner robots. It also teaches a useful engineering idea: decisions often depend not just on the sensor value but on ranges of values.
One practical mistake is placing the sensor too high or too low. A high-mounted sensor may miss small objects on the floor. A low-mounted sensor may detect the floor itself at odd angles. Another mistake is trusting a single reading. Good practice is to sample repeatedly and use a small average or median before making a decision. This makes the robot less jumpy when one reading is unusually wrong. Distance sensing does not create a full map by itself, but it gives a robot enough awareness to begin moving more intelligently through space.
Touch and bumper sensors are among the simplest sensors in robotics, but they remain valuable because they provide direct physical confirmation of contact. A bumper sensor usually acts like a switch. When the robot hits an object, the sensor changes state from not pressed to pressed. This may seem less advanced than distance sensing, but it solves a different problem. Instead of estimating what might be ahead, it confirms what has actually been touched.
In practical robot design, bumpers are often used as a backup safety layer. A distance sensor may fail to notice a thin object, a glass surface, or a shape outside its detection area. If the robot still makes contact, the bumper provides a reliable signal that immediate action is needed. A common reaction is to stop, reverse for a short time, and turn before trying again. That simple routine is often enough for beginner obstacle-avoidance robots.
Touch sensing also teaches an important systems lesson: some sensors are preventive, while others are confirmatory. Distance sensors try to avoid collisions before they happen. Bumper sensors detect the event once it happens. Good robots often use both. This is an example of sensor layering, where one sensor type supports another.
The outputs from touch sensors are usually easy to read because they are digital: pressed or not pressed. That simplicity makes them ideal for early projects. However, beginners still make mistakes. Mechanical switches can bounce, meaning a single press may produce several very quick on-off transitions. If the code reacts to every transition, behavior can look erratic. A short debounce delay or a requirement that the signal remain stable for a moment can solve this.
Another practical design choice is bumper placement. A front bumper helps with head-on contact, but side bumpers may be needed if the robot turns in tight spaces. The key idea is that even simple sensors support meaningful decisions. A pressed bumper is enough to trigger a clear and useful action. This is a strong example of how sensing connects directly to behavior.
Light, color, and line sensors help a robot detect differences in brightness or surface appearance. These sensors are common in beginner robotics because they support visible, easy-to-understand tasks such as line following, edge detection, and color sorting. A line-following robot is a classic example. It uses one or more downward-facing sensors to compare the floor under different parts of the robot. If one side sees a dark line and the other sees a brighter background, the robot can steer to stay centered over the line.
These sensors usually work by shining light onto a surface and measuring the reflection, or by detecting ambient light levels. Dark surfaces reflect less light than bright ones, so the sensor output changes. Color sensors go a step further by estimating how much red, green, and blue light is reflected. In practice, however, lighting conditions matter a lot. A sensor that works perfectly under classroom lights may behave differently in sunlight or shadow.
This is why threshold selection is so important. If the robot uses a fixed rule such as dark means below 300 and bright means above 300, then changes in lighting can cause mistakes. A better beginner practice is to calibrate by measuring the actual line and background before starting. Then choose a threshold between those measured values. This improves reliability without adding much complexity.
Line sensors are excellent for teaching control decisions. Suppose the left sensor sees dark and the right sensor sees bright. The robot is drifting right of the line, so it should steer left. If the opposite happens, steer right. If both sensors see dark, the robot may be directly over a wide line or a junction. If both see bright, the robot may have lost the path and should search. This is a direct and practical connection between sensor readings and movement decisions.
Common mistakes include mounting the sensor too far from the floor, ignoring ambient light changes, and expecting perfectly clean data. Real floors have texture, dust, and uneven color. Good engineering judgment means testing on the real surface, not just assuming the sensor will behave ideally. These sensors do not measure distance like range sensors do, but they give robots another way to interpret their environment and follow structured paths.
Some sensors do not measure the outside world directly. Instead, they measure the robot's own movement. This is extremely important because a robot must often estimate how far it has traveled, how fast it is moving, and how much it has turned. Two common beginner-friendly motion sensing methods are wheel counts and gyros. Together, they help the robot understand motion over time.
Wheel counts usually come from encoders attached to the wheels or motors. Every small rotation produces pulses, and the controller counts those pulses. If you know the wheel size, you can estimate distance traveled. If both left and right wheels show similar counts, the robot is probably moving roughly straight. If one side turns more than the other, the robot is turning. This information is useful for path following, measuring travel distance, and checking whether commanded movement actually happened.
Gyros measure rotational motion, usually the rate at which the robot is turning. By integrating this rotation over time, the controller estimates heading change. This is helpful because wheel counts alone can be fooled by slipping wheels. On a smooth floor, the robot may spin its wheels without moving as expected. A gyro provides another source of evidence about turning behavior.
These sensors are especially important in the larger workflow of mapping and navigation. Before a robot can build even a simple map, it needs some estimate of where it moved between sensor observations. This estimate is never perfect, but wheel counts and gyros provide the beginning of that story. They connect sensing to motion, and motion to location.
A practical beginner example is commanding the robot to drive forward 50 centimeters, then turn 90 degrees. Wheel counts can estimate the forward distance, while the gyro helps confirm the turn. Common mistakes include forgetting that wheel diameter errors affect distance estimates and assuming a gyro stays perfect forever. In reality, small errors accumulate. Even so, these motion sensors are essential because they help the robot relate action commands to actual movement in the world.
One of the first realities every robotics student meets is that sensor data is messy. A sensor reading may jump slightly even when nothing changes. Two sensors of the same type may give slightly different values. A measurement may drift over time or react to environmental conditions such as temperature, light, surface texture, or vibration. This variation is called noise, and learning to spot it is part of becoming effective in robotics.
For beginners, the most important habit is to look at several readings instead of one. If a distance sensor normally reports 32, 33, 31, and suddenly one reading says 85, that outlier may be noise rather than a real obstacle moving away. If a line sensor gives values near the threshold, the robot may rapidly switch left-right-left-right unless the control logic is made more stable. Reading simple sensor outputs means noticing patterns, not just reacting instantly to every number.
Basic calibration improves reliability. Calibration means measuring how a sensor behaves in your real setup and adjusting the program accordingly. For a line sensor, measure the dark line and the bright floor, then set a threshold in between. For wheel encoders, compare estimated travel distance with actual travel distance and adjust the wheel conversion factor. For a gyro, check whether it reports a small turn even when the robot sits still, then subtract that bias if needed.
There are also simple ways to reduce noise in software. Averaging several samples smooths random variation, though it can add delay. A median filter can remove occasional extreme outliers. Hysteresis uses two thresholds instead of one, which prevents rapid switching near a boundary. Debouncing helps touch sensors ignore mechanical chatter. These methods are basic, but they make robot behavior much more stable.
The biggest beginner mistake is assuming a wrong robot action must mean bad code. Often the code is fine, but the sensor inputs are unreliable or uncalibrated. Good engineering judgment means testing the sensor itself, printing values, observing how they change, and tuning the system before adding more complexity. When a robot can sense more reliably, every higher-level task becomes stronger. Better sensing leads to better decisions, safer motion, and a clearer path toward mapping and planning.
1. Why are sensors essential for a robot's intelligent behavior?
2. Which sensor is best matched to detecting that a robot has physically hit an object?
3. What is a good response to the fact that sensor data can be noisy or misleading?
4. A robot's front distance sensor reads too small. According to the chapter, what decision should the robot make?
5. What is the main benefit of combining different sensor types on a robot?
Movement is where a robot stops being a collection of parts and starts becoming an active machine. Sensors may detect the world, and software may decide what to do, but motors and wheels are what turn decisions into action. In this chapter, we focus on the basic movement ideas used by beginner mobile robots: how wheels, motors, and power create motion; how a robot moves forward, stops, and turns; how wheel motion connects to distance and direction; and how a robot can perform a simple obstacle avoidance behavior. These ideas form the bridge between sensing and acting.
A mobile robot usually moves by converting electrical energy from a battery into rotational motion at a motor shaft. That rotation is passed through gears and into wheels, tracks, or sometimes leg joints. For beginner robots, wheels are the most common because they are simple, efficient, and easy to control. Even with wheels, however, movement is not automatic. A useful robot must coordinate motor commands, power limits, wheel grip, timing, and sensor feedback. Small errors in any of these can make a robot drift, wobble, overshoot, or fail to stop where expected.
One important engineering lesson is that movement in robotics is never only about mechanics. It is also about control. A robot that has strong motors but poor control may crash into walls. A robot with excellent sensors but weak power delivery may not move consistently enough to follow a path. Good robot behavior comes from combining hardware and logic: motors provide force, wheels transfer force to the floor, the controller sets motor commands, and sensors help correct mistakes. This is why movement belongs within the larger robotics cycle of sensing, planning, and acting.
As you read this chapter, keep in mind a practical workflow. First, understand how the drive system works. Second, decide how to command simple actions such as forward, stop, left turn, and right turn. Third, measure or estimate how far the robot has moved and how much it has rotated. Fourth, add simple control rules so the robot behaves consistently. Finally, connect movement to sensing so the robot can avoid obstacles instead of blindly driving into them. This chapter does not yet build full path planning or mapping, but it gives the motion foundation needed for those later steps.
Beginners often assume that if both motors are told to run at the same speed, the robot will move in a perfectly straight line. In practice, real robots rarely behave so ideally. Tiny differences in motor strength, wheel diameter, surface friction, battery voltage, or robot weight balance can cause curved motion. That is why robotics engineers rely on calibration, testing, and feedback rather than assumptions. Movement is learned through repeated experiments: drive one meter, observe the result, adjust parameters, and try again.
By the end of this chapter, you should be able to describe how a beginner mobile robot moves, why motion estimates are imperfect, and how simple movement behaviors can be built from basic control rules. This prepares you for the next stage of robotics, where sensing and movement work together to produce navigation.
Practice note for Understand how wheels, motors, and power create movement: document your objective, define a measurable success check, and run a small experiment before scaling. Capture what changed, why it changed, and what you would test next. This discipline improves reliability and makes your learning transferable to future projects.
Practice note for Control forward motion, stopping, and turning: document your objective, define a measurable success check, and run a small experiment before scaling. Capture what changed, why it changed, and what you would test next. This discipline improves reliability and makes your learning transferable to future projects.
A mobile robot moves because its drive system turns stored energy into controlled motion. In beginner robots, this usually starts with a battery supplying electrical power to DC motors. The motors spin quickly, but raw motor speed is often too fast and too weak for useful movement, so gearboxes are commonly added. Gears reduce speed and increase torque, which is the turning force needed to start moving, climb small bumps, or push against floor friction. The result is a wheel that rotates at a practical speed with enough force to carry the robot.
The simplest and most common drive arrangement is the two-wheel differential drive. In this design, a left motor drives a left wheel and a right motor drives a right wheel. A caster wheel or small support wheel often keeps the robot balanced. This system is popular because it can move forward, backward, and turn without requiring steering linkages. If both wheels rotate forward together, the robot moves forward. If one wheel rotates faster than the other, the robot curves. If they rotate in opposite directions, the robot can spin in place.
Power matters as much as mechanics. A weak battery can make movement inconsistent. As voltage drops, motors may slow down, which changes stopping distance and turning behavior. Engineers therefore pay attention to battery health, motor driver limits, and wiring quality. Another practical factor is traction. Smooth wheels on a slippery floor may spin without producing matching motion. In that case, the motor is working, but the robot is not moving as expected. This difference between commanded motion and actual motion is one reason feedback becomes essential in robotics.
Common beginner mistakes include selecting motors that are too small, assuming all wheels behave identically, and ignoring weight distribution. A front-heavy or side-heavy robot can pull to one direction. A wheel mounted slightly off-center can create vibration and poor control. Good engineering judgment means testing the mechanical platform before writing advanced code. If the chassis cannot move reliably in a straight line or basic turn, the software will struggle to compensate.
In practice, a good beginner workflow is to verify each motor separately, confirm both wheels rotate in the expected direction, check that the robot starts and stops smoothly, and test movement on the same surface where it will operate. Strong movement begins with a simple, stable drive system.
Once a robot can move, the next task is to control how it moves. The most basic motion commands are forward, stop, reverse, turn left, and turn right. On a differential drive robot, these actions come from choosing motor directions and relative wheel speeds. Forward motion means both wheels move in the same forward direction. Stopping means sending zero power, applying braking if supported, or reducing speed gradually. Turning means creating a difference between left and right wheel motion.
Speed is usually controlled by changing the average power sent to each motor, often using pulse-width modulation, or PWM. A higher motor command usually produces a higher wheel speed, but not in a perfectly linear way. Friction, battery level, payload, and floor type all influence the result. Because of this, engineers avoid assuming that a command of 50 always means exactly half the speed of a command of 100. Instead, they measure and tune behavior. This is especially important when you want predictable stopping or accurate turns.
There are several ways a robot can turn. A gentle turn is made by running both wheels forward but at different speeds. For example, if the left wheel moves faster than the right wheel, the robot curves right. A sharper turn can be made by stopping one wheel and moving the other. A spin turn happens when one wheel moves forward and the other backward. Each method has trade-offs. Gentle turns are smoother and often more stable, while spin turns are useful in tight spaces but can increase wheel slip.
Stopping also deserves careful attention. A robot that simply cuts motor power may coast due to momentum. On smooth floors or with a heavier robot, this can cause overshoot. A controlled stop may reduce speed first and then brake. In simple educational robots, even adding a short low-speed phase before stopping can improve consistency. This is a practical example of engineering judgment: real motion systems benefit from gradual control rather than abrupt commands.
Beginners often command turns by time alone, such as “turn left for 0.8 seconds.” This can work in a controlled demo, but it is sensitive to battery charge and surface conditions. A more reliable approach is to combine timed commands with measurement from encoders or other sensors when available. Even before advanced navigation, learning to think in terms of controlled speed, measured duration, and observed result is a major step toward robust robot movement.
A moving robot needs some idea of where it has gone. One of the most common methods is odometry, which estimates motion from wheel rotation. If the robot knows the wheel diameter, it can estimate the distance traveled from the number of wheel turns. If it knows how much the left and right wheels turned relative to each other, it can estimate changes in direction. This relationship between wheel motion and robot movement is fundamental for mobile robotics.
Wheel encoders are often used to measure rotation. An encoder counts ticks as the wheel or motor shaft turns. Suppose a wheel has a circumference of 20 centimeters and the encoder reports one full turn. The robot estimates that the wheel has rolled 20 centimeters along the ground. If both wheels report the same forward distance, the robot assumes it moved mostly straight. If one wheel traveled farther, the robot assumes it turned. In differential drive robots, this left-right difference is how heading change is estimated.
Although the idea is simple, the estimate is never perfect. Wheels may slip during acceleration, on dust, or during sharp turns. The floor may not be flat. A wheel diameter may differ slightly from its nominal value. Even small errors accumulate over time. If a robot estimates its path only from wheel motion, the position error grows as it drives farther. This is called drift. Drift is one reason robots later combine odometry with other sensors such as gyroscopes, cameras, or range sensors.
Still, odometry is extremely useful for beginners because it connects motion commands to measurable outcomes. It lets a robot estimate distance traveled, compare expected and actual behavior, and perform simple path following. For example, if you want the robot to move about one meter, you can command motion until the encoder count reaches the expected value. If you want a quarter turn, you can estimate how much wheel difference corresponds to roughly ninety degrees.
A practical habit is to calibrate. Measure the actual distance traveled for a known encoder count. Repeat the test several times. Then adjust your wheel circumference or counts-per-turn assumption. Do the same for turning. This process teaches an important engineering truth: robot motion models are approximations, and careful measurement improves them. Even basic movement becomes much more reliable when wheel motion is linked to observed distance and direction.
Movement becomes useful when it is controlled by rules instead of isolated commands. A control rule is a simple decision about what the motors should do in response to a goal or measurement. For beginners, these rules do not need to be mathematically complex. A robot can already behave much better if it follows a few practical rules such as “if moving too fast near the target, slow down,” or “if drifting right, increase left correction slightly.”
One basic control problem is keeping a robot moving straight. Even if both motors receive the same command, the robot may curve. A simple rule-based controller can compare left and right encoder counts while driving. If the left wheel has turned less than the right wheel, increase left motor power slightly or reduce right motor power slightly. This kind of correction helps the robot maintain a straighter path. It is a first step toward feedback control, where the robot adjusts actions based on measured results.
Another useful control rule concerns distance targets. Imagine the robot needs to approach a location or drive a fixed distance. If it remains at full speed until the final moment, it may overshoot. Instead, a better rule is to move quickly when far away and slow down when close. This is a simple but powerful pattern: large error leads to stronger action, small error leads to gentler action. It reduces jerk, improves stopping accuracy, and is kinder to motors and batteries.
Timing logic is also part of movement control. Sensors can be noisy, and wheels can bounce over uneven surfaces. If a robot reacts instantly to every small fluctuation, it may twitch or oscillate. Engineers often add short delays, minimum command durations, or threshold values. For example, only trigger a turn if an obstacle is detected for more than a brief moment, or only apply a heading correction if the wheel count difference exceeds a meaningful amount. These details make behavior calmer and more dependable.
The practical outcome of simple control rules is consistency. Instead of hoping the robot behaves well, you give it a structure for correcting itself. That is a major shift in robotics thinking. Motion is not just “tell the wheels what to do.” Motion is “measure, compare, adjust, and repeat.” This same workflow later supports line following, waypoint tracking, and autonomous navigation.
A robot does not need a full map to show intelligent behavior. One of the most useful beginner skills is building a reactive movement behavior. Reactive means the robot responds directly to what its sensors detect right now. A classic example is obstacle avoidance. The robot drives forward until a distance sensor reports something too close. It then stops, backs up slightly, turns, and tries another direction. This is simple, but it already combines sensing, deciding, and acting.
A good obstacle avoidance behavior begins with clear thresholds. For example, if the front distance is greater than a safe limit, continue forward. If the distance falls below the limit, stop. If the obstacle remains close, reverse for a short time and then rotate left or right. If one side has more open space than the other, turn toward the more open side. These rules are easy to understand and easy to test. They are also a good example of how robotic intelligence can be built from small practical decisions rather than complicated reasoning.
Engineering judgment matters here. If the safe distance is too small, the robot reacts too late and may collide. If it is too large, the robot becomes overly cautious and may get stuck in open areas. Reverse distance and turn angle also need tuning. A tiny turn may leave the robot facing the same obstacle. A very large turn may make its path inefficient and erratic. Testing in a real room is the best way to choose values that fit the robot’s speed, sensor range, and turning ability.
Common mistakes include reacting to single noisy sensor readings, forgetting that the robot needs space to stop, and turning without checking whether the new direction is actually clear. Another problem is oscillation, where the robot repeatedly changes its mind and wiggles in place. This often happens when rules are too sensitive. Adding a short commitment period after a turn, or averaging several sensor readings, can make behavior much more stable.
The practical outcome is important: with only simple movement commands and a basic distance sensor, a robot can already navigate locally through clutter. This demonstrates the difference between action and planning. The robot is not planning a global route. It is reacting in the moment. That is often enough for beginner projects and forms a useful stepping stone toward more advanced navigation systems.
Reactive movement is useful, but it has clear limits. A robot that only responds to immediate sensor input does not remember much about where it has been or what areas are blocked. It can avoid a chair leg, but it may circle the same table repeatedly. It can turn away from a wall, but it may choose a poor direction because it has no larger picture of the space. This is why robotics separates sensing, mapping, planning, and acting. Movement alone is not navigation.
Without mapping, the robot lives in the present moment. Its decisions are local. If the front sensor sees open space, it moves forward. If it sees an obstacle, it turns. That can work well in simple environments, but it struggles in mazes, narrow passages, and spaces with dead ends. The robot may get trapped in loops because it cannot represent the environment well enough to reason about alternative routes. This is a practical limitation, not a failure of movement control itself.
Odometry helps somewhat by giving a rough estimate of past motion, but odometry alone is not the same as a map. Since wheel-based estimates drift over time, the robot’s guessed position becomes less trustworthy on longer runs. If the robot tries to return to a previous point using only wheel counts, accumulated error may place it noticeably off target. This shows why later robotic systems fuse motion estimates with landmarks, range scans, cameras, or known map features.
Still, understanding the limits of movement without mapping is valuable engineering knowledge. It tells you what your robot can do well right now and what tasks require additional capability. A simple beginner robot can perform forward motion, controlled turning, stopping, and local obstacle avoidance very effectively. It can patrol a small space or wander safely. But if you want reliable room-to-room travel, shortest-path decisions, or return-to-start behavior, you need more than movement rules. You need representation of the environment and some form of planning.
This distinction connects directly to the course outcomes. Sensing tells the robot what is nearby. Movement lets it act. Odometry estimates what happened during motion. Mapping organizes knowledge about space. Planning chooses a route through that space. In this chapter, you built the movement foundation. In later chapters, that foundation will support smarter navigation, where the robot not only moves, but moves with purpose.
1. What is the main role of motors and wheels in a mobile robot?
2. Why might a robot fail to move in a perfectly straight line even if both motors are given the same speed command?
3. How does a beginner mobile robot usually make a turn?
4. What can wheel rotation help a robot estimate?
5. Which behavior is an example of simple obstacle avoidance described in the chapter?
A robot that only reacts to the latest sensor reading behaves like a person walking through a room with no memory of where the walls, doors, or furniture were a moment ago. It can still avoid hitting things, but it will move cautiously, repeat mistakes, and often waste time. A map gives the robot a memory of space. That memory does not need to be perfect or human-like. It simply needs to store useful information about what parts of the environment seem open, blocked, unknown, or important for navigation.
In earlier chapters, sensing and motion were introduced as separate ideas. In practice, mapping connects them. Sensors measure distance, direction, brightness, or motion. The robot controller combines those measurements over time and places them into a spatial structure. Once the robot has that structure, it can make better decisions: where to turn next, whether a corridor is worth exploring, how to return to a charging station, or how to avoid entering a dead end again. This is why maps are central to autonomous systems. They reduce repeated guessing.
For beginners, it helps to think of a robot map as a working sketch rather than a polished drawing. A home robot vacuum does not need a perfect architect's floor plan. It needs enough spatial memory to move efficiently and safely. A warehouse robot needs more accuracy because a small navigation error near shelves can become a collision risk. Engineering judgment matters here: the right map is the one that is good enough for the task, sensor quality, computing power, and speed requirements.
There are several common ways robots represent space. Some use grid maps, where the room is divided into many small cells. Others use landmarks, such as corners, visual markers, or recognizable features. Some store paths and connections between important places instead of every wall detail. Each approach trades memory, accuracy, and ease of update. A beginner should not ask, "Which map is best?" but rather, "Which map helps this robot act well in this situation?"
This chapter follows the practical workflow a real robot uses. First, it gathers distance readings from sensors such as ultrasonic sensors, lidar, infrared, or depth cameras. Next, it estimates where the robot is relative to its earlier position using wheel motion, an inertial sensor, or both. Then it inserts those sensor readings into a local map near the robot or into a larger map of the whole area. As the robot moves, the map is updated again and again. Because motion estimates are never perfect, maps also contain uncertainty. Good robotics work accepts that uncertainty and manages it instead of pretending it does not exist.
You will see why robots need maps for better navigation, how local maps differ from larger global maps, how simple sensor readings become a room layout, and why imperfect maps still remain useful. Most importantly, you will learn to separate four ideas that are often mixed together: sensing collects measurements, mapping stores spatial knowledge, planning chooses a route, and acting sends commands to motors. A robot becomes more capable when these parts support each other clearly.
When these steps are organized well, a robot no longer wanders blindly. It begins to behave as if it remembers the world around it.
Practice note for Understand why robots need maps for better navigation: document your objective, define a measurable success check, and run a small experiment before scaling. Capture what changed, why it changed, and what you would test next. This discipline improves reliability and makes your learning transferable to future projects.
Practice note for Learn the difference between local and global maps: document your objective, define a measurable success check, and run a small experiment before scaling. Capture what changed, why it changed, and what you would test next. This discipline improves reliability and makes your learning transferable to future projects.
A robot map is not just a picture for humans. It is a data structure that helps a machine decide how to move. In the simplest case, a map tells the robot which places are likely free, which are occupied, and which have not been observed yet. That may sound basic, but even this simple information changes behavior dramatically. Without a map, a robot often repeats the same turns, gets trapped in loops, or treats every moment as completely new. With a map, it can remember where it has already been and use that memory to make better choices.
It is important not to imagine that all robots build rich visual maps like video games. Many useful robots operate with rough, practical maps. A delivery robot may only need corridor boundaries and docking points. A cleaning robot may only need room edges, large obstacles, and areas already covered. The level of detail depends on the job. This is a key piece of engineering judgment: more detail is not always better. Detailed maps require more memory, more processing, and more careful error handling.
Beginners often confuse a map with a route. A route is a plan from one place to another. A map is the stored model of the environment that makes planning possible. The map also differs from raw sensor readings. A lidar scan or ultrasonic distance measurement is temporary and local to the current moment. The map keeps useful parts of many readings over time. In that sense, the map gives the robot a memory of space.
Another common misunderstanding is that maps must be exact. Real robot maps are usually approximate. Walls may look thicker than they really are. Chair legs may appear and disappear depending on viewing angle. A doorway may shift slightly if the robot's position estimate drifts. Yet the map can still be useful. If it helps the robot avoid collisions, revisit important places, and travel more efficiently, then it is doing its job.
When designing a robot system, ask practical questions: What decisions depend on the map? How often must it update? How accurate must it be for safe motion? The answers guide the whole navigation design.
Robots can represent space in several ways, and each method fits different tasks. One of the most common beginner-friendly methods is the grid map. In a grid map, the floor area is split into many small squares, often called cells. Each cell stores a value such as free, occupied, or unknown. If the cells are small, the map can describe space in fine detail. If they are larger, the map is less precise but easier to compute. Grid maps are popular because they work naturally with distance sensors and are easy to update as new readings arrive.
Another approach is landmark-based mapping. Instead of storing every small patch of floor, the robot remembers distinctive features: a corner, a doorway, a sign, a visual marker, or a special object shape. This can be efficient when the robot operates in large spaces where full detail is unnecessary. A robot may navigate by moving from landmark to landmark, much like a person remembering a building by elevators, stairs, and reception desks. The challenge is that landmarks must be reliable. If the robot mistakes one chair for another, the map becomes confused.
A third style is a room or topological layout. In this method, the robot stores places and connections rather than detailed geometry. For example, room A connects to hallway B, which connects to room C. This is useful for high-level planning. It answers questions like, "Which sequence of places leads to the target?" However, it does not by itself provide enough detail for close obstacle avoidance. Many real systems combine topological maps with local grid maps for nearby motion.
Choosing among these styles depends on the environment and the job. A small indoor robot often benefits from occupancy grids because walls and furniture matter. A museum guide robot may rely more on landmarks. A warehouse system may use a structured layout with known aisles and stations. Common beginner mistakes include choosing a representation because it sounds advanced rather than because it fits the sensing and control needs.
In practice, these approaches are not rivals. They are tools. A strong robotics design often uses more than one map representation at different levels of decision-making.
To build a simple room map, a robot starts with sensor readings and an estimate of its own position. Suppose the robot has an ultrasonic sensor or lidar that measures how far away obstacles are. If the robot knows the direction the sensor is facing and roughly where the robot is located, each reading can be projected into the map. A short reading suggests a nearby obstacle. A longer reading suggests open space up to that distance. Repeating this process from different positions gradually fills in the room layout.
A practical workflow looks like this. First, the robot reads its sensors. Second, it estimates movement since the last update using wheel rotation, motor commands, or an inertial sensor. Third, it transforms each sensor reading into map coordinates. Fourth, it updates the map cells or landmarks. Fifth, it repeats while moving. Even this basic cycle is enough to create a recognizable sketch of a room if the robot moves slowly and the sensors are reasonably consistent.
Consider a robot driving along one wall. If its distance sensor repeatedly detects a surface two meters to the right, the map will begin to show a long boundary there. If the reading suddenly opens to a larger distance, that may indicate a doorway or open area. If the robot turns and scans again, the new viewing angle can confirm whether the opening is real. This is how separate sensor readings become a room map: not by magic, but by combining geometry and repeated observation.
Beginners often make two mistakes here. The first is treating each reading as perfectly true. Sensors are noisy. Soft materials, shiny surfaces, angled walls, and moving people can all produce misleading values. The second is forgetting that position estimates matter as much as sensor quality. If the robot thinks it moved straight when it actually curved slightly, then correct distance readings may be placed in the wrong map location.
Good engineering practice uses filtering, repeated observation, and conservative updates. A single strange reading should not rewrite the whole map. Stable patterns over time deserve more trust than isolated measurements.
Robots often use both local and global maps because navigation happens at different scales. A local map covers the area near the robot right now. It is used for immediate decisions such as avoiding a chair leg, passing through a doorway, or steering around a person. A global map covers a much larger region, such as an entire apartment floor, office, or warehouse section. It helps the robot plan longer routes and remember important places over time.
Local maps are usually faster to update because they are smaller and focus on current surroundings. They are especially useful when the world changes. If a person sets a box in the hallway, the local map can react quickly even if the larger stored map still shows that hallway as open. This is one reason local mapping is so important for safety. It handles the world as it is now, not just as it was earlier.
Global maps support efficiency and task memory. A robot that knows the larger layout can decide that the kitchen is beyond the hallway, that the charger is near the wall in the living room, or that one corridor leads to a dead end. Without a global map, the robot may still avoid immediate obstacles but will travel less intelligently. It may repeatedly rediscover the same spaces instead of using earlier knowledge.
Engineering judgment is needed to decide how these maps interact. A common design is to let the global map provide the broad route while the local map adjusts that route around short-term obstacles. This prevents the robot from blindly following a path that is temporarily blocked. Another design choice is update rate. Local maps may refresh many times per second, while global maps update more slowly to remain stable.
A common mistake is relying too much on one type. If a robot only uses a global map, it can become unsafe in dynamic environments. If it only uses a local map, it may move safely but inefficiently, with poor long-distance behavior. Robust navigation usually needs both scales working together.
Every robot map depends on knowing, at least roughly, where the robot is. This is harder than it first appears. Many robots estimate motion using wheel encoders, which count wheel rotation. If the wheels roll perfectly, the estimate can be quite good over short distances. But real floors are imperfect. Wheels slip, surfaces vary, and turns are rarely exact. Small errors build up over time. This gradual accumulation is called drift.
Drift is one of the main reasons robot maps become imperfect. Imagine a robot driving around a rectangular room. If each turn is estimated a few degrees incorrectly, then by the time it returns near its starting point, the map may not line up with itself. Walls that should meet may appear offset. A doorway may seem wider or narrower than it is. The map can still be useful, but the errors become more noticeable as the robot travels farther without correction.
Sensor noise adds to the problem. Distance readings fluctuate. Inertial sensors can accumulate bias. Visual features may be misidentified. Beginners sometimes try to solve this by trusting one sensor completely, but that rarely works. Better systems combine several sources: wheel odometry for short-term motion, inertial sensing for rotation changes, and environmental observations to correct accumulated error. Even simple robots benefit from this layered thinking.
A practical habit is to treat all position estimates as uncertain. Instead of asking, "Where exactly is the robot?" ask, "What position is most likely, and how wrong might it be?" That mindset leads to safer design choices. For example, the robot may slow down in narrow spaces, leave extra clearance near walls, or wait for additional readings before committing to a tight turn.
Common mistakes include mapping too quickly, assuming drift is negligible, and failing to revisit known areas for correction. Good mapping is not about eliminating all error. It is about keeping error small enough that the robot can still sense, plan, and act effectively.
A robot's map is rarely finished. In most real applications, the map is updated continuously while the robot moves. This creates a practical challenge: the robot must sense, estimate its motion, update the map, and control its motors at nearly the same time. If any one part runs poorly, the whole navigation system becomes weak. This is why robotics engineers think in loops rather than isolated steps.
A useful mental model is: sense, estimate, map, plan, act, and repeat. The robot measures distances and motion, estimates where it is, updates the local and possibly global map, chooses the next motion, sends motor commands, and then begins the cycle again. When this loop runs smoothly, the robot can adapt to new obstacles, improve its room layout, and correct decisions as better information arrives.
There is also a balance between stability and responsiveness. If the robot updates the map too aggressively from every new reading, the map may become noisy and unstable. If it updates too slowly, it may ignore important changes such as a person stepping into its path. Engineering judgment means choosing update rates, confidence thresholds, and motion speeds that suit the sensors and environment. Slow, careful motion often produces much cleaner maps than fast, jerky movement.
Practical systems also separate short-term and long-term changes. A moving person should affect immediate path decisions, but should not permanently become a wall in the global map. A newly discovered closed door, however, may deserve a longer-lasting update. This difference matters because robots operate in environments that are partly stable and partly changing.
The practical outcome of continuous mapping is better autonomy. The robot no longer acts only on the present instant. It remembers space, improves that memory as it travels, and uses the improved map to move more intelligently. That is the core idea of this chapter: a map gives the robot a useful memory of the world, even when that memory is incomplete. With that memory, navigation becomes not just reactive, but informed.
1. Why do robots need maps for navigation?
2. What is the main difference between a local map and a global map?
3. How does a robot begin turning sensor readings into a map?
4. According to the chapter, why can imperfect maps still be useful?
5. Which statement correctly separates mapping from planning?
In the earlier chapters, the robot learned how to sense the world, estimate where things are, and build a simple map. This chapter connects those pieces into a useful behavior: moving from a starting point to a goal without hitting anything. That is the job of path planning. Planning answers a practical question: given what the robot knows right now, what route should it take?
A beginner often imagines robot movement as a straight line from here to there. Sometimes that works in a wide, empty room. In real environments, however, direct movement is often unsafe or inefficient. A wall may block the shortest route. A chair may be partly visible. A narrow passage may be technically open but too tight for the robot to pass safely. Planning helps the robot compare possible routes and choose one that is reachable, safer, and easier to follow.
It helps to separate four ideas that beginners sometimes mix together. Sensing means collecting information from sensors. Mapping means organizing that information into a useful picture of free space and obstacles. Planning means deciding a route through the map. Acting means sending commands to motors so the robot actually moves. A robot that senses well but plans poorly may still crash. A robot that plans well but follows the path poorly may drift into a wall. Good robot behavior comes from combining all four steps into one workflow.
In this chapter, you will learn how to turn a map into a simple route to a goal, compare direct movement with planned navigation, choose safer paths around walls and obstacles, and combine sensing, mapping, planning, and action in a loop. You will also see why engineering judgment matters. The mathematically shortest path is not always the best path. A route with a little more distance may be much easier to follow and much less likely to fail.
When engineers design beginner robot systems, they usually start with a clear sequence:
This sequence sounds simple, but each step requires good decisions. How much clearance should be left near a wall? When should a robot stop and make a new plan? What happens if the map is incomplete? Practical robotics is about making these decisions carefully enough that the robot behaves safely and predictably, even with imperfect information.
Think of planning as choosing a corridor through the world. The robot is not just finding points on a map; it is finding a path its real body can follow. That means width matters, turning space matters, and uncertainty matters. A robot with noisy sensors should leave a little extra room. A robot with slow steering should avoid sharp zigzags. These are not advanced details to ignore until later. They are basic engineering habits that make planning useful in the real world.
By the end of this chapter, you should be able to look at a simple map and reason about a practical route, explain why a planned path is often better than a direct movement, and describe how a robot joins sensing, mapping, planning, and acting into one working system.
Practice note for Turn a map into a simple route to a goal: document your objective, define a measurable success check, and run a small experiment before scaling. Capture what changed, why it changed, and what you would test next. This discipline improves reliability and makes your learning transferable to future projects.
Practice note for Compare direct movement with planned navigation: document your objective, define a measurable success check, and run a small experiment before scaling. Capture what changed, why it changed, and what you would test next. This discipline improves reliability and makes your learning transferable to future projects.
Practice note for Choose safe paths around walls and obstacles: document your objective, define a measurable success check, and run a small experiment before scaling. Capture what changed, why it changed, and what you would test next. This discipline improves reliability and makes your learning transferable to future projects.
A goal point is just a destination on a map: for example, the charging dock, a doorway, or a marked coordinate in a room. A travel plan is more than that. It is a series of safe locations or motions that connect the robot’s current position to the goal. Beginners often ask, “Why not just drive toward the goal?” The answer is that the goal tells the robot where to end, but not how to get there safely.
To build a travel plan, the robot first needs a map that separates free space from blocked space. On a simple grid map, each cell might be marked free, occupied, or unknown. The planner then searches through free cells to create a route from start to goal. In a hand-built beginner example, this can be as simple as drawing a line of connected safe cells that bends around obstacles.
Planning also depends on where the robot is now, not just where it wants to go. If the robot starts facing away from the goal, the first action may be a turn. If the robot is already close to a wall, it may need to back away slightly before moving forward. This is why planning is grounded in the robot’s actual pose: position and heading together.
A practical travel plan usually has two layers. The first is the global route, which says the general way to reach the goal across the map. The second is the local motion, which decides the next short movement, such as “move forward 20 centimeters” or “turn 15 degrees.” This layered view is useful because the global route gives direction, while local motion handles real-world details.
Engineering judgment matters here. A route that barely squeezes through free cells may look valid on the map but fail in practice because the robot body is wider than expected or sensor readings are noisy. A good beginner planner does not just ask, “Is there a path?” It asks, “Is there a path that this robot can actually follow with enough safety margin?”
One common mistake is planning from an outdated map. If the map says a hallway is open but a box has been moved there, the plan may immediately fail. Another common mistake is setting a goal inside an obstacle or too close to a wall. A good system checks that the goal itself is reachable and safe before planning begins.
In practice, turning a goal point into a travel plan means translating a single destination into a realistic sequence of safe moves. That is the point where a map becomes useful for action.
For path planning, the most important question is not “Where are the obstacles?” but “Where is enough free space for the robot to move safely?” These are related, but not identical. A robot is not a mathematical point. It has width, length, turning limits, and sensor error. Because of that, engineers usually expand obstacles in the map by a safety margin. This process is sometimes called adding clearance or inflating obstacles.
Imagine a robot that is 30 centimeters wide moving past a wall corner. If the map leaves only 31 centimeters of free space, the route may seem possible. In reality, tiny errors in steering or sensing could cause a collision. If we add a safe distance around walls and obstacles, the planner will avoid routes that are technically open but practically risky.
This idea helps beginners compare direct movement with planned navigation. Direct movement often points the robot toward the goal without considering safe clearance. Planned navigation uses the map to choose a route through open areas, often staying away from edges. That route may be longer, but it reduces risk and is easier to follow reliably.
Obstacles are not always large and obvious. They can include table legs, low boxes, people, cords, or objects only partly seen by sensors. Unknown space is also important. A robot should be cautious about driving into areas it has not sensed clearly. In some systems, unknown cells are treated as blocked until proven free. In others, they are handled with reduced speed and extra checks.
A common beginner mistake is using the same safety margin everywhere. In reality, safe distance may depend on speed, sensor quality, and environment. A faster robot needs more stopping space. A robot with poor side sensing may need more wall clearance. A robot on a slippery floor may need more room to turn.
The practical outcome is simple: good planning is based on usable free space, not just empty-looking space. Safe distance turns a map from a sketch of obstacles into a map the robot can trust for movement.
Beginner path planning does not need complicated mathematics to be useful. The core idea is to search for a connected route through free space. On a small grid map, one very simple method is to step from the current cell to nearby cells until the goal is reached, always avoiding occupied cells. More systematic approaches such as breadth-first search or A-style search are popular because they can find good routes efficiently, but the main lesson is more basic: planning means checking options before moving.
One helpful way to think about planning is as a graph problem. Each safe location is a node, and each allowed movement between locations is an edge. The planner asks which sequence of edges reaches the goal with acceptable cost. That cost might represent distance, time, number of turns, or closeness to obstacles. Even at a beginner level, this is powerful because it shows that the “best” path depends on what the robot values.
Suppose there are two ways around a block. One path is shorter but hugs a wall and requires two tight turns. The other path is slightly longer but wide and straight. A distance-only planner may choose the first route. A safer practical planner may choose the second because it is easier for the robot to execute. This is a good example of engineering judgment improving behavior.
Another beginner-friendly idea is to create waypoints. Instead of trying to think about every motor command at once, the planner chooses a small list of target points: go to the hallway center, then to the doorway, then to the final goal. Waypoints simplify navigation and often produce smoother movement.
Common mistakes include planning diagonally through corners where the robot cannot actually fit, ignoring turning radius, or using a map resolution that is too coarse. If cells are too large, narrow obstacles may disappear. If cells are too small, planning may become slow and noisy. A useful map resolution captures important structure without overwhelming the system.
For beginners, the practical takeaway is that simple planners are enough to demonstrate real robot intelligence. The robot does not need a perfect route. It needs a route that is safe, understandable, and good enough to follow in the real environment.
A planned path is only valid as long as the world stays close to the map used to create it. Real environments change. A person walks by. A chair gets moved. A door that was open is now closed. Because of this, planning is not a one-time event. The robot must keep sensing while it moves and be ready to update the map and compute a new route.
This is where the full workflow becomes clear: sense, map, plan, act, and repeat. The robot does not stop being a sensing system once it has a path. In fact, movement makes sensing even more important because the robot is entering new areas and seeing objects from new angles.
Replanning can happen for several reasons. The path ahead may become blocked. The robot may notice that its position estimate has shifted. The goal may change. Or the planner may discover that the current route is no longer the safest option. In a simple beginner system, replanning might happen whenever the next waypoint is obstructed or whenever a fresh sensor reading disagrees strongly with the map.
There is also a trade-off. Replanning too rarely makes the robot inflexible and unsafe. Replanning too often can make it hesitate, jitter, or waste computation. Practical systems balance stability with responsiveness. Many robots keep following the current path if only small harmless changes appear, but trigger replanning when a real conflict is detected.
A common mistake is failing to slow down before replanning. If the robot waits until the obstacle is too close, it may not have enough distance to stop safely. Another mistake is fully trusting one noisy sensor reading. It is better to confirm a change when possible or use caution while gathering more information.
The important practical outcome is that planning is not a fixed route painted on the floor. It is a living decision process connected to current sensing. A reliable robot is one that can adapt when the world refuses to match the original plan.
Once a path has been planned, the robot still has to follow it. This sounds simple, but many path failures happen during execution rather than planning. A path on a map is abstract. Following it requires real motor commands, timing, and correction from sensors. In other words, acting is where the plan meets the physical world.
A beginner robot often follows a path by aiming for the next waypoint. If the waypoint is ahead, move forward. If it is off to one side, turn toward it first. As the robot moves, it repeatedly checks its heading and position, then makes small corrections. This is far more reliable than sending one large command and hoping the robot ends up in the right place.
Step-by-step following also helps combine direct movement with planned navigation. The robot may use local direct motion toward the next waypoint, but the overall sequence of waypoints comes from the planner. This combination is practical because it keeps the movement simple while preserving global safety.
Speed matters. A robot should move more slowly in narrow spaces, near obstacles, or when turning sharply. It can move faster in open areas. A common beginner mistake is using one fixed speed everywhere. That often leads to overshooting turns, drifting wide in corners, or struggling to stop when something unexpected appears.
Another practical issue is path smoothness. A route with many tiny zigzags may be mathematically valid on a grid but difficult for a wheeled robot to follow. Smoothing the path or reducing unnecessary turns often improves real movement. Engineers often prefer a path that is slightly longer but much easier to track.
The key lesson is that planning and acting are linked. A good path is not just one that exists on a map. It is one the robot can follow step by step with the sensors, motors, and control accuracy it really has.
Every beginner robotics project reaches a moment when the robot cannot find a path, chooses a bad one, or starts well and then gets stuck. This is normal. Planning failures are valuable because they reveal which part of the workflow needs improvement. The best response is not guessing, but checking the system in a structured way.
First, check the map. Are obstacles marked correctly? Is free space actually free? Has obstacle inflation made the world too tight for any route, or too loose to be safe? Second, check localization. If the robot does not know where it is accurately, even a good planner will build the wrong route. Third, check the goal. Is it inside free space with enough room around it? Fourth, check execution. Is the robot failing because the planner is bad, or because the robot cannot follow the planned turns and distances?
It is also important to inspect assumptions about the environment. Maybe lighting changed and reduced sensor quality. Maybe reflective surfaces confused distance readings. Maybe the floor caused wheel slip so the robot drifted away from the expected path. Planning quality depends on the quality of sensing and motion, so failures are often system-wide rather than isolated.
A useful troubleshooting habit is to visualize each stage. Draw the robot position, the obstacle map, the inflated safety zone, the goal, and the chosen path. Then compare what the robot thinks with what is physically true. This often makes the problem obvious. For example, a planner may seem broken when the real issue is simply that the robot body was not accounted for in the map.
Common failure patterns include routes too close to walls, paths through unknown space, goals placed in unreachable corners, and frequent replanning caused by noisy sensors. Each problem suggests a practical fix: increase clearance, improve sensing, choose better goal points, or filter sensor data more carefully.
The most important lesson is that planning failure does not mean robotics has stopped working. It means the robot is giving feedback about the quality of its sensing, mapping, planning, and acting chain. A careful engineer uses that feedback to improve the whole system until the robot can travel safely and repeatably from here to there.
1. What is the main purpose of path planning in this chapter?
2. Why is direct movement often worse than planned navigation in real environments?
3. Which choice correctly matches planning with the other robot tasks?
4. According to the chapter, why might the mathematically shortest path not be the best one?
5. What should a robot do after converting a route into small movement steps?
This chapter is written as a guided learning page, not a checklist. The goal is to help you build a mental model for Build a Beginner Robot Navigation Project so you can explain the ideas, implement them in code, and make good trade-off decisions when requirements change. Instead of memorising isolated terms, you will connect concepts, workflow, and outcomes in one coherent progression.
We begin by clarifying what problem this chapter solves in a real project context, then map the sequence of tasks you would follow from first attempt to reliable result. You will learn which assumptions are usually safe, which assumptions frequently fail, and how to verify your decisions with simple checks before you invest time in optimisation.
As you move through the lessons, treat each one as a building block in a larger system. The chapter is intentionally structured so each topic answers a practical question: what to do, why it matters, how to apply it, and how to detect when something is going wrong. This keeps learning grounded in execution rather than theory alone.
Deep dive: Design a complete beginner robot task from start to finish. In this part of the chapter, focus on the decision points that matter most in real work. Define the expected input and output, run the workflow on a small example, compare the result to a baseline, and write down what changed. If performance improves, identify the reason; if it does not, identify whether data quality, setup choices, or evaluation criteria are limiting progress.
Deep dive: Create a simple navigation flow using sensors maps and movement. In this part of the chapter, focus on the decision points that matter most in real work. Define the expected input and output, run the workflow on a small example, compare the result to a baseline, and write down what changed. If performance improves, identify the reason; if it does not, identify whether data quality, setup choices, or evaluation criteria are limiting progress.
Deep dive: Test robot behavior with clear success measures. In this part of the chapter, focus on the decision points that matter most in real work. Define the expected input and output, run the workflow on a small example, compare the result to a baseline, and write down what changed. If performance improves, identify the reason; if it does not, identify whether data quality, setup choices, or evaluation criteria are limiting progress.
Deep dive: Plan the next steps toward more advanced robotics learning. In this part of the chapter, focus on the decision points that matter most in real work. Define the expected input and output, run the workflow on a small example, compare the result to a baseline, and write down what changed. If performance improves, identify the reason; if it does not, identify whether data quality, setup choices, or evaluation criteria are limiting progress.
By the end of this chapter, you should be able to explain the key ideas clearly, execute the workflow without guesswork, and justify your decisions with evidence. You should also be ready to carry these methods into the next chapter, where complexity increases and stronger judgement becomes essential.
Before moving on, summarise the chapter in your own words, list one mistake you would now avoid, and note one improvement you would make in a second iteration. This reflection step turns passive reading into active mastery and helps you retain the chapter as a practical skill, not temporary information.
Practical Focus. This section deepens your understanding of Build a Beginner Robot Navigation Project with practical explanation, decisions, and implementation guidance you can apply immediately.
Focus on workflow: define the goal, run a small experiment, inspect output quality, and adjust based on evidence. This turns concepts into repeatable execution skill.
1. What is the main goal of Chapter 6?
2. When designing a beginner robot task, what should you do first?
3. Why does the chapter suggest comparing results to a baseline?
4. If your robot's performance does not improve, what does the chapter recommend checking?
5. How is learning in this chapter structured?
- Learning Evolved.
- Intelligence Amplified.


