Computer Vision — Beginner
Learn how cameras turn images into useful AI decisions
"AI That Sees for Beginners: Photos to Smart Cameras" is a short, book-style course for anyone who has ever wondered how a phone can recognize a face, how a shopping app can identify a product from a picture, or how a smart camera can notice motion and objects. You do not need any background in artificial intelligence, coding, mathematics, or data science. This course starts from zero and explains every idea in plain language.
The course treats computer vision as a practical skill for understanding modern technology. Instead of jumping into difficult terms, it begins with the most basic question: what does it mean for a machine to “see”? From there, you will build a clear mental model of how images become data, how AI learns patterns from examples, and how visual systems are used in homes, hospitals, shops, roads, and public services.
This course is structured like a short technical book with six connected chapters. Each chapter builds on the one before it, so you are never asked to understand advanced ideas too early. You start by learning what computer vision is and where it appears in daily life. Then you move into pixels, color, resolution, and image quality so you can understand what a digital image really contains.
Once that foundation is clear, the course introduces the idea of training data, labels, and models. You will learn how AI studies examples and makes predictions without getting lost in technical complexity. After that, the course explains the main jobs of computer vision, including image classification, object detection, and segmentation. These core tasks are presented with simple examples so you can tell what each one does and when it is useful.
The final chapters focus on practical thinking. You will see why good images and clear labels matter, why vision systems sometimes fail, and how issues like lighting, bias, and unfair data can affect results. You will also learn how smart cameras work in real time and how to think through a beginner-friendly project from idea to evaluation.
This course is a strong fit for curious individuals, professionals exploring AI tools, business teams evaluating camera-based systems, and public sector learners who need a clear introduction to visual AI. If you want to understand how image recognition works before using or buying a solution, this course gives you the right starting point.
It is especially helpful if you want to make sense of topics such as image recognition, object detection, smart surveillance, visual quality checks, and AI-powered photo search. By the end, you will not be an advanced engineer, but you will understand the concepts well enough to ask smart questions, evaluate simple use cases, and plan your next learning step with confidence.
If you are ready to learn how AI turns images into decisions, this course offers a clear and friendly path. It is short enough to finish without feeling overwhelmed, yet deep enough to give you a true foundation in beginner computer vision. You can Register free to begin, or browse all courses to explore related topics in AI.
By the time you finish, you will understand the full beginner journey from phone photos to smart cameras: what images are, how machines read them, how systems learn, where they fail, and how real-world visual AI products are designed. That knowledge is the perfect first step into the fast-growing world of computer vision.
Computer Vision Educator and Machine Learning Engineer
Sofia Chen designs beginner-friendly AI training focused on practical visual systems. She has helped teams explain image recognition, object detection, and smart camera workflows in simple language for non-technical learners.
When people first hear the phrase computer vision, it can sound mysterious, as if a machine has suddenly gained eyes and understanding. In practice, computer vision is the field of teaching computers to work with images and video in useful ways. A vision system does not experience a scene the way a person does. It receives pixel data from a camera, processes patterns in that data, and produces an output such as a label, a location, a mask, a warning, or a decision. That may sound simple, but it opens the door to many familiar tools: phone face unlock, package scanning, crop monitoring, self-checkout systems, and cameras that can count people or detect safety helmets.
This chapter builds a beginner-friendly mental model of visual AI. You will learn what it means for AI to “see,” where computer vision appears in everyday life, and how machine sight differs from human sight. You will also begin to understand the basic workflow behind image understanding: collect images, label examples, train a model, test it on new images, and improve the system when it makes mistakes. This practical view matters because successful vision projects are rarely about clever algorithms alone. They depend on engineering judgment: choosing clear labels, gathering images that match the real world, and noticing when lighting, blur, background clutter, or bias causes errors.
A good place to begin is with a simple truth: a digital image is data. Every photo is made from tiny picture elements called pixels. Each pixel stores color information, and together those pixel values create shapes, edges, textures, and objects. A human looking at a photo may instantly say, “That is a dog on a sofa.” A machine must work from lower-level patterns first. It may notice color changes, repeated textures, outlines, and spatial arrangements. Modern AI systems, especially deep learning models, learn these patterns from many labeled examples. If you show a model enough clearly labeled images of dogs, cats, cups, cars, or leaves, it gradually learns which pixel patterns tend to match each category.
As you move through this course, you will also learn an important distinction between three major computer vision tasks. Image classification answers a question about the whole image, such as “Is there a cat in this photo?” Object detection finds and locates items, often with boxes, such as “There are three apples, and here is where each one is.” Segmentation goes one step further and marks the exact pixels that belong to each object or region. These tasks look related, but they solve different problems and require different kinds of labels and evaluation.
Beginners often assume visual AI works like magic if enough data is added. Real projects teach the opposite lesson: quality matters more than excitement. A blurry training set creates a blurry model. Poor labels teach confusion. Images captured only in bright daylight may fail at dusk. Photos from one neighborhood, one skin tone range, one camera angle, or one product style may not generalize well. Learning to spot these risks early is part of becoming effective with computer vision. Even a small beginner project becomes stronger when you ask practical questions: Are the labels consistent? Are the examples varied? Will the system be used indoors, outdoors, day, night, or in motion?
By the end of this chapter, you should be able to explain computer vision in simple words, recognize common real-world uses, compare human and machine perception, and describe a basic path from raw photos to useful predictions. Think of this chapter as the foundation for everything that follows. Before building smart cameras, object detectors, or image datasets, you need a clear picture of what “seeing” means in AI. Once that picture is in place, the rest of the course becomes much easier to understand and much more practical to apply.
Practice note for Understand what computer vision is: document your objective, define a measurable success check, and run a small experiment before scaling. Capture what changed, why it changed, and what you would test next. This discipline improves reliability and makes your learning transferable to future projects.
Computer vision begins with a simple idea: turn visual input into useful action. A regular camera captures light and stores it as an image or video stream. A smart camera does something more. It analyzes what it captures and responds in a meaningful way. That response might be unlocking your phone after recognizing your face, highlighting a barcode for checkout, detecting motion in a security system, or warning a driver that a lane is drifting. The “smart” part comes from software that interprets image data rather than merely saving it.
For beginners, it helps to think of computer vision as a pipeline. First, a device captures an image. Next, software reads the image as numbers. Then a model looks for patterns it has learned before. Finally, the system produces an output, such as a label, a box around an object, or a yes/no decision. In engineering practice, each step matters. If the camera is low quality, the model gets poor input. If the labels used during training are inconsistent, the model learns the wrong lesson. If the output is not designed for the actual need, the entire system may be impressive but not useful.
This is why visual AI is not only about recognition accuracy. It is also about matching the system to the real task. If you want to sort ripe and unripe fruit, a simple classifier may be enough. If you want to count fruit on a tree, you likely need detection. If you want to measure damaged areas on leaves, segmentation may be the right choice. Beginners often jump to advanced models before defining the job clearly. A better habit is to ask: What decision must the system support? What image conditions will it face? How much error is acceptable?
As cameras become cheaper and more powerful, visual AI is moving from research labs into daily tools. But successful systems still depend on careful setup, practical testing, and realistic expectations. Smart cameras do not “understand” scenes in a human sense. They identify patterns that are useful enough to support a goal. That practical viewpoint will guide the whole course.
When you open a photo, you see people, objects, places, and meaning. A machine starts much lower. It sees an image as a grid of pixels. Each pixel stores values, often for red, green, and blue color channels. Together, millions of these tiny values form the picture. This is one of the most important beginner ideas in computer vision: images are data first, interpretation second. AI must learn how arrangements of pixels relate to labels such as “cat,” “car,” “banana,” or “road.”
Early computer vision systems often relied on hand-crafted features such as edges, corners, lines, and textures. Modern deep learning systems still depend on these ideas, but they learn feature patterns automatically from examples. In simple terms, lower layers of a model may respond to basic structures like edges or color changes. Deeper layers can combine those patterns into more meaningful parts such as wheels, eyes, leaves, or door shapes. Eventually the system estimates what object or region is likely present. This is not magic understanding. It is learned statistical pattern matching built on many examples.
For practical work, image quality matters more than many beginners expect. Poor lighting can wash out colors or hide object boundaries. Motion blur can smear important details. Shadows may make the same object appear different from one image to the next. Busy backgrounds can distract a model from the object of interest. Even image size matters: if an object appears as only a few pixels, there may not be enough information for reliable recognition.
A useful mental model is that AI climbs a ladder of meaning. At the bottom are pixel values. Above that are local patterns such as edges and color patches. Higher still are object parts and arrangements. At the top are task outputs: classify, detect, or segment. If you remember this ladder, many future topics in the course will feel more intuitive.
Computer vision already surrounds you, even if you do not notice it. Social media apps can suggest photo tags. Navigation apps may read signs or interpret road scenes. Retail stores use cameras to monitor shelves and reduce stock errors. Factories use visual inspection systems to spot damaged products faster than manual checking. Hospitals and clinics use image analysis to assist professionals in reading scans and identifying patterns worth attention. Farms use drones and phone cameras to inspect crop health. Sports broadcasts track players and ball movement. All of these are examples of machines turning images into useful information.
These systems do not all solve the same problem. Some classify entire images. For example, a plant app might predict whether a photo shows a healthy leaf or a diseased one. Some detect objects by drawing boxes around each item, such as cars at an intersection or packages on a conveyor belt. Others perform segmentation by marking the exact pixels of a road, tumor region, background, or person. Learning the difference between these tasks is essential because the task determines how you prepare data, which labels you need, and how you judge success.
Suppose you want to build a beginner project that identifies whether a recycling bin image contains plastic, paper, or glass. If only one main category matters per image, classification may work. But if one image contains several item types at once, object detection becomes more useful. If you need to measure how much of the image is covered by waste or by damage, segmentation may be required. Good engineering starts by matching the task type to the actual question.
One common beginner mistake is assuming a flashy use case means a difficult model is necessary. Often the opposite is true. A small, carefully defined problem with clear photos and consistent labels can produce excellent beginner results. Vision projects become manageable when the use case is narrow, the environment is controlled, and the labels reflect the real decision you need to make.
Humans and machines both work with visual information, but they do it very differently. A person can recognize a dog in dim light, from an unusual angle, or with part of the body hidden behind a chair. Human perception uses years of experience, memory, context, and common sense. You do not need to count pixels to know a mug is still a mug when rotated or partly covered. A computer vision model has no such natural understanding. It learns from examples, and what it learns depends heavily on the data it was shown.
This difference explains both the strength and weakness of visual AI. Machines can process huge numbers of images quickly and consistently. They do not get tired in the same way people do. In repetitive settings such as quality inspection or traffic monitoring, this can be powerful. But machines can also fail in ways that seem surprising. A model trained mostly on bright outdoor images may struggle indoors. A system trained on one camera angle may misread another. A model may latch onto the background instead of the object if the training set accidentally teaches that shortcut.
That is why labeled examples are central to machine sight. During training, humans provide images and the correct answers: the category, the object locations, or the pixel regions. Over time, the model adjusts itself to connect visual patterns to those labels. This works well when the labels are clear and the training images represent the real conditions of use. It works poorly when labels are inconsistent, the data is too small, or the dataset contains hidden bias.
For beginners, the key lesson is not that machines are “worse” than people. It is that they are different. Human vision is flexible and context-rich. Machine vision is pattern-based and data-dependent. Once you understand that, common errors become easier to predict and fix. Better lighting, better labels, more representative examples, and clearer task design usually improve machine performance far more than wishful thinking about model intelligence.
Visual AI matters because so much of the world is visual. People make decisions from images constantly: reading signs, inspecting products, noticing hazards, checking crops, spotting defects, identifying species, and reviewing medical imagery. When machines can assist with parts of this work, they can improve speed, scale, and consistency. In some cases, visual AI can also reduce cost or make services available where experts are scarce. A farmer with a phone camera may get early guidance on crop disease. A small shop may automate stock monitoring. A beginner with a simple project may build a tool that counts objects or flags damaged items.
However, real value comes only when the system is reliable enough for the setting. This is where engineering judgment becomes essential. If a vision model is used at night, then nighttime images must appear in the dataset. If it will analyze people, then fairness and representation matter. If it will operate in safety-critical settings, false positives and false negatives must be studied carefully. A model that performs well on clean demo images may fail badly in dusty warehouses, rainy roads, or cluttered homes.
Bias is one of the most important practical risks. If a dataset overrepresents some groups, objects, backgrounds, or lighting conditions, the model may perform unevenly. Another frequent problem is label noise. If one person labels a photo as “cup” and another labels a similar photo as “mug,” the model receives a mixed message. Beginners should learn early that preparing a simple photo dataset is not just collecting files. It means choosing classes carefully, writing clear label rules, checking image quality, and including variation without chaos.
In real projects, success often comes from small disciplined steps: gather representative images, clean the data, label consistently, test on unseen examples, inspect errors, and revise. Visual AI matters not because it is futuristic, but because it can solve ordinary problems when built thoughtfully.
This course is designed to take you from curiosity to practical understanding. In this first chapter, you have met the core idea of computer vision: teaching machines to work with images by learning patterns from labeled examples. You have also seen that machine sight starts with pixels, not meaning, and that useful systems depend on data quality, label clarity, and realistic testing. Those ideas are the foundation for everything ahead.
In the next parts of the course, you will deepen this mental model. You will look more closely at how images are built from pixels, color channels, and patterns. You will learn how models are trained on labeled datasets and how predictions are evaluated. You will compare image classification, object detection, and segmentation not just in theory, but in terms of when each should be used. You will also practice preparing beginner-friendly datasets, because data preparation is one of the most valuable skills in applied computer vision.
Another major theme of the course is error awareness. Beginners often focus only on successful predictions, but strong practitioners study failure. If a model confuses a cat with a small dog, why? If it misses objects in shadow, what changed? If it performs poorly on one kind of phone camera, what does that reveal about the training data? Learning to investigate errors will help you build systems that are not just interesting, but dependable.
By the end of the course, you should be able to explain computer vision in simple language, identify where it is useful, describe how AI learns from examples, choose the right task type for a problem, assemble a basic photo dataset with clear labels, and recognize common causes of mistakes such as poor lighting, blur, background clutter, and bias. That is a strong starting point for anyone entering the world of AI that sees.
1. What is computer vision in the context of this chapter?
2. According to the chapter, how does a vision system begin understanding an image?
3. Which example best matches object detection rather than image classification or segmentation?
4. What is the basic workflow for image understanding described in the chapter?
5. Why might a vision model trained only on bright daylight photos perform poorly at dusk?
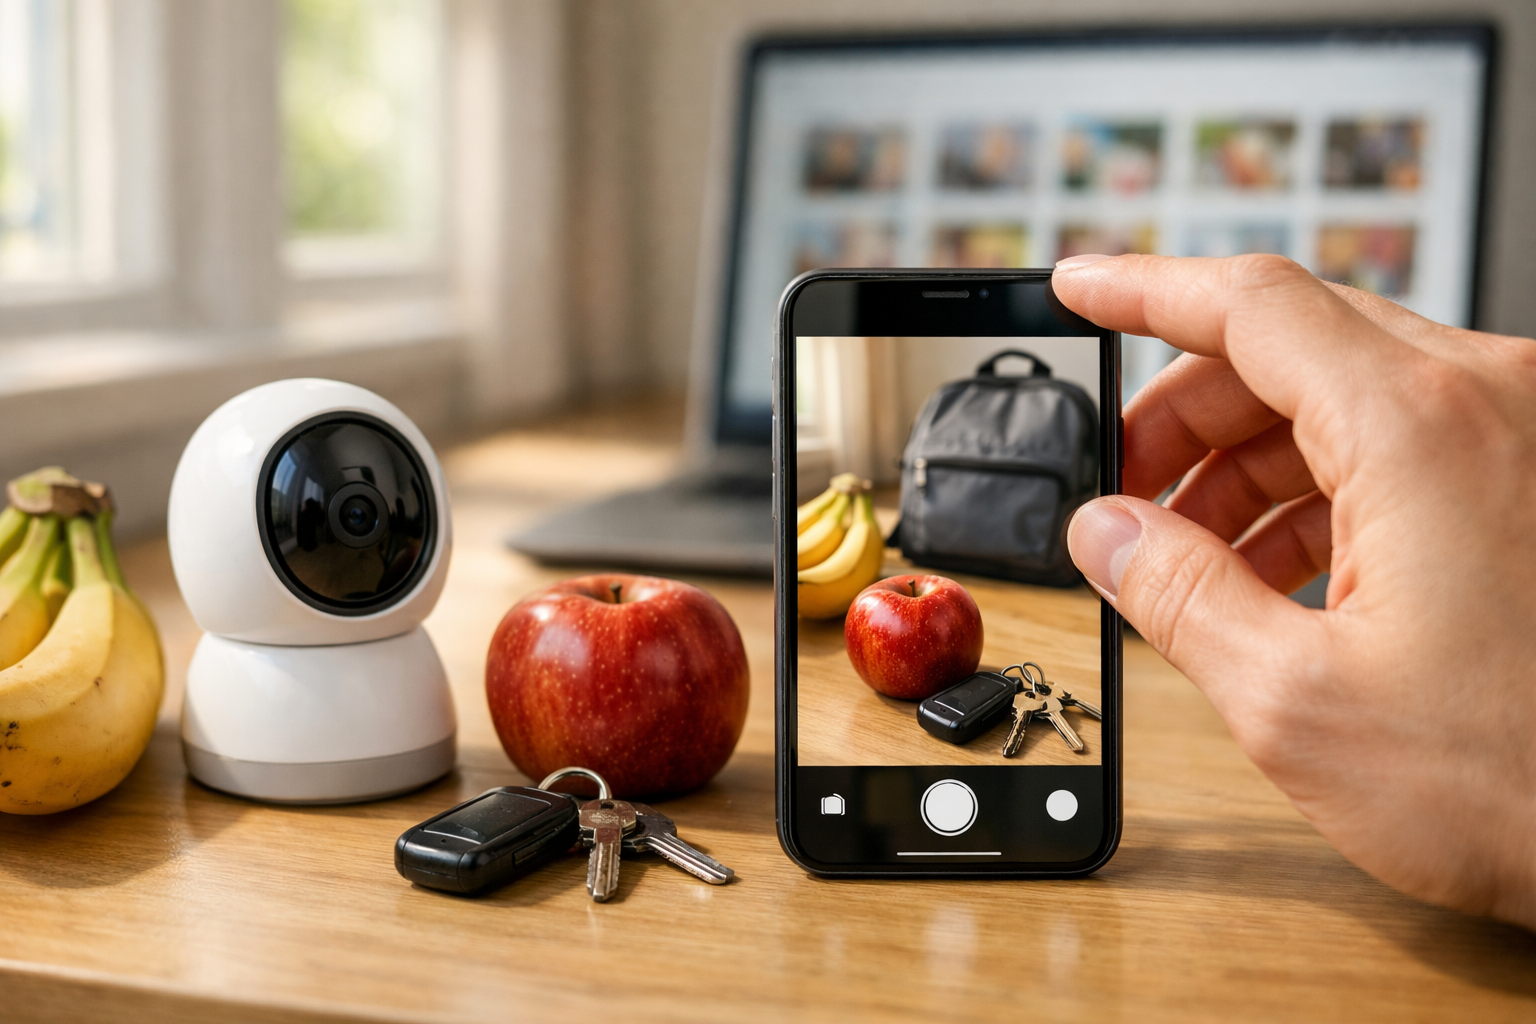
Before a computer can recognize a face, count apples, or warn that a lane marker is drifting, it must deal with something much simpler: an image as data. For beginners, this is the key mental shift in computer vision. Humans look at a photo and immediately understand a scene. A machine receives a grid of numbers. This chapter explains how that grid is built, how color and brightness are stored, and why repeated visual patterns let AI systems tell one object from another.
Digital images are not magic pictures living inside a device. They are measurements. A camera sensor captures light, and software stores that light as many tiny values arranged in rows and columns. Each tiny location is called a pixel. When enough pixels are placed together, your eyes see a smooth image. When a model reads them, it sees structured data that can be compared, filtered, and learned from.
This matters because nearly every practical computer vision workflow begins with the same engineering question: what exactly is the model being fed? If your images are blurry, too dark, too small, poorly labeled, or inconsistent in color, the model will not learn the right patterns. In beginner projects, performance is often limited less by complex math and more by image quality, labeling discipline, and good judgment about what the pixels actually represent.
In this chapter, you will learn how digital images are stored, understand pixels, color, and resolution, see how patterns help machines identify objects, and practice reading an image as data without coding. These ideas connect directly to later topics such as classification, detection, and segmentation. A classifier may decide whether an image contains a cat. A detector may draw a box around the cat. A segmentation model may mark the exact cat-shaped pixels. All three depend on the same foundations: pixels, color values, and visible patterns.
As you read, keep one practical goal in mind: if you were asked to prepare photos for a beginner AI project today, could you make choices that help the model instead of confusing it? That means checking lighting, choosing a sensible image size, avoiding mixed labels, and noticing hidden bias in what your pictures show. Good computer vision starts with careful looking, not just clever algorithms.
Think of this chapter as learning the alphabet of visual AI. Once you understand what the numbers mean, you can better explain why a model succeeds, why it fails, and how to improve the data it sees.
Practice note for Learn how digital images are stored: document your objective, define a measurable success check, and run a small experiment before scaling. Capture what changed, why it changed, and what you would test next. This discipline improves reliability and makes your learning transferable to future projects.
Practice note for Understand pixels, color, and resolution: document your objective, define a measurable success check, and run a small experiment before scaling. Capture what changed, why it changed, and what you would test next. This discipline improves reliability and makes your learning transferable to future projects.
Practice note for See how patterns help machines identify objects: document your objective, define a measurable success check, and run a small experiment before scaling. Capture what changed, why it changed, and what you would test next. This discipline improves reliability and makes your learning transferable to future projects.
Practice note for Read an image as data without coding: document your objective, define a measurable success check, and run a small experiment before scaling. Capture what changed, why it changed, and what you would test next. This discipline improves reliability and makes your learning transferable to future projects.
A pixel is the smallest addressable unit in a digital image, but it is not a tiny square object in the real world. It is better to think of a pixel as one measurement taken at one position in a grid. If an image is 800 pixels wide and 600 pixels tall, then it contains 480,000 measured locations. Each location stores information about light captured there. When all of those values are displayed together, your brain blends them into meaningful objects.
This simple idea has an important consequence for computer vision: a machine does not begin with “dog,” “road sign,” or “leaf.” It begins with a matrix of values. Nearby pixels that change together may form an edge. Groups of edges may form a shape. Repeated arrangements of shapes may become a recognizable object. This is why raw images are often described as data arrays rather than pictures.
When beginners inspect images for AI projects, they should ask practical questions. Is the object large enough to occupy enough pixels? Is it cut off at the edge? Is the background taking up most of the image? A cat occupying 20 pixels in a distant photo gives much less useful information than a cat clearly visible in 20,000 pixels. More pixels on the target often means more learnable detail.
A common mistake is treating all images as equal because they look fine at a glance. Two photos may both show a cup, yet one may have the cup centered and sharp while the other has it tiny and partly hidden. To a model, those are very different learning examples. Good engineering judgment means checking not only whether an object is present, but how strongly the pixels represent it.
You can also read an image as data without coding by imagining a table. Each row and column has a value, and the values nearby usually relate to each other. Sudden changes often mark boundaries. Smooth regions often mark flat surfaces or blurred areas. This mindset helps you understand why AI can analyze images systematically rather than magically.
Most digital color images are stored using channels. The most common format is RGB: red, green, and blue. Instead of one value per pixel, there are usually three. A pixel might be stored as a combination such as red 200, green 120, blue 60. Together these numbers produce the visible color at that location. In many common formats, each channel uses values from 0 to 255, where 0 means none of that channel and 255 means a strong amount.
Brightness is closely related but not identical to color. A bright white area has high values in all three channels. A dark area has low values. A pure red object may be bright in the red channel and low in the other two. Many vision systems either use full color or convert images into grayscale when color is not essential. Grayscale reduces each pixel to one brightness value, which can simplify some tasks but may remove useful clues.
In practice, color can help or hurt. It helps when objects are meaningfully distinguished by color, such as ripe versus unripe fruit or red warning lights versus dark backgrounds. It hurts when color varies for reasons unrelated to the task, such as different indoor bulbs, sunset light, or camera filters. A beginner dataset with mixed lighting may accidentally teach the model to rely on color casts instead of true object structure.
A strong habit is to inspect whether color is a reliable signal in your project. If you are identifying bananas, yellow may matter. If you are identifying chairs, shape may matter more than color because chairs come in many colors. This is a judgment call, and good computer vision work often depends on making the right call early.
Another common mistake is forgetting that cameras do not all record color the same way. Different phones can make the same scene warmer, cooler, more saturated, or darker. If your training images come mostly from one device and your real-world images come from another, model accuracy may drop. This is one reason consistency in data collection is so important for beginner projects.
Resolution describes how many pixels an image contains, usually written as width by height, such as 1920 by 1080. Higher resolution means more sampled points and often more visible detail. But more is not always better. A very large image increases storage, memory use, and processing time. Many AI systems resize images before training because models often need a fixed input size.
It is important to separate resolution from file size and from visual quality. A compressed JPEG may have high resolution but still contain blocky artifacts or smearing. A smaller PNG may preserve edges more cleanly. For computer vision, the useful question is not “How big is the file?” but “Does the image preserve the information needed for the task?” If fine texture matters, heavy compression can damage learning. If only broad shapes matter, moderate compression may be acceptable.
Beginners often make two opposite mistakes. The first is shrinking images too aggressively, causing small objects to disappear or lose sharp boundaries. The second is using giant images for no reason, making training slow without improving results. Good engineering judgment means matching image size to the task. For classifying large, centered objects, moderate sizes may work well. For detecting tiny defects or distant signs, higher detail may be necessary.
You should also think about object scale. If one image shows a full car and another shows only a small car far away, the model must learn across very different sizes. Some variation is healthy because real life varies. Too much uncontrolled variation can confuse a beginner model. A practical approach is to keep examples reasonably consistent at first, then expand diversity later.
When preparing a dataset, check for blur, motion smear, over-compression, screenshots of screenshots, and accidental crops. These quality problems can silently damage model performance. A model trained on poor-quality images may learn the wrong patterns or fail when shown cleaner images in deployment. The safest habit is to review samples visually and ask whether the target detail is truly visible in the pixels.
Machines recognize objects by finding patterns in pixel arrangements. Some of the most useful patterns are edges, shapes, corners, and textures. An edge appears where pixel values change sharply, such as the boundary between a dark mug and a light table. Shapes emerge from groups of edges. Texture comes from repeated fine patterns, such as fur, grass, brick, or fabric.
These patterns are powerful because they remain meaningful even when exact pixels change. A cat may move, rotate, or appear in a different color, yet ears, eyes, fur texture, and body outline still create related visual structures. AI models learn these recurring structures from many labeled examples. This is why labeled data matters so much. Labels connect visible patterns to names like “cat,” “tree,” or “stop sign.” Without clear labels, the model cannot learn the right mapping.
Patterns also help explain the difference between major vision tasks. In image classification, the model looks for patterns that support one whole-image label. In object detection, it must locate where those patterns occur and place boxes around them. In segmentation, it must decide which exact pixels belong to each object or region. All three tasks build on the same low-level clues but use them in increasingly precise ways.
A practical lesson for dataset preparation is that cluttered backgrounds can mislead a model. If every photo of a coffee mug is taken on the same kitchen counter, the model may learn the counter texture instead of the mug shape. This is called a shortcut or spurious correlation. To reduce it, collect examples with varied backgrounds, angles, distances, and object appearances while keeping labels accurate.
Another mistake is assuming AI understands objects the way humans do. Humans can infer hidden parts and context easily. Models need repeated exposure to the patterns that truly signal the object. If an object is often occluded, partly cropped, or mixed with similar textures, you need enough examples to teach that variation. Practical success comes from asking not just “What is in this photo?” but “What repeatable visual evidence would a machine actually use?”
Lighting is one of the biggest sources of vision error because it changes the pixel values before the object itself changes. A white cup can look gray in shadow, yellow under warm indoor light, or bright blue near a window. Reflections can hide detail. Strong backlight can turn an object into a dark silhouette. To people, the object often remains obvious. To a model, the data may look very different.
This is why poor lighting is a classic cause of failure in beginner projects. If training images are collected in one stable condition, such as a bright office desk, the model may perform well there but fail outdoors, at night, or under uneven lighting. The lesson is not that lighting must always be perfect. The lesson is that your training data should reflect the conditions where the model will actually be used.
Good engineering judgment means deciding whether to control lighting or embrace variation. For a simple classroom demo, controlled lighting can help isolate the concept and produce cleaner learning. For a practical smart camera, variation is necessary because real environments change. The best approach often combines both: start with clean images to verify the pipeline, then add realistic diversity such as shadows, cloudy weather, different rooms, and multiple times of day.
Lighting problems are also tied to bias. If a face dataset mostly contains well-lit images of some groups but poorly lit images of others, the system may perform unfairly. If a product dataset shows items only on white backgrounds, the model may fail in stores or homes. Bias in vision often enters through what is missing, not just what is present. Reviewing a dataset for diversity of lighting, environment, and subject presentation is a basic but important fairness check.
Practical fixes include using consistent exposure when collecting data, avoiding extreme glare, taking multiple conditions on purpose, and removing images where the target is unreadable. The goal is not visual beauty. The goal is dependable evidence in the pixels.
Turning photos into machine-friendly data means organizing images so a model can learn from them consistently. The core workflow is simple: collect images, decide the task, label them clearly, inspect quality, and store them in a predictable structure. But in practice, the details matter. A beginner project often succeeds or fails based on label clarity more than model choice.
Start by choosing the task. If each image should get one label, you are doing classification. If you need boxes around objects, you are doing detection. If you need exact object regions, you are doing segmentation. The task determines how detailed your labels must be. Beginners sometimes mix tasks accidentally, such as using whole-image labels when the object is tiny and not always centered. That creates confusion because the label does not match the visual evidence.
Next, make labels unambiguous. If one folder is named “dog” and another is “puppy,” the categories may overlap. If some images contain multiple objects but only one label, the model may learn inconsistent rules. A good beginner dataset uses category names that are easy to define and apply consistently. It is better to have fewer, clearer classes than many messy ones.
Then check machine-friendliness. Keep image formats consistent when possible, avoid duplicates, and make sure files open correctly. Resize thoughtfully rather than randomly. Remove images that are too blurry, too dark, or mislabeled. Split data into training, validation, and test sets so you can evaluate honestly. If near-duplicate images appear in both training and test sets, results may look better than reality.
You can read an image as data without coding by thinking in layers: pixel grid, color channels, object patterns, and label. A model does not need a story about the photo. It needs a stable relationship between visual evidence and the target answer. Your job in dataset preparation is to protect that relationship.
The practical outcome of this chapter is straightforward. If you understand how images are stored and how patterns appear in pixel data, you can make smarter choices about photo collection, resolution, labels, and quality control. That foundation will support everything that comes next in computer vision, from simple classifiers to smart cameras that find and track objects in the real world.
1. What is the key mental shift beginners must make in computer vision?
2. Why can poor image quality hurt a computer vision model?
3. How is color usually represented in digital images according to the chapter?
4. Which visual features help AI systems separate one object from another?
5. If you were preparing photos for a beginner AI project, which choice would best help the model?
In the last chapter, you saw that images are made of pixels, colors, edges, and repeated visual patterns. Now we take the next step: how an AI system uses many pictures to learn what those patterns mean. This chapter introduces the beginner-friendly idea behind computer vision learning. You do not need advanced math to understand the process. Instead, think about how people learn from examples. A child can learn what a bicycle looks like after seeing many bicycles from different angles, in different colors, and in different places. A computer vision system learns in a similar way, except it needs carefully prepared examples and clear instructions.
Those instructions usually come in the form of training data and labels. Training data is the collection of images you show the system. Labels are the answers that tell the system what each image contains. If you want a model to tell cats from dogs, you show it many cat images labeled “cat” and many dog images labeled “dog.” Over time, the model adjusts itself to connect pixel patterns with the correct label. This is the basic idea of machine learning for images.
It is also important to remember that not all vision tasks are the same. Sometimes we want one answer for the whole image, such as “this photo shows a banana.” That is called image classification. Sometimes we want to find where an object is in the image, such as drawing a box around each banana. That is object detection. Sometimes we want a pixel-level map showing exactly which pixels belong to the banana. That is segmentation. The learning process is related across all three tasks, but the labels must match the goal.
As you read this chapter, focus on four practical ideas. First, examples teach the AI system. Second, the model is the part that learns from those examples. Third, learning works best when the data is clear, balanced, and connected to the real-world problem. Fourth, the path from training to prediction is a workflow: collect images, label them, train the model, test it, and then use it on new images.
Good engineering judgment matters from the beginning. Beginners often think success comes from using a powerful model first. In practice, clear labels and realistic images matter more than fancy tools. A small, well-organized dataset usually teaches more than a large messy one. Poor lighting, blurry photos, confusing labels, and biased examples can all make a vision system fail in ways that are easy to miss. By the end of this chapter, you should be able to explain in simple words how AI learns from pictures and what makes that learning work well or fail badly.
In beginner projects, you might train a system to sort recyclable items, recognize simple hand gestures, tell ripe fruit from unripe fruit, or count products on a shelf. In all of these cases, the same core ideas apply. Start with a clear task, gather representative examples, label them carefully, and test on images the model has never seen before. That is how a smart camera begins to become useful instead of just interesting.
Practice note for Understand training data and labels: document your objective, define a measurable success check, and run a small experiment before scaling. Capture what changed, why it changed, and what you would test next. This discipline improves reliability and makes your learning transferable to future projects.
Practice note for See how examples teach an AI system: document your objective, define a measurable success check, and run a small experiment before scaling. Capture what changed, why it changed, and what you would test next. This discipline improves reliability and makes your learning transferable to future projects.
Training data is the collection of examples used to teach an AI system. In computer vision, these examples are usually images or video frames. You can think of training data as the study material for the model. If the study material is clear and relevant, the model has a better chance of learning something useful. If the study material is messy, incomplete, or misleading, the model will learn the wrong lessons.
For a beginner, the most important point is that training data must match the real task. If you want a camera to recognize apples on a kitchen table, your training images should include apples in kitchens, on tables, under different lighting conditions, and from different angles. If all your training photos show apples centered on a white background, the model may perform well in practice tests but fail in a real kitchen. This is why engineers say the data should be representative of the real-world environment.
Training data can be simple or complex. For image classification, each training example may be a whole image with one label. For object detection, each image may also include one or more boxes showing where objects are located. For segmentation, training data is more detailed because regions or pixels must be marked. The task decides what kind of training data is needed.
A practical beginner workflow is to collect a small but thoughtful dataset. Use images with normal variation: near and far views, bright and dim lighting, clean and cluttered backgrounds. Include cases that are easy and cases that are hard. Avoid duplicates where dozens of images are almost identical, because they do not add much learning value. The goal is not just to have many pictures. The goal is to have useful variety.
When people say an AI system “learns from data,” this is what they mean. It does not understand the world the way humans do. It studies examples and finds statistical patterns that connect image content to answers. The better the training data reflects the problem, the better the chance that the model will make good predictions later.
Labels are the teaching signals attached to training images. They tell the model what answer is correct. In a cat-versus-dog classifier, the labels might simply be “cat” and “dog.” In a recycling project, the labels might be “plastic bottle,” “can,” “paper,” and “other.” Without labels, a supervised computer vision system has no clear target to learn.
Good labels must be consistent. This sounds simple, but it is one of the most common places where beginner projects go wrong. Suppose one person labels a tomato as “fruit,” another labels it as “vegetable,” and a third labels it as “tomato.” Even if each label makes sense in some context, the model now receives mixed instructions. It cannot learn a clean category boundary if humans do not agree on the rules. Before labeling, define categories clearly and write a short guide that explains what belongs in each class.
Examples should also be balanced enough to support learning. If you have 900 images of dogs and 100 images of cats, the model may lean too strongly toward predicting “dog.” That does not always mean the project fails, but it does mean you should pay attention to class imbalance. In beginner projects, it is often better to gather a modest, balanced set first rather than one large, uneven collection.
The form of labels depends on the task. Classification uses one label for the whole image. Detection uses labels plus boxes around objects. Segmentation uses labels assigned to pixel regions. This difference matters because it changes the effort required to create the dataset. A classification project may be quick to label. A segmentation project may require careful annotation work.
One practical habit is to inspect your labels by hand before training. Open a sample of images and verify that the labels make sense. Look for wrong categories, missing objects, cut-off images, and accidental duplicates. Cleaning labels early saves a lot of time later. Many model problems are not model problems at all; they are labeling problems hidden inside the dataset.
A model is the part of the system that learns from examples. For beginners, the easiest way to understand a model is as a pattern-finding machine. It does not memorize the meaning of objects like a human. Instead, it adjusts internal settings so that certain image patterns become linked with certain answers. Those patterns may include colors, edges, textures, shapes, and combinations of visual features.
Imagine showing the model many pictures of stop signs. The model may notice that stop signs often have a red color, an octagonal shape, and strong edge boundaries. If you also show many non-stop-sign images, it learns that not every red object is a stop sign. In this way, examples teach the AI system what patterns matter and which ones are misleading.
This is why variety matters so much. If every stop sign image is taken on a sunny day from the same distance, the model might accidentally connect “sunny bright background” with “stop sign.” Then it may fail on rainy or nighttime images. Good learning happens when the model sees enough variation to focus on stable patterns instead of accidental details.
Another useful idea is that the model learns by making mistakes and being corrected. During training, it predicts an answer for each image. The training process compares that prediction with the label, measures the error, and adjusts the model to reduce future error. This cycle repeats many times. Over time, the model becomes better at matching image patterns to the correct output.
Engineering judgment matters here. A more complex model is not automatically better for a beginner dataset. If you only have a small number of examples, a simpler approach may generalize better. Also, if your images are low quality or labels are noisy, even a sophisticated model can learn the wrong patterns. Learning patterns is not magic. It is the result of repeated exposure to examples that are informative, consistent, and connected to the real use case.
The complete workflow of a beginner vision project usually follows a simple path: collect data, label data, split the dataset, train the model, test the model, and then use it for prediction. Understanding this flow is essential because many beginners focus only on training and forget that testing is what tells you whether the model will work on new images.
Training is the stage where the model sees labeled examples and adjusts itself. But if you judge performance only on those same training images, you may fool yourself. The model can become too specialized to the training set, a problem called overfitting. It may seem accurate because it has learned the details of those examples, but it may not perform well on fresh images taken later.
That is why datasets are often split into at least two parts: a training set and a test set. The training set teaches the model. The test set checks whether the model learned patterns that generalize beyond the original examples. Some projects also use a validation set to tune settings during development. The key idea is simple: testing must happen on images the model did not learn from directly.
Prediction is the final stage. Here, the trained model receives a new image and produces an output such as a class label, a confidence score, a set of bounding boxes, or a segmentation map. This is what people usually see as the “AI result.” But prediction quality depends entirely on the earlier stages. If the data and labels are weak, prediction will be weak.
In practice, keep the workflow disciplined. Do not move test images into the training set just to raise your score. Do not change labels after seeing test failures unless you review the dataset systematically. And always inspect failure cases. If the model struggles with dark images, crowded scenes, or unusual angles, those observations are valuable. They show you what kind of new data or improved labeling is needed next.
Beginners often hear that machine learning needs a lot of data. That is partly true, but it can lead to a bad habit: collecting huge numbers of images without checking whether those images are useful. More data helps only when it improves coverage of the problem. If the extra images are repetitive, mislabeled, or unrelated to the real task, they may waste time or even make learning worse.
Imagine building a model to recognize oranges. If you add 5,000 nearly identical photos of the same orange on the same table, you have increased the quantity but not the diversity. The model may become too tuned to that setting. It has not truly learned what oranges look like in stores, kitchens, lunch boxes, or outdoor markets. In this case, 200 varied images could be more valuable than 5,000 repetitive ones.
Quality includes several dimensions: correct labels, enough visual diversity, representative lighting, realistic backgrounds, and fair coverage of important categories. If one class has sharp, high-resolution images and another class has blurry, dark images, the model may learn quality differences instead of object differences. That creates a hidden bias in the dataset.
Another issue is annotation cost. Detection and segmentation labels can take a lot of time to create. It is often smarter to label a smaller set carefully than to rush through a large set with many mistakes. Clean examples are powerful teaching material. Messy examples force the model to learn from confusion.
A practical strategy is to start small, train early, inspect failures, and then collect more targeted data. If your model fails on side views, gather more side views. If it struggles under yellow indoor light, capture more examples in that setting. This feedback loop is far more efficient than blindly adding random images. Good dataset growth is guided by evidence, not by the simple belief that bigger must be better.
Many beginner vision projects fail for predictable reasons, and most of them have more to do with data and setup than with advanced algorithms. One common mistake is using images that are too clean and unrealistic. A model trained only on perfect product photos may fail badly when used with a real camera in clutter, shadows, reflections, or motion blur.
Another major mistake is poor labeling. Inconsistent categories, missed objects, and unclear rules create confusion for the model. If people labeling the data do not agree on what counts as a positive example, the system receives mixed messages. Write clear category definitions and review samples before training.
Beginners also often ignore environmental factors. Poor lighting can hide edges and distort colors. Camera angle can change shape appearance. Backgrounds can accidentally become shortcuts. For example, if all “cat” photos are indoors and all “dog” photos are outdoors, the model may learn room versus grass instead of cat versus dog. This is a classic form of bias caused by the dataset rather than by the model itself.
Another mistake is not separating training and testing data properly. If nearly identical images appear in both sets, the test result may look strong even though the model has not truly generalized. Keep your testing honest. That is the only way to know whether the system is ready for use.
Finally, beginners sometimes expect perfect predictions. Real vision systems make errors. The important skill is to understand why they fail. Review wrong predictions one by one. Ask whether the issue comes from low image quality, missing examples, class imbalance, weak labels, or task confusion between classification, detection, and segmentation. This habit builds practical engineering judgment. A useful smart camera is rarely created in one try. It is built through repeated cycles of collecting, labeling, training, testing, and improving with care.
1. What do labels do in an image-learning system?
2. Which example best matches object detection?
3. According to the chapter, what usually matters more than using a fancy model first?
4. What is the basic workflow from training to prediction described in the chapter?
5. Why is testing on new images important?
In the last chapters, you learned that computer vision helps machines turn pictures and video into useful decisions. In this chapter, we focus on the main kinds of jobs that vision systems do. This matters because many beginner mistakes come from picking the wrong type of vision task. If the goal is only to decide what is in a photo, one method is enough. If the goal is to locate every object, a different method is needed. If the goal is to outline the exact shape of something, we need an even more detailed approach.
The three core tasks you will hear about again and again are image classification, object detection, and segmentation. These tasks are related, but they answer different questions. Classification asks, “What is this image mostly about?” Detection asks, “What objects are here, and where are they?” Segmentation asks, “Which exact pixels belong to each object or region?” Understanding this difference is a major step toward building useful beginner projects.
There are also specialized vision jobs such as reading text from images, finding faces, and tracking movement over time. These are often built on top of the core ideas. In practice, companies and developers do not start by asking, “Which model is popular?” They start by asking, “What decision do we need from the image?” Good engineering judgment means matching the business problem to the simplest vision approach that can solve it well enough.
For example, imagine a bakery checking whether a tray contains cookies or muffins. A simple classification system may be enough. But if the bakery wants to count every cookie on the tray, it needs detection. If it wants a robot arm to frost only the visible cookie surfaces, it may need segmentation. The image is the same, but the job is different, so the vision method changes.
As you read this chapter, keep one practical rule in mind: choose the least complicated task that still answers the real question. Simpler tasks usually need less labeled data, are easier to train, cost less to run, and are easier to explain to users. More detailed tasks can be powerful, but they also require more careful labeling, more compute power, and more testing under difficult conditions such as shadows, glare, blur, or cluttered backgrounds.
By the end of this chapter, you should be able to tell these tasks apart, explain when to use each one, and connect real-world business problems to the right computer vision approach. That skill is one of the most valuable beginner foundations in computer vision.
Practice note for Differentiate key computer vision tasks: document your objective, define a measurable success check, and run a small experiment before scaling. Capture what changed, why it changed, and what you would test next. This discipline improves reliability and makes your learning transferable to future projects.
Practice note for Identify when to use classification: document your objective, define a measurable success check, and run a small experiment before scaling. Capture what changed, why it changed, and what you would test next. This discipline improves reliability and makes your learning transferable to future projects.
Practice note for Understand detection and segmentation: document your objective, define a measurable success check, and run a small experiment before scaling. Capture what changed, why it changed, and what you would test next. This discipline improves reliability and makes your learning transferable to future projects.
Practice note for Match business problems to the right vision approach: document your objective, define a measurable success check, and run a small experiment before scaling. Capture what changed, why it changed, and what you would test next. This discipline improves reliability and makes your learning transferable to future projects.
Practice note for Differentiate key computer vision tasks: document your objective, define a measurable success check, and run a small experiment before scaling. Capture what changed, why it changed, and what you would test next. This discipline improves reliability and makes your learning transferable to future projects.
Image classification is the simplest major computer vision task to understand. The system looks at an entire image and predicts a label, or sometimes several labels, for that whole image. In plain language, classification answers the question: what is this picture? If you show a model a photo, it might say “cat,” “pizza,” “ripe banana,” or “damaged package.” It does not tell you where the object is. It just decides what category best matches the image.
This approach works well when each image is mostly about one thing, or when a single yes-or-no decision is enough. For example, a recycling sorter might classify an image as “plastic bottle” or “not plastic bottle.” A farm app might classify a leaf image as “healthy” or “diseased.” A quality control camera might classify a product as “pass” or “fail.” In all of these cases, the user cares more about the overall decision than the exact location of the object.
The workflow is beginner-friendly. First, collect images for each class. Next, label each image clearly. Then split the data into training, validation, and test sets. Train the model on labeled examples. Finally, evaluate how often it predicts the correct class on new images. The labels must match the real task. If you mix labels like “apple,” “fruit,” and “red object,” the model learns a confusing target. Good labels are consistent, specific, and useful for the decision you want to make.
A common mistake is using classification when the image contains multiple important objects. Suppose you want to know whether a shelf is missing any products. A single whole-image label may be too weak, because the shelf can contain many different items at once. Another mistake is assuming high accuracy means the system understands the object well. A classifier may succeed by learning shortcuts from the background, camera angle, or lighting instead of the true object. For example, if all “good” product photos are bright and all “bad” ones are dark, the model may learn lighting instead of quality.
Good engineering judgment means asking whether one image-level label is enough to drive the action you need. If yes, classification is often the fastest, cheapest, and easiest solution. It needs simpler labels than detection or segmentation and is often the best starting point for a first project.
Object detection adds location to recognition. Instead of only saying what is in the image, the model also points to where it is. The usual output is a bounding box, which is a rectangle drawn around an object, plus a class label and a confidence score. Detection answers the question: what objects are present, and where are they?
This is useful when there may be several objects in one image, or when counting and locating matter. In a shop, detection can find every product on a shelf. On a road, it can locate cars, bikes, pedestrians, and traffic signs. In a warehouse, it can detect boxes, labels, or damaged packages. In each case, classification alone would be too limited because the system needs separate results for multiple objects.
To build a detection dataset, you draw a box around each object and assign the correct label. This takes more effort than image classification because every object must be marked carefully. Beginners often label boxes too tightly in one image and too loosely in another. That inconsistency makes learning harder. A practical rule is to include the whole object with as little extra background as possible, and to follow the same style across the dataset. If the task includes partially visible objects, decide on a clear labeling rule before annotation starts.
Bounding boxes are powerful, but they are still an approximation. A box around a bicycle includes empty space between the frame and wheels. A box around a person may include background. That is acceptable when the goal is counting, tracking, alerting, or rough localization. It is often not good enough when exact shape matters.
Common mistakes include choosing detection when there is only one centered object per image, which adds complexity without much benefit, and forgetting edge cases such as overlapping objects, small distant targets, motion blur, and bad weather. Good practical testing should include crowded scenes, poor lighting, and unusual viewpoints. Detection is the right choice when location matters, especially for counting, monitoring, searching, and scene understanding.
Segmentation is the most detailed of the three main tasks. Instead of giving one label to the whole image or drawing a rough box around an object, segmentation assigns labels to exact image regions or even individual pixels. In simple words, segmentation answers: which exact parts of the image belong to each object or surface?
There are two common forms. Semantic segmentation labels pixels by category, such as road, sky, tree, or person. Instance segmentation goes further and separates individual objects of the same type, such as one person from another person. This level of detail is useful when shape, boundary, or occupied area matters. For example, a medical tool may need the exact outline of a tumor region. A farming robot may need to separate crop from weed. A self-driving system may need the precise drivable road area rather than a single box.
Segmentation is powerful, but it is also expensive. Labeling pixel-level masks takes much more time than assigning image labels or drawing boxes. This means beginners should choose segmentation only when they truly need exact boundaries. If your action is simply to count apples in a crate, detection may be enough. If your action is to spray only the visible weed leaves and avoid the crop, segmentation becomes much more valuable.
Engineering judgment is important here. The more detailed the task, the more ways the model can fail. Thin edges, reflections, shadows, transparent objects, hair, smoke, and overlapping surfaces can make segmentation difficult. In practice, teams often start with a simpler method and move to segmentation later if the business need demands it. They ask: does the extra labeling effort produce enough extra value?
A common beginner mistake is to think segmentation is always “better” because it is more detailed. That is not true. Better means better for the goal. Segmentation gives rich pixel-level understanding, but it only makes sense when that precision changes the outcome of the system.
Beyond the three core tasks, computer vision also includes specialized jobs that many people meet in daily life. Face recognition, text recognition, and motion recognition are common examples. These systems often combine core vision tasks in smart ways.
Face-related systems usually begin with face detection, which finds where a face is in an image. After that, another model may verify identity, estimate landmarks such as eyes and nose position, or classify expressions. This is useful for phone unlock, attendance systems, and photo organization. But it also raises privacy and fairness concerns. Lighting, camera angle, age, skin tone balance in the training data, and image quality can strongly affect results. In real deployments, developers must be careful about consent, bias, and error cost.
Text recognition, often called OCR, means reading printed or handwritten text from images. A simple pipeline might first detect the text area, then recognize the characters. This is useful for reading receipts, package labels, road signs, serial numbers, and forms. OCR can fail when the image is blurry, the text is curved, fonts are unusual, or lighting creates glare. A good practical trick is to improve the image before recognition by cropping, rotating, sharpening, or increasing contrast.
Motion recognition works with video rather than a single still image. It may detect movement, track an object over time, or recognize actions such as walking, falling, or entering a restricted area. A home security camera, for example, might first detect motion, then classify whether the moving object is a person, pet, or car. Motion systems must handle changing light, shadows from trees, camera shake, and repeated background movement like rain or fans.
These specialized applications show that real computer vision products are often built as pipelines. One model detects, another reads or classifies, and another tracks over time. The main lesson is still the same: understand the decision you need, then choose the right combination of vision tasks.
Choosing the right vision task is a practical design decision, not just a technical one. Start with the outcome the user or business needs. Ask what action will be taken after the model gives its answer. If the answer is simply “accept or reject this image,” classification may be enough. If the action depends on object count or location, detection is a better fit. If the action depends on exact shape, area, or boundary, segmentation may be required.
A useful way to think about this is by asking three levels of questions. First: What is in the image? That suggests classification. Second: Where are the objects? That suggests detection. Third: Which exact pixels belong to each object? That suggests segmentation. These questions can save time, money, and frustration at the start of a project.
Good engineering judgment also considers data and budget. Classification usually needs the least detailed labels. Detection needs more labeling time. Segmentation needs the most. More detailed tasks often need more powerful hardware and more careful evaluation. So if two methods can solve the problem, the simpler one is usually the better business choice.
You should also consider the cost of mistakes. If a model for sorting fruit occasionally mislabels one image, classification may be acceptable. If a road system must know exactly where people are crossing, detection matters more. If a surgical tool must avoid cutting healthy tissue, segmentation may be necessary. The required precision should match the real-world risk.
Beginners often choose a task based on what seems impressive instead of what is necessary. That leads to oversized datasets, slow annotation, and hard-to-explain failures. A better habit is to write one plain-language sentence: “The system needs to decide X from the image.” Then choose the vision task that directly supports that decision. That is how business problems are matched to the right approach.
Let us bring these ideas down to earth with practical examples. In a shop, a store manager may want to know whether a shelf photo shows the correct product family. That is classification. If the manager wants to count how many cereal boxes are visible and where empty spaces are, that is detection. If a shelf-cleaning robot must know the exact visible surface of spilled liquid or damaged packaging, segmentation becomes more useful. The environment also matters: reflective packaging, crowded shelves, and poor camera angles can all reduce accuracy.
On roads, a traffic camera might classify weather or road condition from the whole scene: clear, rainy, snowy, or foggy. A driver assistance system detecting nearby cars, signs, and pedestrians is using object detection. A lane-keeping system that identifies the exact drivable area or lane markings may rely on segmentation. In this setting, practical testing is critical because shadows, nighttime glare, dirt on the lens, and rare events can create dangerous mistakes.
In homes, a smart doorbell may use classification to decide whether an image likely contains a visitor. It may use detection to distinguish a person, package, or pet and show where each one is. A robot vacuum may use segmentation to separate floor, rug, wall, and obstacle regions for cleaner navigation. Here, real-world variation is huge: furniture moves, daylight changes through the day, pets appear unexpectedly, and low-light performance matters at night.
These examples show that there is no single “best” computer vision method. The right approach depends on the decision, the level of detail required, the cost of mistakes, and the effort available for data labeling. Shops often care about counting and stock visibility, roads care about safety and precise location, and homes care about convenience under changing conditions.
The practical outcome for a beginner is simple: define the question clearly, select the lightest-weight vision task that answers it, and test the system under real conditions rather than perfect sample photos. That habit will help you build smarter, more reliable vision projects from the start.
1. Which computer vision task best answers the question, "What is this image mostly about?"
2. A store wants to know how many products appear in a shelf photo and where they are located. Which approach fits best?
3. When is segmentation more appropriate than detection?
4. According to the chapter, what is a good practical rule when choosing a vision approach?
5. A bakery wants a robot arm to frost only the visible surfaces of cookies on a tray. Which task is most suitable?
In earlier chapters, you learned that computer vision systems learn from examples. That idea sounds simple, but in practice the quality of those examples decides whether a model becomes helpful or frustrating. A vision model can look impressive in a demo and still fail in real life if its training photos are messy, biased, poorly labeled, or too limited. That is why trustworthy vision systems begin long before model training. They begin with careful dataset preparation, honest testing, and realistic expectations about what accuracy means.
For beginners, it is useful to think of trustworthiness as a combination of four habits. First, collect images that match the real task. Second, label them clearly and consistently. Third, look for bias, noise, and missing situations before training. Fourth, measure results in a way that reflects actual use, not just a single number on a screen. These habits help you move from “the model works sometimes” to “the model works well enough for a real purpose.”
Imagine building a small camera system to recognize ripe and unripe fruit, detect safety helmets, or classify recycling items. If most training photos are bright, centered, and clean, but real usage includes shadows, clutter, and odd angles, the system will struggle. If one class has many more images than another, the model may over-predict the larger class. If labels are inconsistent, the model learns confusion instead of patterns. These problems are common, and beginners often blame the algorithm first when the real issue is the data.
This chapter focuses on practical engineering judgment. You will learn how to prepare simple image datasets the right way, how to spot bias and weak labels, how to understand accuracy in beginner-friendly terms, and how to improve results through better images and better testing. The goal is not perfection. The goal is to build a system that behaves reliably enough for its job and to know where its limits are.
A trustworthy vision workflow usually follows a repeatable path:
Notice that this workflow returns to the dataset again and again. In beginner projects, better data often improves results more than changing the model. If the examples are clearer, more balanced, and more realistic, the system has a better chance to learn useful patterns. Trust grows when the process is careful, repeatable, and open about weaknesses.
Another important idea is that accuracy is not the same as usefulness. A model with high overall accuracy may still fail badly on a rare but important case. For example, a camera that usually detects workers with helmets might miss helmets in low light or on people standing farther away. If those missed cases matter, the model is not trustworthy enough yet. Trust comes from understanding what the system gets right, what it gets wrong, and how often those mistakes happen in the real setting.
By the end of this chapter, you should be able to look at a beginner vision project and ask strong practical questions: Are the photos varied enough? Are the labels consistent? Are some cases missing? What does the reported accuracy actually mean? What changes would likely improve the result? These are the habits that turn a simple model into a more dependable vision system.
Practice note for Prepare simple image datasets the right way: document your objective, define a measurable success check, and run a small experiment before scaling. Capture what changed, why it changed, and what you would test next. This discipline improves reliability and makes your learning transferable to future projects.
Practice note for Spot bias, noise, and weak labels: document your objective, define a measurable success check, and run a small experiment before scaling. Capture what changed, why it changed, and what you would test next. This discipline improves reliability and makes your learning transferable to future projects.
A model can only learn from what it sees in the dataset, so collecting useful photo examples is one of the most important steps in computer vision. Beginners often gather images quickly from the internet or from a single short photo session. That can be enough for a demo, but it often produces a brittle system that only works in conditions similar to those exact images. A better approach is to collect examples that match the real task as closely as possible.
Start by defining the task in a very concrete way. If you are building a classifier for cats and dogs, ask what kinds of photos the system will see later. Indoor pets? Outdoor pets? Close-up faces? Full-body shots? Day and night? If you are building an object detector for boxes on a shelf, ask about camera height, shelf clutter, lighting, distance, and whether boxes overlap. These details tell you what your dataset must include.
Useful datasets include variation. Try to collect images from different angles, distances, backgrounds, lighting conditions, and device cameras. Include easy examples and hard examples. If every banana photo is yellow, centered, and placed on a white table, the model may learn “white table” as part of the banana pattern. Later, a banana in a fruit bowl may confuse it. Diversity in the images helps the model focus on the object instead of accidental background clues.
A practical beginner rule is to collect data in groups. Make sure each class has roughly similar coverage. If one class has 500 images and another has 40, the model may become biased toward the larger class. Also avoid near-duplicate photos, such as ten almost identical shots taken in one second. Those add volume but not much new information. It is usually better to have fewer varied examples than many repeated ones.
Finally, organize your files early. Keep a clear folder structure, simple filenames, and notes about where the images came from. Good organization makes labeling, splitting, and reviewing much easier later. Collecting useful examples is not just about quantity. It is about choosing images that teach the model what the real world actually looks like.
Labels are the teaching signal for supervised learning. If the labels are wrong, vague, or inconsistent, the model learns the wrong lesson. This is why people say “garbage in, garbage out.” In computer vision, labels may be simple class names, bounding boxes around objects, or segmentation masks that mark each pixel. No matter the format, the key question is the same: do the labels clearly match the task?
Good labels are consistent. If one person labels a small orange fruit as “orange” and another labels the same kind of fruit as “citrus,” the model receives mixed instructions. If blurry examples are labeled one way on some days and another way on other days, the training data becomes noisy. For beginner projects, it helps to write a short labeling guide before labeling begins. Define each class in one sentence. Add edge-case rules. For example: “If the object is less than half visible, label as unknown,” or “If two classes are both present, label according to the largest object.”
Weak labels are labels that are technically present but not very reliable. An image folder may say “dog,” but perhaps the dog is tiny in the corner. A box may roughly cover a helmet but include most of the background. These labels can still be useful, but you should know their limits. The more precise the task, the more careful the labels must be. Object detection needs boxes that are consistently tight. Segmentation needs careful boundaries. Classification needs images where the labeled category is actually clear.
One common mistake is labeling what you expect instead of what is visible. For instance, if a product package usually contains apples, a labeler might mark it as “apple” even when the fruit cannot really be seen. That teaches the model to guess from context rather than appearance. Another mistake is silently changing label rules in the middle of a project. If the class definition evolves, earlier labels may need review.
In practice, better labels often improve model quality faster than adding more random photos. A smaller, cleaner dataset can beat a larger, messy one. Good labels help the model learn the right visual patterns, and they make your testing results more meaningful because you are measuring against something trustworthy.
Bias in vision systems happens when the data does not represent the real world fairly or completely. This can cause the model to work well for some situations and poorly for others. Beginners often think bias only applies to large social systems, but it appears in small projects too. A plant classifier trained mostly on healthy leaves may struggle with damaged leaves. A face-related system trained mostly on one skin tone or age group may perform unevenly across people. A store camera trained during daytime may fail at night.
The simplest way to spot bias is to ask: which cases are overrepresented, and which are missing? Look through your images by condition, not just by class. Do you mostly have bright lighting? Mostly front-facing objects? Mostly clean backgrounds? Mostly one camera type? If so, the model may learn shortcuts. For example, if all “helmet” photos are taken outdoors and all “no helmet” photos are indoors, the model may learn background differences rather than helmet features.
Fairness means checking whether the system performs reasonably across important groups and conditions. In a beginner setting, you may not need advanced fairness metrics, but you do need awareness. If the system will be used on different users, locations, or devices, test those separately. A single average score can hide unequal performance. Trustworthy systems do not just work on the easiest examples.
Missing cases are especially dangerous because they often remain invisible until deployment. If your recycling classifier never saw crushed cans, wet paper, or partially hidden bottles, those items may be misclassified later. If your object detector never saw overlapping tools or strong glare, it may fail in a workshop. Real-world use is full of edge cases, so it is wise to collect some difficult examples on purpose.
You do not remove all bias in one step. Instead, you reduce it by finding blind spots and filling them. A trustworthy vision system is honest about what it has seen, what it has not seen, and where its performance may be uneven.
Many beginners feel nervous when they hear words like accuracy, precision, recall, or confusion matrix. The good news is that you can understand useful evaluation without heavy math. Start with a plain-language question: out of the images the model sees, how often does it make the right decision for the task? That basic idea is a good entry point, but it is only the beginning.
Accuracy means the share of predictions that are correct overall. If a model gets 90 out of 100 test images right, accuracy is 90%. That sounds simple, but it can be misleading when classes are unbalanced. Imagine 95 images of apples and 5 images of oranges. A weak model that predicts “apple” every time would still score 95% accuracy while completely failing on oranges. So accuracy is useful, but only if you also check where the mistakes happen.
A confusion matrix is just a table showing what the model predicted compared with the true labels. For beginners, it is one of the most practical tools because it reveals which classes are getting mixed up. If cats are often predicted as dogs, that tells you more than one summary number. If safety helmets are missed mainly in dim light, that gives you a clear direction for improvement.
It is also important to separate training data from testing data. If you test on the same images used for learning, the score may look unrealistically high. That does not prove the model generalizes. A proper workflow uses separate training, validation, and test sets. The test set should stay untouched until you want an honest final check.
For beginner projects, ask these practical evaluation questions:
Measuring success is really about understanding behavior. A number is helpful, but examples of failure are often more helpful. Save and review wrong predictions. When you can explain the mistakes in plain language, you are evaluating the system in a trustworthy way.
A vision model may perform well in development and still fail after deployment because the real world is messy. Cameras shake, lighting changes, objects are partly blocked, users hold items at strange angles, and scenes contain clutter that was not in the training data. Understanding these failure sources is part of building trustworthy systems. If you know what commonly goes wrong, you can test for it early.
Poor lighting is one of the biggest causes of error. Shadows hide details, strong backlight creates silhouettes, and low light adds noise. Motion blur is another problem, especially for handheld cameras or moving objects. Small objects can be missed because they occupy too few pixels. Background clutter can pull attention away from the target object. Reflections, glare, weather, dirty lenses, and low-resolution cameras all reduce image quality and make recognition harder.
Another common failure comes from distribution shift. This means the new images look different from the training images in some important way. Maybe the training photos came from one store but the system is now used in another. Maybe the model learned on clean web images but must now handle phone photos. Even a change in camera height or color balance can matter. The model is not “thinking” about the object like a person does; it is matching learned patterns from data. When those patterns change, errors rise.
Some failures come from system design choices, not just the model. If the confidence threshold is too low, the system may produce too many false detections. If the crop sent to the classifier is poor, even a good classifier may fail. If labels allowed ambiguous examples, the model may be uncertain in exactly those situations later.
Real-world failure is not a sign that the project is useless. It is a signal that the training and testing process must better match reality. Reliable systems come from expecting imperfections and designing around them instead of assuming ideal conditions.
When a model underperforms, beginners often jump straight to changing architectures or searching for a more advanced algorithm. Sometimes that helps, but a more dependable method is step-by-step improvement. First, inspect the failures. Then make one meaningful change at a time and test again. This approach teaches you which changes actually matter and keeps the project understandable.
Start with data quality. Remove clearly wrong labels. Fix inconsistent class names. Add missing examples for weak classes. If the model fails in dim light, collect more dim-light photos. If it struggles with clutter, add cluttered scenes. This is usually the highest-value improvement. Next, review the data split. Make sure near-duplicate images are not leaking from training into test sets, because that creates overly optimistic results.
Then improve the image pipeline. Better cropping, resizing, and camera placement can help more than a complex new model. In some projects, simple guidance for photo capture makes a major difference: hold the object closer, avoid strong backlight, keep the lens clean, and include the whole object in the frame. These are not glamorous changes, but they often produce practical gains.
Testing should also improve step by step. Build a small checklist of realistic scenarios and rerun it after each change. For example: bright light, dim light, cluttered background, partly hidden object, far distance, and rotated object. This turns testing into a repeatable engineering habit rather than a one-time guess.
Over time, these small cycles create a much stronger system. The goal is not just a better score. The goal is confidence that the system behaves sensibly, that you understand its limits, and that future improvements can be made in a controlled way. Trustworthy vision systems are built through careful iteration: collect, label, test, review, improve, and repeat.
1. What is the best first step in a trustworthy vision workflow?
2. Why might a vision model perform well in a demo but fail in real life?
3. What is a likely result if one class has many more images than another in the dataset?
4. According to the chapter, why is accuracy not the same as usefulness?
5. Which improvement is most aligned with the chapter's advice for building a more dependable vision system?
In the earlier chapters, you learned the building blocks of computer vision: pixels, color, patterns, labels, and the different tasks a vision system can perform. Now it is time to connect those ideas to something that feels more like a real product. A camera becomes "smart" when it does more than capture an image. It observes a scene, extracts useful patterns, makes a decision, and then triggers an action. That action might be as simple as drawing a box around a face, counting people in a room, or sending an alert when a package appears at a door.
For beginners, the biggest shift in thinking is this: a computer vision project is not only about the model. A useful project is a full workflow. It starts with a goal, such as detecting ripe fruit or reading whether a parking space is occupied. Then it moves through camera setup, data collection, labeling, testing, handling mistakes, and deciding what should happen after the system sees something important. In other words, building a vision project means designing a small system, not just training an algorithm.
Real-world camera projects also introduce engineering judgment. You must ask practical questions. Where will the camera be placed? What lighting will it see in the morning, afternoon, and night? Does the model need to work instantly, or can it process images later? What is the cost of a mistake? A system that labels a flower incorrectly is very different from a system that decides whether a factory worker is wearing safety gear. The environment, speed, and consequences of errors all shape the best design.
This chapter ties together the course outcomes in a practical way. You will see how smart cameras work in real time, how to map a simple project from start to finish, how to think about privacy and safety before deployment, and how to create a beginner project plan with confidence. By the end, you should be able to look at an everyday problem and sketch a realistic vision solution, while also recognizing the limits and responsibilities that come with using cameras and AI.
A good beginner mindset is to keep the first project narrow. Choose one clear task, one simple environment, and one measurable outcome. For example, instead of building a "home security AI," start with "detect whether a package is visible on the front porch during daylight." This smaller scope makes it easier to collect data, label examples well, notice common errors such as shadows or blur, and improve the system step by step. Small, focused projects are how real computer vision skills grow.
Practice note for Understand how smart cameras work in real time: document your objective, define a measurable success check, and run a small experiment before scaling. Capture what changed, why it changed, and what you would test next. This discipline improves reliability and makes your learning transferable to future projects.
Practice note for Map a simple vision project from start to finish: document your objective, define a measurable success check, and run a small experiment before scaling. Capture what changed, why it changed, and what you would test next. This discipline improves reliability and makes your learning transferable to future projects.
Practice note for Consider privacy and safety before deployment: document your objective, define a measurable success check, and run a small experiment before scaling. Capture what changed, why it changed, and what you would test next. This discipline improves reliability and makes your learning transferable to future projects.
Practice note for Create a beginner project plan with confidence: document your objective, define a measurable success check, and run a small experiment before scaling. Capture what changed, why it changed, and what you would test next. This discipline improves reliability and makes your learning transferable to future projects.
Practice note for Understand how smart cameras work in real time: document your objective, define a measurable success check, and run a small experiment before scaling. Capture what changed, why it changed, and what you would test next. This discipline improves reliability and makes your learning transferable to future projects.
A normal camera captures light and stores an image or video. A smart camera adds interpretation. It does not just record what happened; it tries to understand what is in the scene. This understanding usually comes from software that runs either on the camera itself, on a nearby device such as a phone or small computer, or in the cloud. The key idea is that the camera feed is turned into information that can support a decision.
Most smart camera systems follow a simple pipeline. First, the camera captures frames. A frame is one image from the video stream. Next, the system preprocesses those frames. It may resize them, adjust brightness, or convert color formats so the model can work efficiently. Then the vision model analyzes the frame. Depending on the task, it may classify the entire image, detect objects with boxes, or segment regions such as roads, leaves, or people. Finally, the system uses those results to do something useful, such as save a clip, count objects, raise an alert, or display a message.
The "smart" part is not magic. It comes from matching patterns learned from labeled examples to what the camera sees right now. If the model has learned what helmets look like, it can search each frame for those patterns. If it has learned what an empty shelf versus a full shelf looks like, it can estimate stock levels. This is why data quality matters so much. A camera is only as smart as the examples, assumptions, and design decisions behind it.
In practice, a smart camera must also be reliable enough for its setting. That includes handling blur, low light, motion, unusual angles, and background clutter. Many beginner projects work well in a controlled test but fail in daily use because the camera position changes or sunlight creates strong shadows. A smart camera therefore needs both an AI model and careful setup. Good placement, stable mounting, and realistic testing are part of the intelligence of the full system.
If you remember one idea from this section, let it be this: a smart camera is a decision-making system built on top of image capture. The camera provides the eyes, but the workflow provides the brain and the behavior.
Not every vision project needs to operate instantly. One of the first design choices is deciding between real-time vision and photo analysis. Real-time vision processes a live camera feed frame by frame and produces results quickly enough to be useful during the event. Photo analysis works on saved images or recorded video after the fact. Both are valuable, but they solve different problems and place different demands on the system.
Real-time systems are used when timing matters. A doorbell camera that detects a visitor, a traffic camera that counts vehicles, or a factory camera that warns when an item is missing from a conveyor belt all need fast responses. In these cases, speed, stable performance, and simple outputs are often more important than perfect accuracy on every frame. Sometimes a slightly smaller, faster model is the better engineering choice because delayed results are less useful than quick, good-enough ones.
Photo analysis is often easier for beginners. You can collect images, inspect them carefully, and process them one at a time. This is useful for plant disease snapshots, sorting product photos, or checking whether uploaded images meet quality rules. Since there is no strict time limit, you can use slower models, review results manually, and improve labels with less pressure. For learning, this can be an excellent path before moving to live video.
There is also a hidden difference in how errors appear. In photo analysis, each image is separate. In real-time video, errors may flicker from frame to frame. An object may be detected in one frame, missed in the next, and found again after that. This can make a system feel unstable even if the average accuracy is reasonable. Engineers often solve this by smoothing predictions across several frames or requiring repeated detections before taking action.
When choosing between the two, ask practical questions. Does the user need an immediate alert? Can the device handle the computation locally? Is internet access reliable enough to send video elsewhere? Will processing every frame cost too much power or money? Is the environment predictable, or will changing conditions create noise? These questions matter more than choosing the most advanced model.
A beginner rule of thumb is simple: if the project can succeed with still images, start there. Once the task is clear and the model performs reliably, move to live video. This staged approach reduces complexity and helps you understand whether your real challenge is the vision model, the camera setup, or the speed of the system.
When you move from sample images to real cameras, ethics and safety become part of the project design. A camera can collect sensitive information about faces, homes, workplaces, and daily routines. Even a small beginner project should be built with respect for privacy, consent, and responsible use. This is not extra polish added at the end. It is part of building a trustworthy system from the beginning.
The first question is whether you truly need to capture people at all. Sometimes the answer is no. A project about parking occupancy may only need a top-down view of spaces rather than a wide street view. A shelf-monitoring system may only need to see products, not customers. Narrowing the camera field of view is one of the simplest and best privacy protections. If the system only collects what it needs, there is less risk of misuse.
Consent matters when people are being recorded or analyzed. In many settings, you should inform users clearly that a camera is active and explain what the data is used for. For educational or hobby projects, this is especially important when filming family, classmates, or coworkers. Do not assume that because the technology is easy to use, people are comfortable being monitored. Good practice includes asking permission, limiting storage time, and avoiding unnecessary sharing of raw footage.
Responsible use also means thinking about harm from mistakes and bias. A model may perform worse on some lighting conditions, clothing styles, skin tones, backgrounds, or camera angles if the training data was narrow. If the system is used in a way that affects people, such as security, attendance, or safety compliance, those errors matter. You should test across realistic conditions, document the limits, and avoid high-stakes claims that the system cannot support.
A practical beginner habit is to add a short ethics note to every project plan. Write who is being recorded, what is stored, how long it is kept, what mistakes could happen, and what safeguards you will use. This habit trains you to think like a responsible builder, not just a model trainer.
A simple vision project becomes much easier when you break it into stages. A clear workflow helps you decide what to do first, what to test, and how to improve. Many beginners jump straight into model training and only later realize that the real problem was poor data, unclear labels, or a camera pointed in the wrong direction. A better approach is to map the project from start to finish before building.
Start with the goal. Write one sentence that describes the decision the system should support. For example: "Detect whether a recycling bin is full." Then define the output. Will the system return yes or no, draw a box, count objects, or estimate an area? This choice tells you whether you need classification, object detection, or segmentation. Next, define success in a simple way. Maybe you want the correct result on 9 out of 10 daytime images, or an alert within two seconds of seeing the object.
After that, plan your data. Decide what examples you need, how many conditions to cover, and how you will label them. Include normal cases and tricky ones: shadows, clutter, partial views, blur, and low light. If the camera will be fixed in one spot, collect data from that spot. If the environment changes by time of day, collect examples across those times. Labels should be clear and consistent. If two people would label the same image differently, your classes or instructions may be too vague.
Then think about the engineering steps around the model. How will images enter the system? Where will processing happen? How often will predictions run? What action follows a prediction? What happens if the result is uncertain? This is where practical design matters. A beginner project is stronger when it includes a simple rule for uncertainty, such as "if confidence is low, save the image for review instead of acting automatically."
A useful workflow for beginners often looks like this:
Common mistakes include collecting only easy images, using inconsistent labels, ignoring edge cases, and measuring success only on familiar data. Another common issue is trying to solve too many tasks at once. Keep the first workflow short and visible. If you can draw the steps on one page, you are likely working at a good beginner scale.
The best first projects are simple, visual, and easy to test. They use a narrow camera view, clear labels, and a small number of classes. The goal is not to build a perfect product. The goal is to practice the full journey from idea to working prototype. A good beginner project teaches you how data, models, environment, and decision rules interact.
One strong idea is a desk occupancy detector. Point a camera at a chair or desk and classify the scene as occupied or empty. This keeps the task small and lets you explore lighting changes, object variation, and confidence thresholds. Another beginner-friendly idea is package detection at a doorstep. You can turn this into an object detection task and then trigger a message when a box appears in a region of interest.
Plant monitoring is another excellent option. You might classify leaf images as healthy or stressed, or detect whether a pot is present on a shelf. This works well because the subjects are easier to control, and privacy concerns are usually lower than with human-centered scenes. A recycling sorter is also useful: classify images of items into paper, plastic, or metal categories, knowing that mistakes often come from similar shapes, labels, or reflections.
If you want to try segmentation, choose a visually simple target such as identifying the area of a puddle on the ground or the region covered by weeds in a garden image. Segmentation is more detailed, so it can be harder to label, but it gives a strong feel for how computer vision can move beyond just naming objects.
For any first project, keep these practical rules:
The practical outcome of a beginner project should be something concrete: a count, an alert, a label, or a dashboard entry. Even a simple on-screen message such as "Bin appears full" is a meaningful result if it is based on a clear pipeline. That is how a classroom concept becomes a real-world vision application.
You now have the pieces needed to think like a beginner computer vision practitioner. You know that images are made from pixels and patterns, that AI learns from labeled examples, that classification, detection, and segmentation solve different kinds of problems, and that real systems succeed or fail based on data quality, environment, and design choices. The next step is to turn that understanding into repeated practice.
Start by writing a one-page project plan. Include the problem, camera position, target labels, type of model output, data collection plan, privacy notes, and what action follows a prediction. This single page will help you organize your thinking and reveal weak spots early. If the plan feels too large, reduce the scope until it seems buildable in a few sessions rather than a few months.
Then run a small experiment. Gather a modest dataset, label it carefully, and test your idea. Expect mistakes. In fact, your first errors are valuable because they show what the model is really learning and where the environment is causing confusion. Review those failures one by one. Was the object too small? Was the scene too dark? Were the labels inconsistent? Did the camera angle hide the important feature? This process of inspecting failure cases is one of the fastest ways to improve.
As you continue, build the habit of comparing the model to the real task. Accuracy numbers alone do not tell the full story. Ask whether the system is useful, respectful of privacy, and safe enough for its purpose. A simple model that works consistently in one narrow setting is often better than a complex model that is hard to explain or maintain.
Your confidence should come not from believing the AI will always be right, but from knowing how to design, test, and improve a practical workflow. That is the real beginner milestone. From here, you can explore more advanced models, larger datasets, or edge devices that run vision locally. But the core lesson remains the same: successful computer vision is built by connecting clear goals, realistic data, responsible use, and thoughtful engineering.
If you can look at a camera-based problem and describe what the system should see, what labels it needs, what output is appropriate, what could go wrong, and how to test it safely, then you have taken an important step from theory to practice.
1. According to the chapter, what makes a camera "smart"?
2. What is the main idea behind a useful computer vision project for beginners?
3. Which factor should influence the design of a real-world camera project?
4. Why does the chapter recommend starting with a narrow first project?
5. Which beginner project best matches the chapter’s advice?
- Learning Evolved.
- Intelligence Amplified.


