AI Robotics & Autonomous Systems — Beginner
Teach a robot to steer away from obstacles—one simple step at a time.
This beginner-friendly course is a short, book-style path to one clear outcome: help a robot avoid obstacles using simple, explainable logic. If you have never coded, never studied AI, and never touched robotics before, you are in the right place. We start from first principles—what a robot “knows,” how it senses the world, and how it chooses an action—then build a complete obstacle-avoidance behavior step by step.
Autonomous navigation can sound intimidating because people associate it with complex math, huge maps, or advanced machine learning. This course takes a different approach. You will learn the smallest set of ideas that still produces real navigation behavior: a repeated loop of sensing, deciding, and moving. You’ll practice using distance readings, safety zones, and clear rules such as “slow down when close” and “turn away when blocked.” By the end, you will have a working navigation controller you can explain, test, and tune.
Your project is a basic “robot brain” for obstacle avoidance. It continuously reads distances (from one or more directions), decides whether the path is safe, and chooses a motion command (drive forward, slow down, turn, or stop). You will also learn how to make the behavior more stable so it doesn’t shake, panic, or get stuck as easily.
Each chapter builds on the previous one, like a compact technical book. You begin by defining the problem in plain language and setting success criteria. Next, you learn what sensors do and how to handle imperfect readings. Then you study movement basics—how steering and speed affect safety. After that, you assemble the “brain” as a controller: a set of rules that turn sensor readings into motion. Finally, you harden your solution through tuning and edge-case handling, and finish with a capstone demo you can reuse or expand.
This course is designed for absolute beginners: curious learners, students, and teams who want a practical introduction to AI robotics and autonomous systems without needing a deep technical background. It also works well for managers or stakeholders who want to understand what goes into safe robot behavior and how to evaluate it.
You only need a computer with internet access and the willingness to follow step-by-step instructions. A physical robot kit is optional—many learners start in a simulator and later transfer the same ideas to real hardware.
If you’re ready to build a real obstacle-avoidance behavior from scratch, start now and move chapter by chapter. Register free to begin, or browse all courses to see related beginner topics.
Robotics Engineer & Autonomous Systems Educator
Sofia Chen builds mobile robot prototypes and teaches practical autonomy for beginners. Her work focuses on making sensors, control, and navigation understandable without heavy math. She has supported teams deploying safe robot behaviors in labs and classrooms.
Obstacle avoidance sounds simple: don’t hit things. But as soon as you ask a robot to do it on its own, you discover the hidden parts of the problem: the robot must decide what counts as “an obstacle,” how close is “too close,” and what to do when safe choices conflict with smooth motion or forward progress. In this course, you will treat obstacle avoidance as a practical engineering task: build a controller that reacts to distance readings, keeps a safety buffer, and behaves predictably across different environments.
By the end, you will have a beginner-friendly workflow: a loop that senses the world, chooses an action with simple step-by-step logic, and moves—then repeats fast enough to stay safe. You will test in simulation first (where bumps are cheap), then tune speed, turning, and safety thresholds to reduce collisions and annoying oscillations. Before coding anything, this chapter makes the problem concrete, sets “success rules,” and walks through a first paper simulation so your design decisions aren’t guesses.
Keep one idea in mind: your robot never directly “sees” the world the way you do. It sees numbers—distance readings, hit events, or pixels—then you decide what those numbers mean and what action they should trigger. That translation from raw sensor data to safe behavior is what you’re building.
Practice note for Define autonomous navigation using everyday examples: document your objective, define a measurable success check, and run a small experiment before scaling. Capture what changed, why it changed, and what you would test next. This discipline improves reliability and makes your learning transferable to future projects.
Practice note for Understand the robot loop: sense → think → move: document your objective, define a measurable success check, and run a small experiment before scaling. Capture what changed, why it changed, and what you would test next. This discipline improves reliability and makes your learning transferable to future projects.
Practice note for Set success rules: safety distance, smooth motion, and stopping: document your objective, define a measurable success check, and run a small experiment before scaling. Capture what changed, why it changed, and what you would test next. This discipline improves reliability and makes your learning transferable to future projects.
Practice note for Plan the course project and what you will build by the end: document your objective, define a measurable success check, and run a small experiment before scaling. Capture what changed, why it changed, and what you would test next. This discipline improves reliability and makes your learning transferable to future projects.
Practice note for Do a first “paper simulation” with simple obstacle scenarios: document your objective, define a measurable success check, and run a small experiment before scaling. Capture what changed, why it changed, and what you would test next. This discipline improves reliability and makes your learning transferable to future projects.
Practice note for Define autonomous navigation using everyday examples: document your objective, define a measurable success check, and run a small experiment before scaling. Capture what changed, why it changed, and what you would test next. This discipline improves reliability and makes your learning transferable to future projects.
Practice note for Understand the robot loop: sense → think → move: document your objective, define a measurable success check, and run a small experiment before scaling. Capture what changed, why it changed, and what you would test next. This discipline improves reliability and makes your learning transferable to future projects.
Practice note for Set success rules: safety distance, smooth motion, and stopping: document your objective, define a measurable success check, and run a small experiment before scaling. Capture what changed, why it changed, and what you would test next. This discipline improves reliability and makes your learning transferable to future projects.
In everyday life, autonomy is normal: you walk down a hallway, avoid a chair, and still head toward the kitchen. You don’t compute a map in your head; you continuously adjust based on what you sense. Autonomous navigation for robots aims for the same outcome: move through an environment with minimal human control. Sometimes there is a destination, sometimes it’s patrol or exploration, and sometimes it’s simply “don’t crash while you roam.”
Navigation is hard because robots are limited in ways humans forget. A robot has a body shape that can snag corners, wheels that slip, and sensors that have blind spots. The environment can be messy: glossy floors confuse some sensors, glass can appear invisible, and narrow hallways amplify small steering errors. Even when a robot detects an obstacle, it must choose how to avoid it: stop, turn left, turn right, or back up. Those choices affect smoothness and reliability.
In this course you will focus on the beginner-friendly core: reactive obstacle avoidance. Reactive means the robot responds to nearby obstacles without building a complex global map. This is a great first step because it teaches the main engineering tradeoffs: safety distance vs. forward progress, turning aggressiveness vs. oscillation, and sensor noise vs. stability. You will also plan the course project: a small controller that reads distances (front/left/right), applies simple rules, and produces steering and speed commands that keep the robot moving without bumping.
Most mobile robots can be understood as a loop running many times per second: sense → think → move. In the sense step, the robot collects observations: “front distance is 0.8 m,” “left is 0.4 m,” “right is 1.2 m,” or “a bump sensor triggered.” In the think step, your controller decides on an action: reduce speed, turn away, or stop. In the move step, the robot applies motor commands and the world changes—so the next sense step gets new readings.
This loop is where beginner obstacle avoidance lives. You do not need advanced planning to start; you need consistent rules that run repeatedly. A typical mistake is writing logic that assumes the world is static: for example, checking distances once and committing to a long turn. In practice, short repeated decisions are safer: take a small action, re-sense, then adjust again. This makes the behavior robust to sensor noise and to moving obstacles (like a person stepping in front of the robot).
Another common mistake is mixing “what the robot wants” with “what the robot can do.” Your think step should be written in terms of available signals (distances) and available actions (speed, turn rate). Keep it concrete: if the front reading is below a threshold, slow down; if it is very low, stop; if the left side is tighter than the right, turn right. You will later implement this as a basic controller, but first you will define what “safe” means so the rules have a clear target.
An “obstacle” is anything the robot should not intersect with its body: walls, furniture, people, table legs, and sometimes edges or stairs. Avoidance starts with one practical decision: choose a safety distance (also called clearance) that the robot tries to maintain. This is not just comfort—it compensates for sensor error, braking distance, and the fact that the robot’s body is wider than a point.
A helpful mental model is a set of zones in front of the robot based on distance readings:
When beginners see a distance like “0.35 m,” they often treat it as exact. It rarely is. Ultrasonic sensors can bounce off angled surfaces; IR can be sensitive to material and lighting; lidar can miss thin objects at certain angles; depth cameras can struggle on reflective surfaces. Safety distance is your buffer against reality. If your robot is small and slow, the buffer can be smaller; if it is faster or heavier, you need more.
Collisions also have “types.” A gentle brush while turning can happen even when front distance looks safe (because a corner of the robot swings out). That leads to a key engineering judgement: don’t define safety using only the front sensor. Use side readings (or multiple rays) to represent the robot’s footprint and the space it needs while turning. In later chapters, you will encode this by reading left/front/right distances and choosing turns that increase clearance before increasing speed.
Obstacle avoidance behaviors that look excellent in one environment can fail badly in another. To build intuition, classify environments into three beginner-friendly categories and anticipate the failure modes of simple rules.
Open space is forgiving: obstacles are sparse and the robot has room to turn. Here, a basic “if front is close, turn” controller often looks smart. The main risk is overreacting to noise: if you turn every time a reading jitters low, the robot will wander or wiggle for no reason.
Clutter (chairs, table legs, boxes) creates frequent close readings and sharp changes. A simple controller can get trapped in local patterns: it turns away from one object and immediately faces another, producing oscillation. In clutter, you want a bit of persistence: commit to a turn for a short time window, or bias toward the direction with more open space rather than flipping left-right each loop.
Narrow hallways are the toughest for reactive logic. The robot can read “close” on both sides all the time, so naive rules might slow to a stop or ping-pong between walls. The practical fix is to change what “success” looks like: in a hallway, you expect small side distances, so the safety thresholds must be adapted (or interpreted differently) and the goal becomes centered, smooth forward motion rather than maximizing side clearance.
This is why the chapter includes a first “paper simulation.” Before you touch a simulator, you should imagine a few scenes—approaching a wall head-on, passing between two obstacles, entering a corner—and step through what your rules would do. If your rules cannot handle these simple sketches, they will not handle real-time physics either.
You need success rules that are measurable; otherwise tuning becomes random. For beginner obstacle avoidance, three metrics cover most of what you care about: bump rate, clearance, and smoothness. Think of them as the safety, comfort, and stability of your controller.
Tradeoffs are unavoidable. If you set safety distance very large, bump rate may drop but the robot may stop too often or refuse to pass through reasonable gaps. If you set it too small, the robot may look confident but will scrape corners. Smoothness is often the hidden issue: beginners can achieve low bump rate by turning aggressively, but the robot then zig-zags and wastes time. A good controller slows down near obstacles and turns proportionally, so it can make small corrections instead of panicked spins.
Also define a clear stopping rule. Stopping is not failure; it is a safety action. For example: “If front distance is below the danger threshold for N consecutive cycles, stop and rotate in place until the front is clear.” Without a stopping rule, your robot may keep inching forward into a collision because the controller always prefers motion.
In simulation you will track these metrics informally at first (observing behavior and counting bumps), then more systematically if your simulator provides logs. The key is consistency: tune one parameter at a time and judge changes against the same scenarios.
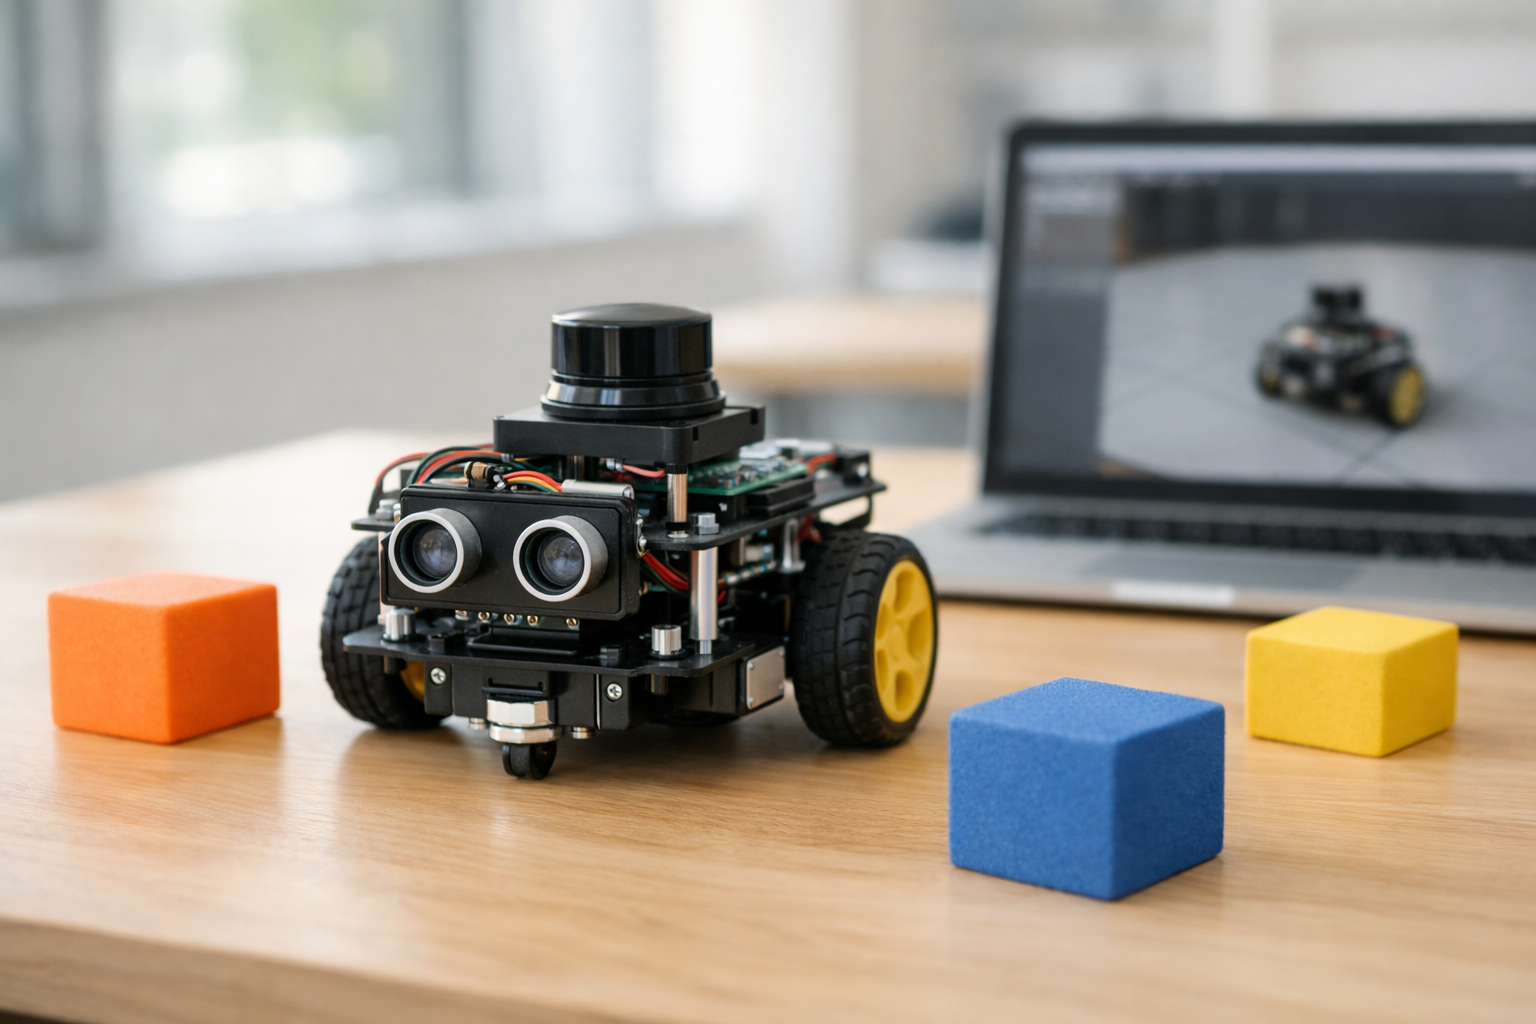
Your build plan for this course is deliberately simple: represent the world using a few distance readings and convert them into motor commands with easy, repeatable logic. The practical toolkit has three parts: a simulator workflow, basic sensors, and a controller you can explain in plain language.
Sensors you will commonly see for beginner obstacle avoidance include:
World representation for Chapter 1 can be as simple as three numbers: left, front, right distances. Add safety zones by comparing each reading to thresholds (safe/caution/danger). This gives you a “distance-based map” that is tiny but actionable.
Simple logic controller (conceptually) looks like this: (1) if front is in danger, stop and turn toward the more open side; (2) else if front is in caution, slow down and gently steer away from the closer side; (3) else drive forward, optionally with a small bias that keeps you centered between obstacles. The engineering judgement is in the thresholds and gains: how slow is “slow,” how strong is “gently,” and how long you keep turning before re-evaluating.
Simulator-first workflow: start with a clean world (one wall), verify the stop and turn behavior, then add clutter, then test a hallway. Use the same paper-simulation scenarios as test cases. If the robot oscillates, add hysteresis (slightly different thresholds for entering vs. leaving a zone) or limit how quickly the steering direction can flip. If it bumps, increase safety distance or reduce speed near obstacles. This course will keep returning to that loop: observe → adjust one thing → retest on the same scenarios until behavior is reliably safe and smooth.
1. Why does obstacle avoidance become more complex than “don’t hit things” when a robot must do it autonomously?
2. What best describes autonomous navigation in this chapter?
3. In the robot loop described, what is the correct order of repeated steps?
4. According to the chapter, what does the robot “see,” and what must your controller do with that information?
5. What is the main purpose of doing a first “paper simulation” before coding?
Obstacle avoidance sounds simple: “don’t hit things.” In practice, your robot never directly knows where obstacles are. It only receives sensor readings—numbers (or bits) that approximate the world. This chapter makes those readings feel concrete and usable. You’ll learn what common sensors can and can’t tell you, why distance numbers can be wrong, and how to turn raw measurements into practical “near / medium / far” zones. You’ll also build the habit of watching live sensor data with a basic dashboard, because most navigation bugs become obvious the moment you see readings jump, freeze, or disagree.
Engineering judgment matters here. A beginner mistake is assuming sensors provide ground truth. Another is making control decisions from a single noisy sample. We’ll work from first principles: what the sensor truly measures, how often you sample it, how to smooth it just enough, and how to define a safety buffer that prevents last-second collisions. The goal is not perfect perception; it’s reliable behavior that reduces bumps and oscillations while still letting the robot move.
By the end of this chapter, you should be able to look at a distance stream like “0.82 m, 0.79 m, 0.30 m, 3.50 m” and immediately ask: Is that a reflection? A blind spot? A sampling issue? A filter issue? And then turn it into a decision: slow down, turn away, or keep going.
Practice note for Learn what a sensor reading is and why it can be wrong: document your objective, define a measurable success check, and run a small experiment before scaling. Capture what changed, why it changed, and what you would test next. This discipline improves reliability and makes your learning transferable to future projects.
Practice note for Compare ultrasonic, infrared, bump, and LiDAR-style sensing: document your objective, define a measurable success check, and run a small experiment before scaling. Capture what changed, why it changed, and what you would test next. This discipline improves reliability and makes your learning transferable to future projects.
Practice note for Turn raw readings into “near / medium / far” zones: document your objective, define a measurable success check, and run a small experiment before scaling. Capture what changed, why it changed, and what you would test next. This discipline improves reliability and makes your learning transferable to future projects.
Practice note for Create a simple sensor dashboard to watch readings change: document your objective, define a measurable success check, and run a small experiment before scaling. Capture what changed, why it changed, and what you would test next. This discipline improves reliability and makes your learning transferable to future projects.
Practice note for Design a basic safety buffer that prevents immediate collisions: document your objective, define a measurable success check, and run a small experiment before scaling. Capture what changed, why it changed, and what you would test next. This discipline improves reliability and makes your learning transferable to future projects.
Practice note for Learn what a sensor reading is and why it can be wrong: document your objective, define a measurable success check, and run a small experiment before scaling. Capture what changed, why it changed, and what you would test next. This discipline improves reliability and makes your learning transferable to future projects.
Practice note for Compare ultrasonic, infrared, bump, and LiDAR-style sensing: document your objective, define a measurable success check, and run a small experiment before scaling. Capture what changed, why it changed, and what you would test next. This discipline improves reliability and makes your learning transferable to future projects.
Practice note for Turn raw readings into “near / medium / far” zones: document your objective, define a measurable success check, and run a small experiment before scaling. Capture what changed, why it changed, and what you would test next. This discipline improves reliability and makes your learning transferable to future projects.
Practice note for Create a simple sensor dashboard to watch readings change: document your objective, define a measurable success check, and run a small experiment before scaling. Capture what changed, why it changed, and what you would test next. This discipline improves reliability and makes your learning transferable to future projects.
A sensor reading is not “the obstacle distance.” It is a measurement produced by a physical device, under assumptions the device designer made. Understanding those assumptions lets you predict failure modes instead of being surprised by them.
Common obstacle-avoidance sensors include ultrasonic (sonar), infrared (IR) proximity, bump switches, and LiDAR-style range sensors. They differ in what they measure:
Practical outcome: choose sensors based on what behavior you want. If your only requirement is “don’t push hard into walls,” bump sensors plus gentle speed may suffice. If you want smooth steering before contact, you need a distance sensor. If you want to navigate tighter spaces, a wider field of view (multiple sensors or a scanning sensor) reduces surprises.
Common mistake: treating a single forward sensor as “front is safe.” One sensor covers one region. Obstacle avoidance is really “avoid collisions in the robot’s swept path,” which includes corners, side clearance, and the arc your robot makes while turning.
Distance sensors typically output a number plus an implicit unit. In beginner robotics you’ll see centimeters (cm), millimeters (mm), meters (m), or sometimes a raw analog-to-digital count that you must convert. Always write down the unit at the point you read the value. “0.3” is meaningless unless you know whether it’s 0.3 m (30 cm) or 0.3 cm.
Think of distance readings as “how much room you have to stop or turn.” If your robot is moving forward, the useful question is: Is the distance ahead greater than my stopping distance plus a buffer? Even a simple robot needs a mental model for this:
To make this concrete, suppose your robot moves at 0.2 m/s and you sample sensors at 10 Hz (every 0.1 s). If you detect an obstacle right after a sample, you might not react for nearly 0.1 s, during which you travel ~0.02 m (2 cm), plus motor lag. That means a “safe” threshold of 5 cm may be too small even if the sensor is perfect.
Practical workflow: normalize your readings into a consistent internal unit (meters is common), then compute decisions from those meters. This prevents subtle bugs like comparing a cm threshold to a meter reading (robot either freezes forever or never turns).
Sensors can be wrong in repeatable ways. Treat “wrong readings” as engineering facts you design around, not rare accidents. Noise is random variation—numbers jitter even when nothing changes. Blind spots are systematic—regions where the sensor cannot see. Reflections are “weird but consistent”—the sensor sees something that isn’t the obstacle you care about.
Examples you will likely encounter:
Beginner-friendly practice: build a simple sensor dashboard that prints or plots live readings while you move the robot (or simulator robot) toward known objects. Watch for signatures: steady decrease as you approach a wall, sudden spikes when passing an angled edge, or flat lines when the sensor saturates. Logging a few seconds of data is often enough to reveal whether your controller is failing because of logic or because the sensor stream is unreliable.
Common mistake: using a single reading to trigger a hard turn. One bad “near” sample can cause needless oscillation; one bad “far” sample can cause a bump. The fix is usually not complex math—it’s modest filtering and sensible safety margins.
Sampling rate is how often you read sensors and update decisions. It sets the pace of the robot’s “attention.” A slow sampling rate makes the robot feel clumsy: it drives too far before reacting, then over-corrects. An extremely fast rate can create jitter if the controller reacts to every tiny fluctuation.
In a beginner simulator workflow, you typically have a control loop that runs at a fixed timestep (for example, 10–50 updates per second). Choose a rate you can reason about. Then compute the distance the robot travels per update:
distance_per_update ≈ speed × (1 / update_rate)
If your robot travels 2–5 cm per update, you can design thresholds and buffers with that granularity. If it travels 20 cm per update, you’ll need very large safety zones or you will hit things before you can react.
Practical workflow suggestion:
Common mistake: mixing rates without realizing it—printing at 1 Hz, sensing at 5 Hz, and controlling at 50 Hz. The robot then “looks” stable in logs but behaves unstable physically. Your sensor dashboard should show timestamps or loop counts so you can verify the robot is truly checking as often as you think.
Filtering means turning a noisy signal into a more usable one. For obstacle avoidance, you want to reduce jitter while preserving real changes (like approaching a wall). You don’t need advanced statistics to get 80% of the benefit.
Three beginner-friendly filters are common:
Engineering judgment: decide what kind of mistake you prefer. If your robot must never hit obstacles, prefer filters that err on the “closer” side (conservative). For example, instead of averaging, you might take the minimum of the last few readings for the forward direction so that one genuinely close detection is not washed out. The trade-off is more false alarms.
Common mistake: filtering after you discretize into “near/medium/far.” Filter the numeric distance first, then map to zones. Otherwise, the zone label can flip rapidly and you’ll see turn-left/turn-right oscillations.
Practical outcome: with simple smoothing plus validation, your sensor dashboard should show fewer spikes, and your robot should stop “twitching” when driving along a wall or passing doorway edges.
To implement obstacle avoidance, you must convert continuous distances into actionable categories. A simple and effective approach is safety zones: define thresholds that map a distance to “far,” “medium,” or “near.” This is where you design a safety buffer that prevents immediate collisions.
Start with three zones for the forward direction:
Set thresholds using robot size and reaction distance. A practical recipe:
Then design decision logic that is stable. Example behavior: if forward is near, set speed to 0 and turn away from the closer side; if forward is medium, reduce speed and add a gentle turn bias away from obstacles; if far, go straight. If you have left/right sensors, compute a simple “steer away” rule: turn toward the side with more distance.
Common mistakes and fixes:
Practical outcome: when you watch your dashboard, you should see distances transition smoothly through far→medium→near as you approach obstacles, and the robot should respond early enough that it rarely triggers the bump sensor (if present). The numbers become decisions, and decisions become repeatable motion.
1. Why can a robot’s distance sensor readings not be treated as “ground truth” about obstacle locations?
2. What is a key risk of making control decisions from a single sensor sample?
3. What is the main purpose of converting raw distance measurements into “near / medium / far” zones?
4. Why does the chapter recommend building a simple live sensor dashboard?
5. Which design goal best matches the chapter’s approach to a safety buffer?
Obstacle avoidance is not just “seeing” an obstacle—it is turning sensor readings into motion that is smooth, predictable, and safe. In this chapter you will build an intuition for how a simple wheeled robot moves, how to express movement as two commands, and why speed changes everything about safety. You will also learn a practical workflow: move a little, check sensors again, and only then decide what to do next. This loop is the heart of beginner-friendly autonomous navigation.
We will keep the focus on practical engineering judgement. You will see why a robot that seems fine at low speed suddenly starts bumping things when you increase speed, why corners can trap you even when your sensors “see” the wall, and how a small reusable “movement API” helps you write clearer obstacle-avoidance logic in later chapters.
By the end, you should be able to implement emergency stop and slow-down behavior, practice basic maneuvers (turn away, follow a curve, back up), and tune turning and safety thresholds to reduce oscillation. Even in a simulator, treat these rules as real: your goal is not only to avoid collisions, but to avoid risky situations that are likely to become collisions when the world is noisy.
Practice note for Understand wheels, turning, and why speed affects safety: document your objective, define a measurable success check, and run a small experiment before scaling. Capture what changed, why it changed, and what you would test next. This discipline improves reliability and makes your learning transferable to future projects.
Practice note for Model movement with two simple commands: forward and turn: document your objective, define a measurable success check, and run a small experiment before scaling. Capture what changed, why it changed, and what you would test next. This discipline improves reliability and makes your learning transferable to future projects.
Practice note for Implement emergency stop and slow-down behavior: document your objective, define a measurable success check, and run a small experiment before scaling. Capture what changed, why it changed, and what you would test next. This discipline improves reliability and makes your learning transferable to future projects.
Practice note for Practice basic maneuvers: turn away, follow a curve, back up: document your objective, define a measurable success check, and run a small experiment before scaling. Capture what changed, why it changed, and what you would test next. This discipline improves reliability and makes your learning transferable to future projects.
Practice note for Build a tiny “movement API” you can reuse in later chapters: document your objective, define a measurable success check, and run a small experiment before scaling. Capture what changed, why it changed, and what you would test next. This discipline improves reliability and makes your learning transferable to future projects.
Practice note for Understand wheels, turning, and why speed affects safety: document your objective, define a measurable success check, and run a small experiment before scaling. Capture what changed, why it changed, and what you would test next. This discipline improves reliability and makes your learning transferable to future projects.
Practice note for Model movement with two simple commands: forward and turn: document your objective, define a measurable success check, and run a small experiment before scaling. Capture what changed, why it changed, and what you would test next. This discipline improves reliability and makes your learning transferable to future projects.
Practice note for Implement emergency stop and slow-down behavior: document your objective, define a measurable success check, and run a small experiment before scaling. Capture what changed, why it changed, and what you would test next. This discipline improves reliability and makes your learning transferable to future projects.
Practice note for Practice basic maneuvers: turn away, follow a curve, back up: document your objective, define a measurable success check, and run a small experiment before scaling. Capture what changed, why it changed, and what you would test next. This discipline improves reliability and makes your learning transferable to future projects.
Many beginner robots use differential drive: two powered wheels (left and right) and possibly a small caster wheel for balance. The key idea is simple: the robot turns because the wheels can spin at different speeds. If both wheels spin forward at the same rate, the robot drives straight. If the left wheel spins faster than the right wheel, the robot curves to the right (because the left side “pushes” farther). If one wheel goes forward while the other goes backward, the robot can spin in place.
This matters for obstacle avoidance because “turning” is not a separate mechanism—it is a consequence of changing wheel speeds. When you later implement logic like “turn away from the closest obstacle,” you are really choosing a relationship between left and right wheel speeds.
Practical intuition: imagine the robot’s body has an invisible point halfway between the wheels. That midpoint is often treated as the robot’s position. When wheel speeds differ, the robot rotates around an instantaneous center somewhere to the left or right. The tighter the turn, the closer that center is to the robot. Tight turns are useful, but they can also be jerky, cause wheel slip, and lead to oscillation if your control logic keeps switching directions.
Common mistake: assuming the robot can instantly change direction like a video-game character. Real wheels have traction limits, motors have acceleration limits, and your controller updates at discrete time steps. Good obstacle avoidance respects these limits: it turns early, slows down near obstacles, and avoids last-second hard pivots whenever possible.
To keep your controller simple and reusable, describe movement using two commands: linear speed (how fast the robot moves forward/backward) and turning speed (how fast the robot rotates). You will often see these written as v (meters/second) and ω (radians/second). Even if your simulator uses different units, the concept is the same: one value controls forward motion, one value controls steering.
This two-command model is powerful because it matches how you think about navigation. “Go forward slowly” means a small positive v. “Turn left gently” means a small positive ω. “Spin in place to the right” means v = 0 and negative ω. In later chapters, your obstacle-avoidance logic can output just (v, ω), while the rest of the system converts that into motor signals.
A tiny movement API helps you avoid repeated low-level code. For example, define helpers like drive(v), turn(ω), and drive_turn(v, ω), plus safety wrappers like stop() and backup(v, t). The API is not about complexity—it is about clarity. When you read your controller later, you should see intent (slow down, turn away, back up) instead of raw numbers scattered across conditionals.
v > 0, ω = 0v = 0, ω ≠ 0v > 0, ω ≠ 0v < 0, usually small magnitude for safetyCommon mistake: using only “forward” and “hard turn” states. That often creates a jerky, oscillating robot that constantly over-corrects. A curved motion (forward + gentle turn) is usually smoother and safer.
If you increase speed without changing anything else, bumps become more likely. The reason is stopping distance. Your robot cannot stop instantly: it needs time for your controller to notice danger, issue a stop command, and for the motors and wheels to slow down. Even in simulation, there is a delay because decisions happen at discrete time steps.
A practical way to think about it is: stopping distance ≈ reaction distance + braking distance. Reaction distance is how far the robot travels during one control cycle (plus any extra latency). Braking distance depends on how quickly you can reduce speed, which is limited by motor torque, wheel traction, and any acceleration limits in the simulator.
This directly informs emergency stop and slow-down behavior. If your “stop distance” is too small, the robot will still collide even though your code correctly detects an obstacle. Beginners often blame the sensor, but the real issue is that the robot was moving too fast for the chosen safety threshold.
Engineering judgement: choose safety zones that scale with speed. For example, define three distance thresholds from your front distance sensor: danger (immediate stop), caution (slow down), and clear (normal speed). If you later tune speed upward, increase these thresholds or reduce acceleration so the robot can still stop in time.
Common mistake: only implementing an emergency stop. Emergency stop prevents some collisions, but it also causes “stop-go-stop” oscillation when the robot creeps forward, triggers stop, creeps again, and repeats. Adding a slow-down zone creates smoother behavior and reduces jitter.
Even if your robot can spin in place, it still has practical limits: a maximum turning speed, a minimum stable turning radius at a given forward speed, and sensor blind spots. These limits show up most clearly near corners. A classic failure mode is the “corner trap”: the robot approaches a wall, turns away, but the front sensor still sees the wall because the robot’s body swings toward it. The controller then flips direction repeatedly, and the robot gets stuck oscillating.
To handle corners, you need two things: (1) a minimum turning behavior that is strong enough to actually change the robot’s heading, and (2) a fallback maneuver when turning isn’t enough. A practical pattern is:
v, moderate ω).Backing up is not “giving up”—it is a common recovery action. The important safety rule is to back up slowly and for a limited time, because you may not have rear sensing. If your simulator provides rear distance readings, still treat reverse as higher risk and keep it conservative.
Common mistake: always turning with v > 0. Sometimes forward motion is exactly what keeps you pinned against a corner. Allowing v = 0 (spin) and a brief v < 0 (backup) makes the system far more robust.
Autonomous navigation for beginners is easiest when you think in time steps. Your robot should not decide “drive forward until the goal” in one shot. Instead, it should repeat a loop: read sensors, choose a motion command, apply it briefly, then read sensors again. This is both safer and simpler to debug.
In a simulator workflow, you typically have a control update rate (for example, 10–50 times per second). Each cycle, you compute (v, ω) from the latest distance readings and apply it for one time step. Then you re-evaluate. This makes your obstacle avoidance responsive to new obstacles and reduces the chance of driving too far on stale information.
Practical outcome: you can test behaviors in small increments. If the robot bumps into a wall, you can inspect logs: what was the front distance, what command did you send, and how many cycles did it take to react? This is also where you tune thresholds and speeds. If oscillation occurs, reduce turning aggressiveness, add a slow-down band, or introduce small “hysteresis” (don’t immediately switch states until the distance has clearly moved out of the threshold).
A reusable movement API fits naturally into this loop. Your controller returns intents like stop(), drive_turn(v, ω), or backup(v, t). The time-step loop executes them safely, enforcing maximum speeds and acceleration limits.
Common mistake: mixing time logic everywhere (“sleep” calls, long blocking turns) inside the obstacle-avoidance code. That makes the robot blind while executing a maneuver. Prefer short actions repeated over multiple cycles so you can keep checking distances as you move.
Safety-first motion is a set of rules that prioritize controlled behavior over maximum speed. The simplest effective approach is to make speed a function of distance: fast when clear, slow when close, and stop when too close. This naturally integrates emergency stop and slow-down behavior and reduces bumping.
A practical rule set using a front distance reading might look like this: if distance is below danger, command stop() (and possibly spin). If distance is between danger and caution, command a slow forward speed and a turn away from the closer side. If distance is above caution, allow normal cruising speed with gentle steering corrections. If you have left and right distance readings, choose turning direction by “turn away from the smaller distance,” and scale turning speed by how unequal the distances are.
v = 0 when inside the danger zone.v gradually as distance decreases.ω as obstacles get closer on one side.Engineering judgement shows up in tuning. If the robot “ping-pongs” between walls, your turning is too aggressive or your slow-down band is too narrow. If it bumps despite stopping, your danger threshold is too small for your speed and time step. If it freezes in clutter, your caution threshold may be too large or your recovery behavior too timid.
The practical outcome is a movement layer you can reuse: a small API for commanding safe motion, plus a clear set of safety rules that convert distances into (v, ω). With that foundation, later chapters can focus on better sensing and smarter decision-making without rewriting how the robot moves.
1. Why can a robot that avoids obstacles well at low speed start bumping into things when its speed increases?
2. Which workflow best matches the chapter’s recommended approach for safe obstacle avoidance?
3. How does the chapter simplify robot motion into two commands for beginner-friendly control logic?
4. What is the main purpose of implementing emergency stop and slow-down behavior?
5. What is a key benefit of building a small reusable “movement API” in this chapter?
A robot can have excellent sensors and still crash into chair legs if it doesn’t have a “brain” that turns distance readings into actions. In this chapter, you will build that brain as a simple controller: a small set of rules that repeatedly reads sensors, decides what to do next, and commands the robot’s speed and turning. The goal is not to create perfect navigation—it is to create a controller you can understand, debug, and tune.
You will start with a rule-based controller that turns away from obstacles. Then you’ll add left/right choice by using multiple sensor directions (left, front, right). Next, you’ll handle real-world behavior issues that beginners hit immediately: jitter (rapid back-and-forth turning), getting stuck in corners, and oscillations near thresholds. Finally, you’ll run a full navigation loop in a simulated room using repeatable scenarios and simple logs so you can see why the robot chose each action.
As you work, think like an engineer: pick thresholds that are safe, but not so conservative that the robot crawls; avoid “twitchy” decisions by adding stability; and always test changes in a controlled way. The controller you build here is the foundation you will improve later with better sensing, mapping, and planning.
Practice note for Create a rule-based controller that turns away from obstacles: document your objective, define a measurable success check, and run a small experiment before scaling. Capture what changed, why it changed, and what you would test next. This discipline improves reliability and makes your learning transferable to future projects.
Practice note for Add left/right choice using multiple sensor directions: document your objective, define a measurable success check, and run a small experiment before scaling. Capture what changed, why it changed, and what you would test next. This discipline improves reliability and makes your learning transferable to future projects.
Practice note for Fix jitter: reduce rapid back-and-forth turning: document your objective, define a measurable success check, and run a small experiment before scaling. Capture what changed, why it changed, and what you would test next. This discipline improves reliability and makes your learning transferable to future projects.
Practice note for Handle dead ends with a simple “turn until clear” strategy: document your objective, define a measurable success check, and run a small experiment before scaling. Capture what changed, why it changed, and what you would test next. This discipline improves reliability and makes your learning transferable to future projects.
Practice note for Run your first full navigation loop in a simulated room: document your objective, define a measurable success check, and run a small experiment before scaling. Capture what changed, why it changed, and what you would test next. This discipline improves reliability and makes your learning transferable to future projects.
Practice note for Create a rule-based controller that turns away from obstacles: document your objective, define a measurable success check, and run a small experiment before scaling. Capture what changed, why it changed, and what you would test next. This discipline improves reliability and makes your learning transferable to future projects.
Practice note for Add left/right choice using multiple sensor directions: document your objective, define a measurable success check, and run a small experiment before scaling. Capture what changed, why it changed, and what you would test next. This discipline improves reliability and makes your learning transferable to future projects.
Practice note for Fix jitter: reduce rapid back-and-forth turning: document your objective, define a measurable success check, and run a small experiment before scaling. Capture what changed, why it changed, and what you would test next. This discipline improves reliability and makes your learning transferable to future projects.
Practice note for Handle dead ends with a simple “turn until clear” strategy: document your objective, define a measurable success check, and run a small experiment before scaling. Capture what changed, why it changed, and what you would test next. This discipline improves reliability and makes your learning transferable to future projects.
A controller is the part of your navigation system that converts “what I sense” into “what I do.” In obstacle avoidance, the controller typically outputs two commands: forward speed (how fast to move) and turn rate (how fast to rotate). The simplest controller is rule-based: a set of if-then statements that compare sensor readings to thresholds and choose actions.
Rule-based controllers are popular for beginners because they are transparent. If the robot turns left, you can point to the exact rule that caused it. This matters when you are learning how distance sensors behave (noise, blind spots, reflections) and when you want predictable safety behavior. They also run fast and don’t need training data.
Learning-based controllers (for example, reinforcement learning or imitation learning) can produce smoother behavior and adapt to complex environments, but they are harder to debug. If a learned policy fails, you often need to inspect training data, reward functions, or network outputs. For a first obstacle-avoidance brain, rules are the right tool: you will build intuition for safety zones, thresholds, and how sensor geometry affects decisions.
In this chapter you will implement a rule-based controller that runs in a loop: read distances → decide action → send motor commands → repeat. That loop is the heartbeat of autonomous navigation.
To turn raw distances into decisions, define safety zones. A safety zone is simply a distance threshold that changes behavior. A common beginner setup uses two zones: a caution zone where the robot should slow down and prepare to turn, and a danger zone where the robot must immediately avoid collision.
Example thresholds (you will tune them later):
Your first rule-based controller can be built from just one forward distance reading (front sensor). The simplest logic looks like this in plain language: “If something is very close in front, turn; otherwise go forward.” That already creates obstacle avoidance, but it has two common issues: (1) it doesn’t know whether left or right is better, and (2) it often oscillates when hovering around the threshold.
Engineering judgment: set the danger threshold based on robot size and stopping distance. If your robot needs 0.15 m to stop from its normal speed, a 0.25 m danger zone gives you margin for sensor noise and controller delays. A common mistake is picking thresholds from a diagram without considering speed—faster robots need larger safety zones.
Practical outcome: by the end of this section, you should be able to write clear if-then rules that map distance readings to “go,” “slow,” and “turn,” and you should know how to justify your thresholds in terms of safety and dynamics.
One forward distance is enough to avoid collisions, but not enough to make good choices. To decide whether to turn left or right, read distances in at least three directions: left, front, and right. In a simulator, you might get these as three ray-cast ranges. On a real robot, you might approximate them using three ultrasonic sensors, three IR sensors, or a lidar split into angular sectors.
With three directions, your controller can implement “turn away from the closest obstacle” or “turn toward the clearest space.” A robust beginner rule is: when front is blocked, turn toward the side with more free distance. Concretely:
Also use the side readings proactively. If the front is clear but the right side is getting close (for example, you are scraping along a wall), add a gentle steering correction away from that side. This is still rule-based control; you are just using more information.
Common mistakes to watch for:
Practical outcome: you now have a controller that makes a deliberate left/right choice instead of spinning randomly, and you can reason about why the robot chose its turn direction from the three numbers (left, front, right).
As you add more rules, conflicts appear. For example, one rule might say “go forward because front is clear,” while another says “turn left because right is close.” To avoid chaotic behavior, assign priorities. A simple, safe priority stack for obstacle avoidance is:
Implement this as a decision ladder. First check the strongest safety condition (danger). If true, set speed to zero (or very low) and choose a turn direction. If not in danger, check caution: if front is in caution or a side is too close, set a reduced speed and steer away. Only if all readings are in the clear zone do you command full forward speed with minimal turning.
This structure prevents a common beginner failure mode: the robot “tries to do everything” by issuing a large turn rate while still commanding high forward speed, causing wide arcs that clip obstacles. Reducing speed during turns makes motion more controlled and reduces bumping.
Practical outcome: your controller becomes predictable. When you watch the robot, you can categorize each moment as one of a few modes (danger-avoid, caution-steer, clear-cruise). That predictability is critical for debugging and tuning.
Once your controller runs, you will likely see jitter: rapid left-right oscillation when distances hover near a threshold or when left and right readings are very similar. This is not just annoying; it can make the robot stall, scrape walls, or waste battery. Two simple stability tools fix most beginner jitter without advanced math: hysteresis and cooldown timers.
Hysteresis means you use different thresholds for entering vs leaving a mode. Example: enter “danger” when front < 0.25 m, but don’t exit danger until front > 0.30 m. That small gap prevents mode-flipping when readings bounce around 0.25 m due to noise.
Cooldown timers mean “commit to a turn for a short time.” When the robot decides “turn left to avoid,” hold that decision for, say, 0.3–0.7 seconds before allowing a switch. This prevents the controller from changing its mind every loop iteration. A practical pattern is to store last_turn_direction and a turn_until_time. If the timer is still active, keep turning the same way unless a stronger safety condition forces a stop.
Dead ends are another stability challenge: if front is blocked and both sides are also close, the robot can “shiver” in place. A simple strategy is turn until clear: pick a turn direction (often the side with slightly more space) and keep turning until the front distance leaves the danger zone by a safe margin. This converts a messy corner case into a clear behavior you can test.
Obstacle avoidance improves fastest when testing is repeatable. Random driving in a random room makes it hard to know whether a change helped. Instead, create a small set of standard scenarios in your simulator and run them after every controller tweak. This is your beginner-friendly workflow for running a full navigation loop (sense → decide → act) while keeping results comparable.
Build three or four simple simulated rooms:
Add lightweight logs. Each control loop, record: timestamp, left/front/right distances, current mode (danger/caution/clear), chosen turn direction, speed command, and turn command. In simulation you can print to console or save CSV. The goal is not perfect analytics; it is to answer basic debugging questions like “Why did it turn right here?” and “Did it leave danger mode too early?”
Common testing mistakes: changing multiple parameters at once, starting from different initial positions each run, and judging success only by “it didn’t crash this time.” Instead, change one threshold at a time, keep the same start pose, and measure outcomes like minimum distance to obstacles, number of oscillations in the corridor, and time to escape the corner.
Practical outcome: you can run your first complete autonomous navigation loop in a simulated room and iteratively tune speed, turning rate, safety thresholds, and stability settings to reduce bumps and jitter while keeping motion efficient.
1. What is the main purpose of the Chapter 4 controller?
2. Why add left/front/right sensor directions instead of using only one distance reading?
3. What is “jitter” in obstacle avoidance, and what is the general fix described?
4. How should the controller handle dead ends or corners where the robot gets stuck?
5. When tuning thresholds and testing changes, what approach does the chapter recommend?
In earlier chapters you built a basic obstacle-avoidance controller that “usually” works: it moves forward when the front is clear, turns away when something is close, and slows down as it approaches obstacles. Now you will do the work that turns a demo into something you can trust—tuning, handling edge cases, and validating behavior across repeated runs.
Reliability in robot navigation is less about inventing a smarter algorithm and more about making careful engineering trade-offs. If you make the robot too cautious, it freezes or crawls forever. If you make it too bold, it bumps into things, scrapes along walls, or oscillates in place. This chapter gives you a practical workflow: tune the key parameters, learn the common failure patterns and what causes them, add a few targeted behaviors for corners, narrow gaps, and being stuck, and then confirm the improvements using a small, repeatable test suite.
You can do all of this in a beginner-friendly simulator. The goal is not perfect navigation; the goal is predictable navigation. Predictable robots are easier to improve, easier to debug, and safer to run around people and furniture.
Practice note for Tune thresholds to reduce bumps without freezing: document your objective, define a measurable success check, and run a small experiment before scaling. Capture what changed, why it changed, and what you would test next. This discipline improves reliability and makes your learning transferable to future projects.
Practice note for Improve corner behavior and avoid “wall hugging”: document your objective, define a measurable success check, and run a small experiment before scaling. Capture what changed, why it changed, and what you would test next. This discipline improves reliability and makes your learning transferable to future projects.
Practice note for Handle narrow passages with a cautious slow-drive mode: document your objective, define a measurable success check, and run a small experiment before scaling. Capture what changed, why it changed, and what you would test next. This discipline improves reliability and makes your learning transferable to future projects.
Practice note for Add a simple recovery behavior when stuck: document your objective, define a measurable success check, and run a small experiment before scaling. Capture what changed, why it changed, and what you would test next. This discipline improves reliability and makes your learning transferable to future projects.
Practice note for Create a mini test suite of obstacle courses to compare results: document your objective, define a measurable success check, and run a small experiment before scaling. Capture what changed, why it changed, and what you would test next. This discipline improves reliability and makes your learning transferable to future projects.
Your obstacle-avoidance controller has a handful of “knobs” that dominate behavior: safety distances (thresholds), forward speed, turning speed (or turn strength), and how quickly you change between them. These parameters are coupled: increasing speed usually requires larger safety distances and stronger turns, because the robot needs more time and space to react.
A practical approach is to tune in this order: (1) choose conservative safety distances, (2) find a forward speed that does not cause frequent impacts, then (3) increase turn strength until it reliably avoids contact, and finally (4) relax the safety distances just enough to prevent freezing. If you tune in the reverse order—trying to fix bumps by only turning harder—you often create oscillation and “ping-ponging” between left and right turns.
Track your tuning with a small table (even in a notebook): parameter values, observed failures, and what you changed. That habit turns tuning from guessing into an experiment. The practical outcome of this section is a controller that can move briskly in open space yet slows early enough to avoid the most common bumps.
Most beginner controllers fail in a few recognizable ways. Learning to name them helps you fix them quickly.
Oscillation looks like rapid left-right turning (or forward-stop-forward-stop). The typical cause is high gain with no damping: the robot reacts strongly to tiny differences in left vs. right distance readings, then overshoots, then corrects back. Fixes include (1) smoothing the sensor readings (moving average over a few frames), (2) limiting how quickly turn commands can change (a rate limiter), and (3) adding hysteresis so the controller commits to a turn direction for a minimum time unless a stop condition triggers.
Freezing is when the robot refuses to move even though a human can see a path. This is usually caused by thresholds that are too large, or by treating any “near” reading on the side as a hard stop. A useful pattern is “slow but not stop”: if the front is moderately blocked but not dangerously close, creep forward while turning away. This often lets the robot slide past furniture edges without needing perfect clearance.
False clears happen when the robot thinks it is safe but it is not—often due to sensor blind spots, noisy readings, or geometry. For example, a front sensor can miss chair legs if the beam passes between them, or a lidar may briefly report a long distance if a reflective surface causes a drop-out. Practical mitigations are: (1) take the minimum of several recent samples (a short “min filter”), (2) fuse multiple directions (front-left + front + front-right) into the stop/slow decision, and (3) keep a small safety margin that you do not tune away.
The outcome here is diagnostic skill: when you see the behavior, you immediately suspect a short list of causes and apply the correct kind of fix instead of random parameter changes.
Corners are where simple distance-based logic gets stressed. In a convex corner (like the outside of a box), sensors usually detect the obstacle cleanly. In a concave corner (like the inside of a doorway recess or a U-shaped trap), a robot can “see” clearance in one direction and get pulled into a dead-end where turning becomes difficult.
Two sensor effects are common. First, specular reflection (especially with sonar and some lidars) can return longer distances than reality, so the robot believes a corner is open. Second, beam geometry: if your controller uses only a narrow front ray, it may not notice that forward motion will collide with a wall that is slightly off-axis.
To improve corner behavior and avoid wall hugging, use these practical techniques:
A common mistake is trying to fix corners by increasing the stop distance everywhere. That prevents corner collisions but causes freezing in tight rooms. The better approach is targeted logic: recognize corner-like patterns in the sensor readings and adjust turning behavior only then. The practical outcome is fewer “stutters” at corner entrances and fewer situations where the robot gets pulled into concave traps.
Narrow passages are a special case because obstacle avoidance can fight itself. If both left and right sensors report “near,” a naive controller might alternately turn away from each wall, producing oscillation or a full stop. But narrow gaps are often exactly where you want the robot to continue—slowly and centered.
Introduce a cautious slow-drive mode. Trigger it when the front is not in the stop zone but both side distances are below a “narrow” threshold (or when the left-right difference is small and both are near). In this mode:
Deciding when to proceed versus when to turn away is about confidence. If the front distance is decreasing quickly while you are already slow, or if the centering command saturates (you need maximum steering just to stay centered), treat it as “not passable” and execute a turn-away behavior. In simulation, you can test this with a hallway barely wider than the robot and with a hallway that is too narrow—your controller should behave differently in each case.
The outcome is a robot that can traverse doorways and corridors without either scraping along one side (wall hugging) or refusing to enter (freezing).
Even with careful tuning, robots get stuck: wedged against a chair leg, trapped in a concave corner, or oscillating with negligible progress. A simple recovery behavior makes the system far more robust, and you can implement it without complex mapping.
Stuck detection is “commanded motion vs. actual progress.” In a simulator, you may have access to ground-truth position; on a real robot you might use wheel odometry or a basic velocity estimate. The simplest rule is: if you commanded forward motion for N seconds but your measured displacement is below a small threshold, declare stuck.
A common mistake is triggering recovery based only on “front is blocked for too long.” That confuses legitimate waiting (for example, approaching a wall and turning) with being stuck. Use the progress-based check instead; it aligns with the real problem: the robot is not going where it thinks it is going.
The outcome is resilience: instead of staying trapped indefinitely, the robot has a clear, repeatable way to escape and continue.
Tuning without validation is how you accidentally make things worse. You need a mini test suite of obstacle courses and a simple way to compare results across parameter changes. The goal is run-to-run consistency: the robot should behave similarly each time, not succeed once and fail the next run due to noise or tiny starting differences.
Create 4–6 small courses in your simulator, each targeting a behavior: (1) open room with a single obstacle, (2) slalom around multiple obstacles, (3) hallway/narrow passage, (4) concave corner trap, (5) doorway into a room, and optionally (6) cluttered “living room.” Keep the starting pose fixed. If your simulator includes randomness (sensor noise), run each course multiple times.
Do not optimize only for speed. Many controllers “improve” by going slower everywhere, which hides problems instead of solving them. Use the score to force balance: low collisions and reasonable completion time. When you adjust a parameter, rerun the suite and compare. This is how you develop engineering judgement: you see which knobs change which behaviors and you learn to make trade-offs intentionally.
The outcome is confidence. You will know, with evidence, that your obstacle-avoidance behavior is more reliable—fewer bumps, fewer freezes, fewer corner failures—and that improvements persist across multiple runs.
1. What is the main goal of Chapter 5’s workflow for obstacle avoidance?
2. Why is tuning thresholds described as an engineering trade-off in this chapter?
3. Which combination best matches the chapter’s approach to improving reliability?
4. What is the purpose of adding a cautious slow-drive mode for narrow passages?
5. How does a mini test suite of obstacle courses help in Chapter 5?
This chapter is your “put it all together” moment. Up to now, you’ve worked with sensors, safety zones, and simple rules in isolation. A robot in the real world does not get that luxury: distance readings arrive continuously, control logic must make decisions on time, and motors will do exactly what you last commanded—even if that command is now unsafe. Your capstone goal is to assemble a complete navigation loop that (1) reads sensors, (2) interprets them with safety zones, (3) chooses a motion command, (4) enforces safety limits, and (5) measures performance so you can tune it on purpose rather than guessing.
To keep this beginner-friendly, we’ll focus on obstacle avoidance (not goal-seeking). The robot’s job is to keep moving without hitting things, in a demo course designed to expose the most common failure modes: late turns, oscillation (“wiggling”), getting stuck in corners, and speed that’s too high for the sensing and control rate.
By the end of the chapter you will have: a single main loop you can run repeatedly, a repeatable demo course, before/after tuning measurements, a safety switch (timeouts and max-speed limits), and a small “results report” and configuration package you can reuse in future projects.
Practice note for Assemble the final navigation loop from sensors, rules, and motion: document your objective, define a measurable success check, and run a small experiment before scaling. Capture what changed, why it changed, and what you would test next. This discipline improves reliability and makes your learning transferable to future projects.
Practice note for Build a demo course and record performance (before/after tuning): document your objective, define a measurable success check, and run a small experiment before scaling. Capture what changed, why it changed, and what you would test next. This discipline improves reliability and makes your learning transferable to future projects.
Practice note for Add a “safety switch”: timeouts and maximum speed limits: document your objective, define a measurable success check, and run a small experiment before scaling. Capture what changed, why it changed, and what you would test next. This discipline improves reliability and makes your learning transferable to future projects.
Practice note for Document your settings and what you learned for reuse: document your objective, define a measurable success check, and run a small experiment before scaling. Capture what changed, why it changed, and what you would test next. This discipline improves reliability and makes your learning transferable to future projects.
Practice note for Next steps: mapping, path planning, and learning-based upgrades: document your objective, define a measurable success check, and run a small experiment before scaling. Capture what changed, why it changed, and what you would test next. This discipline improves reliability and makes your learning transferable to future projects.
Practice note for Assemble the final navigation loop from sensors, rules, and motion: document your objective, define a measurable success check, and run a small experiment before scaling. Capture what changed, why it changed, and what you would test next. This discipline improves reliability and makes your learning transferable to future projects.
Practice note for Build a demo course and record performance (before/after tuning): document your objective, define a measurable success check, and run a small experiment before scaling. Capture what changed, why it changed, and what you would test next. This discipline improves reliability and makes your learning transferable to future projects.
Practice note for Add a “safety switch”: timeouts and maximum speed limits: document your objective, define a measurable success check, and run a small experiment before scaling. Capture what changed, why it changed, and what you would test next. This discipline improves reliability and makes your learning transferable to future projects.
Practice note for Document your settings and what you learned for reuse: document your objective, define a measurable success check, and run a small experiment before scaling. Capture what changed, why it changed, and what you would test next. This discipline improves reliability and makes your learning transferable to future projects.
Your capstone controller is a loop that runs at a fixed rate (for example 10–20 Hz). Each iteration should do the same steps in the same order. Consistency matters because most “mystery” behaviors come from inconsistent timing (reading old sensor data, skipping updates, or sending motor commands irregularly).
A practical end-to-end loop looks like this: read sensors → sanitize readings → compute safety zones → choose behavior → apply safety limits → send motion command → log key values. Sanitizing readings means handling missing/invalid distances (NaN, infinity, out-of-range). A beginner-friendly rule is: if a reading is invalid, treat it as “far” only if you have other confirming sensors; otherwise treat it as “near” to be conservative.
Use the same distance-to-zone mapping you’ve learned: define thresholds for danger (must react now), caution (start turning/slow down), and clear (normal speed). Then compute a small set of features that your rules use, such as min_front, min_left, min_right. Keep it simple: the capstone is about reliability, not cleverness.
min_front is in danger, stop and turn toward the side with more clearance. Else if in caution, reduce speed and turn away from the nearer side. Else, go forward with a small bias to stay centered.Common integration mistake: mixing units. If your sensor reports meters but your thresholds are in centimeters, the robot will behave “possessed.” Choose one unit system (meters is typical) and enforce it everywhere—thresholds, logs, plots, and documentation. Another mistake is using a control rate that is faster than your sensors update; you end up repeating old readings and overreacting. Align loop rate to sensor update rate or explicitly check timestamps and skip control updates when data is stale.
Tuning only works if you can repeat the same test and compare results. Your demo course should be small, deterministic, and designed to reveal weaknesses. In a beginner simulator workflow, create a world that is “challenging enough” but not chaotic: straight hallway segments, one gentle curve, one narrow passage, and a corner that can cause trapping. Avoid clutter at first; you want to diagnose your controller, not randomness.
A good capstone course has three zones: (1) a runway where the robot accelerates and demonstrates stable straight driving, (2) a forced decision point (like a T-junction or offset obstacle) that tests turning behavior, and (3) a corner or U-shape that tests whether your logic escapes instead of oscillating.
Common mistake: changing the course while tuning. If you move walls or resize obstacles mid-process, you lose comparability and start chasing phantom improvements. Lock the course, version it (even as a simple file copy), and only modify it after you have a stable controller.
When you record performance, don’t rely only on “it looked better.” Save the run logs and (if possible) a screen recording. Visual evidence helps you diagnose patterns like repeated left-right oscillations near a wall, or late braking when approaching a corner.
Even a demo robot needs safety engineering. In real robots, a single bug can mean broken hardware. In simulation, safety features still matter because they prevent “runaway” behavior that ruins your tests and hides the true performance of your obstacle avoidance logic.
Add a simple safety switch layer that sits between your controller and the motors. This layer enforces rules that must always be true, regardless of what the navigation logic requests. Two beginner-friendly safeguards are maximum speed limits and timeouts.
Maximum speed limits: Clamp linear and angular velocity to safe bounds, for example v ∈ [0, v_max] and |ω| ≤ ω_max. Choose v_max based on stopping distance: the robot must be able to detect an obstacle, decide, and stop before collision. If your control loop runs at 10 Hz and your robot moves 0.2 m/s, it travels 2 cm per cycle—often manageable. At 1.0 m/s it travels 10 cm per cycle—your “danger zone” must be much larger, and late turns become frequent.
Timeouts (watchdogs): If sensor data is stale (no update for N milliseconds) or your loop misses its deadline repeatedly, force a stop. A practical rule: if the latest sensor timestamp is older than 2–3 control cycles, set velocity to zero and raise a “stale data” flag in logs. Similarly, if your controller outputs commands but the robot pose is not changing (stuck against a wall) for a few seconds, trigger an “escape” behavior: back up slowly and turn in place toward the clearest side.
These safeguards make your demo easier to tune because your runs become bounded: the robot won’t rocket into a wall, spin endlessly, or keep driving on stale readings. They also build correct engineering habits: autonomy is not only about “what to do,” but also about “what must never happen.”
A capstone is not complete until you can explain your results. Your results report can be short, but it should be specific: what settings you used, what you measured, and what changed after tuning. This turns a one-off demo into a learning artifact you can build on.
Start by summarizing your baseline run: thresholds for clear/caution/danger, nominal forward speed, turn gain (how strongly you turn away from obstacles), control rate, and sensor update rate. Then report at least three outcomes: collision count, time/distance performance, and stability (oscillation or smoothness).
When something doesn’t work, attach a reason tied to observable evidence. For example: “The robot oscillated in the hallway because left/right distance differences were small and noise caused the sign of the turn command to flip each cycle.” That diagnosis suggests a fix: add a deadband (don’t turn unless the difference exceeds a threshold), add smoothing, or reduce turn gain.
Common reporting mistake: changing multiple parameters at once. If you adjust speed, thresholds, and smoothing together, you can’t tell what helped. Make one change per run, label the run, and compare logs. Your future self will thank you when you reuse this controller on a different robot or sensor set.
Packaging is how you make your capstone reusable. A beginner project often “works on my machine” because critical values are hidden in code, scattered across files, or remembered informally. Instead, collect your parameters and procedures so you can rerun the demo months later and get the same behavior.
Create a configuration file (or a single clearly marked block in code) that contains: sensor topic/names (or input functions), thresholds for zones, speed limits, turn gain, smoothing parameters, control loop rate, and safety timeout durations. Use clear names and consistent units. Then add a short README-style note explaining how to launch the simulator, start the controller, and run the demo course.
Common packaging mistake: recording only final settings. Keep your baseline too. The baseline is your proof that tuning helped, and it becomes a reference point when you later add complexity (like goal navigation) and something regresses.
Finally, write down the one or two “rules of thumb” you learned (for example: “If I increase speed, I must increase caution distance and control rate,” or “Deadband reduces hallway oscillation more than lowering turn gain”). These are portable insights that transfer to new robots and sensors.
Your capstone obstacle-avoidance robot reacts locally: it decides based on what it senses right now. That’s a strong foundation, but it has a clear limitation: it doesn’t know where it is trying to go. The next steps in autonomous navigation add memory and intent.
The typical progression is: (1) mapping, (2) localization, (3) path planning, and (4) smarter control. Mapping means building a representation of free space and obstacles (often a 2D occupancy grid). Localization means estimating the robot’s pose on that map. Path planning means computing a route to a goal while avoiding obstacles. Obstacle avoidance remains relevant, but it becomes the “local planner” that follows the global plan safely.
As you move forward, your capstone work stays useful if you keep interfaces clean. For example, your safety limiter can remain unchanged, your sensor preprocessing can remain unchanged, and only the behavior selector changes from “wander and avoid” to “track a target heading and avoid.”
The key engineering judgment as you advance is deciding what must be deterministic and safety-critical (timeouts, speed clamps, emergency stop) and what can be adaptive (gains, path choices, learned behaviors). If you carry that separation forward, your future projects will be both more capable and more dependable.
1. Which sequence best describes the complete navigation loop assembled in this capstone project?
2. Why does the chapter emphasize that motors will do exactly what you last commanded?
3. What is the main purpose of building a repeatable demo course and recording before/after performance?
4. The demo course is designed to expose which set of common obstacle-avoidance failure modes?
5. What does the chapter mean by adding a “safety switch” to the navigation loop?
- Learning Evolved.
- Intelligence Amplified.