AI Robotics & Autonomous Systems — Beginner
Build simple AI robots at home with zero prior experience
"Hands-On AI Robotics at Home for Beginners" is a short book-style course designed for complete beginners who want a clear, practical entry into robotics and artificial intelligence. You do not need any previous experience in coding, data science, engineering, or electronics. This course starts from the very beginning and explains everything in simple language, one step at a time.
Instead of overwhelming you with technical terms, this course shows you how a robot works as a system: it senses, decides, and acts. You will learn what makes a robot different from a simple machine, how AI helps a robot respond more intelligently, and how basic parts like controllers, sensors, motors, and power sources fit together. Each chapter builds on the previous one, so you grow your skills in a natural order.
The course is organized like a short technical book with six connected chapters. In the beginning, you will explore what AI robotics means in everyday life and how to set up a safe home learning space. Next, you will learn the physical building blocks of a beginner robot, including the small computer inside it, the sensors that collect information, and the motors that create movement.
After that, you will move into basic coding. The goal is not to turn you into a programmer overnight. Instead, you will learn how code gives instructions to a robot in a way that is easy to follow. You will see how simple commands, variables, loops, and if-then rules allow a robot to do useful tasks. Then you will connect code with sensor data so your robot can react to the world around it.
By the middle of the course, you will understand how a robot can detect distance, light, or touch, and then use that information to make simple decisions. This is one of the most important ideas in AI robotics: a robot becomes more useful when it can respond based on what it senses. You will then apply these ideas in a small home robotics project, such as a simple obstacle-aware robot.
This course is built for learners who want progress without confusion. Each chapter includes milestones that help you focus on one achievement at a time. You will not be asked to master advanced math or complex software. Instead, you will learn how to plan a small robot project, connect the pieces safely, write beginner-friendly control logic, test behavior, and improve results through simple troubleshooting.
The final chapter helps you go beyond your first build. You will learn how to identify common beginner mistakes, improve your robot in small steps, and think about safe and responsible use of AI robotics at home. You will also see how the simple ideas in this course connect to larger autonomous systems used in the real world.
If you have been unsure where to begin, this course gives you a friendly and realistic first step. It is ideal for learners who want a practical foundation they can build on later with more coding, electronics, or autonomous systems work.
Ready to begin your first AI robotics journey? Register free and start learning at your own pace. You can also browse all courses to explore more beginner-friendly AI topics after this one.
Robotics Educator and Applied AI Engineer
Sofia Chen designs beginner-friendly robotics programs that help new learners understand AI through simple, practical builds. She has worked on educational robot kits, sensor-based prototypes, and hands-on STEM learning experiences for schools and independent learners.
Welcome to the starting point of your home robotics journey. Many beginners imagine robotics as a field reserved for research labs, expensive machines, or advanced programmers. In reality, beginner robotics can start on a desk, with a small robot car, a microcontroller, a few sensors, and simple code that you can read line by line. The goal of this chapter is to make AI robotics feel understandable, practical, and safe. By the end, you should be able to describe what a robot does in everyday language, identify the main parts of a basic robot, choose realistic first projects, and prepare a workspace that helps you learn without unnecessary risk.
A useful way to think about robotics is as a combination of three things: sensing, deciding, and acting. A robot uses sensors to notice something about the world, a controller to process that information, and motors or other outputs to do something in response. Add artificial intelligence, even in a simple beginner form, and the robot can make better choices instead of following only one rigid script. That does not mean it becomes magical or human-like. It means it can react to conditions, compare options, and follow decision rules that help it behave more usefully.
At home, beginner AI robotics often means small wheeled robots, line-following kits, obstacle-avoiding cars, robotic arms, or tabletop projects that use distance sensors, light sensors, buzzers, LEDs, and basic programming. These projects are excellent because they teach real engineering habits. You learn to connect parts carefully, test one feature at a time, check power problems, read simple code examples, and make small changes to observe results. Those habits matter more than starting with a complicated machine.
One common mistake is to set goals that are too large too early. A beginner may say, “I want to build a self-driving home robot with voice control and computer vision.” That is exciting, but it is not a good first milestone. Better beginner goals are specific and measurable: make a robot move forward and stop, make it detect an obstacle, make it turn when the path is blocked, or make it follow a dark line on the floor. These smaller wins build intuition. They also teach an important engineering lesson: most advanced robots are built from many simple behaviors working together reliably.
You will also need a safe and organized place to work. Robotics combines electronics, moving parts, code, batteries, and tools. A good learning space does not need to be large, but it should be stable, well lit, uncluttered, and away from water, pets, and small children when parts are exposed. Good organization saves time. Labeling wires, storing screws in containers, and keeping batteries in a dedicated spot may sound basic, but these habits reduce frustration and prevent avoidable mistakes.
As you move through this course, remember that robotics is not only about building devices. It is about learning a workflow. You observe a problem, design a simple behavior, assemble a prototype, run a test, notice what failed, and improve one variable at a time. That loop is the heart of practical robotics. In this chapter, we begin with the basic ideas that make the rest of the course easier: what robots are, what AI means in this context, how intelligence differs from simple automation, what core parts every robot needs, what tools are useful for beginners at home, and how to work safely from day one.
Practice note for Understand what robots and AI do: document your objective, define a measurable success check, and run a small experiment before scaling. Capture what changed, why it changed, and what you would test next. This discipline improves reliability and makes your learning transferable to future projects.
Practice note for Recognize common robot parts: document your objective, define a measurable success check, and run a small experiment before scaling. Capture what changed, why it changed, and what you would test next. This discipline improves reliability and makes your learning transferable to future projects.
In plain language, a robot is a machine that can sense something, process information, and do an action in the physical world. That action might be moving wheels, turning a servo, lighting an LED, making a sound, or picking up an object. The key idea is that a robot does more than sit there as a passive device. It receives information and responds through hardware.
At home, a beginner robot is often a small mobile platform with two wheels, a battery, a controller board, and one or two sensors. If a distance sensor notices a wall ahead and the robot turns away, that is already robotics. It does not need to look like a human or speak with a voice assistant. Many of the most useful real robots in industry and homes are simple in shape and specialized in purpose.
A helpful engineering mindset is to think of a robot as a system, not as a single object. The body holds the parts together. The electronics provide power and control. The software tells the hardware what to do. The sensors connect the machine to the outside world. If any one part is missing or poorly understood, the robot may fail in a way that seems mysterious until you trace the system step by step.
Beginners often confuse a robot with any electronic device. A lamp with a timer is electronic, but not usually thought of as a robot. A remote-control car moves, but if it only moves when a person directly commands it, it has limited autonomy. A robot usually has at least some ability to operate on its own based on programmed logic. Even a tiny obstacle-avoiding car demonstrates this idea clearly.
When you start building, your first goal is not to make a perfect robot. Your first goal is to understand the input-process-output pattern. Input comes from buttons or sensors. Processing happens in the controller. Output goes to motors, LEDs, buzzers, or displays. Once that pattern feels natural, the rest of robotics becomes much easier to learn and debug.
Artificial intelligence in beginner robotics does not have to mean advanced neural networks or cloud-based computer vision. In a home learning context, AI often means a robot uses information to choose between actions in a way that appears purposeful. It can react differently depending on conditions, follow rules, compare sensor values, or improve behavior based on input. The important point is that the robot is not just repeating one fixed movement no matter what happens around it.
For example, imagine a small robot car with a front distance sensor. If the path is clear, it moves forward. If an object is detected close ahead, it stops, reverses slightly, and turns. This is a simple form of decision-making. It is not human intelligence, but it is still an intelligent behavior in the practical robotics sense because the robot uses sensor data to alter what it does.
As you progress, AI can include more sophisticated methods such as pattern recognition, line tracking using multiple sensors, or selecting actions from several possible choices. But beginners should first become comfortable with readable logic. If sensor value is less than a threshold, do one action; otherwise, do another. These simple rules are incredibly important because they teach you how a robot connects perception to behavior.
A common mistake is to think AI automatically makes a robot smart in every situation. In real engineering, AI is only as good as the data, rules, and testing behind it. A badly placed sensor, weak battery, noisy readings, or poor threshold value can make a so-called intelligent robot behave badly. That is why good robotics practice combines software thinking with physical testing. You do not just write code. You observe real motion, lighting conditions, floor surfaces, and object distances.
Practical outcome: by the end of this course, when you see a simple block of beginner code, you should be able to identify what information the robot is using and why it chooses a certain action. That skill is the foundation for reading and modifying beginner-friendly robot code examples with confidence.
Automatic behavior means a machine follows a fixed sequence with little or no awareness of changing conditions. Intelligent behavior means the machine changes what it does based on information from its surroundings or internal state. Both are useful, and one is not always better than the other. In fact, good robotics often combines reliable automatic actions with a few well-designed intelligent decisions.
Consider two examples. In the first, a robot drives forward for three seconds, turns right for one second, and stops. That is automatic behavior. It may work in a carefully prepared setup, but if a chair is in the way, the robot still crashes. In the second example, the robot drives forward unless its distance sensor sees an obstacle. Then it stops and turns. This is more intelligent because it reacts to the real environment.
Engineering judgment matters here. Beginners sometimes try to add too much decision logic before the basic hardware works consistently. That can create confusion because the problem may not be intelligence at all. It may be a loose wire, motor polarity issue, weak battery, or wrong sensor angle. A smarter workflow is to test the automatic behavior first. Make the robot move forward reliably. Then test sensor readings. Only after both work should you add decision rules.
Another common mistake is to assume any behavior that looks complex is intelligent. Sometimes it is just a long sequence of prewritten steps. That can still be useful, especially for repeatable tasks, but it is not the same as adaptation. The practical question to ask is: does the robot behave differently when conditions change? If yes, there is some level of intelligent response.
As a beginner, your goal is not to build a robot that understands everything. Your goal is to create simple, testable decisions. For instance:
These small rules are the building blocks of useful robot behavior and the first step toward AI robotics that you can actually build at home.
Most beginner robots can be understood through four main groups of parts: the body, the brain, the sensors, and the movement system. If you can recognize these groups, you can look at almost any simple robot kit and understand its purpose quickly.
The body or chassis is the physical frame. It holds the electronics, motors, wheels, and battery in place. A good body keeps parts secure and balanced. Beginners often underestimate mechanical layout, but placement matters. A sensor mounted too low may hit the floor. A battery placed badly can make the robot unstable. Wires hanging into the wheels can stop movement entirely.
The brain is usually a controller board such as a microcontroller. This is the part that runs the code. It reads inputs from sensors and sends outputs to motors or other devices. In beginner projects, the controller does not need to be powerful. What matters more is that it is supported by simple software tools and a clear learning community. You should be able to upload code, inspect values, and make edits without fighting the setup.
Sensors let the robot notice the world. Common beginner sensors include ultrasonic distance sensors, infrared obstacle sensors, line-following sensors, light sensors, buttons, and simple touch switches. Every sensor has limits. Distance sensors can give noisy readings. Light sensors depend heavily on room lighting. Line sensors can behave differently on glossy versus matte surfaces. Good robotics practice means testing sensors in the real environment where the robot will operate, not just assuming the data is always correct.
The movement system usually includes DC motors, wheels, motor drivers, or servo motors. Motors need enough power, but they also need proper control electronics. A controller board usually cannot drive a motor directly, so a motor driver is commonly used. This is a detail beginners often miss. If the robot body is the skeleton and the controller is the brain, then the motor driver is part of the muscle system that delivers useful power to movement.
Power is a hidden fifth category that touches all the others. A robot with weak or unstable power may behave randomly, even if the code is correct. When troubleshooting, always check battery charge, wiring polarity, and whether the motor supply and logic supply are appropriate. Many early robotics problems are power problems wearing a disguise.
You do not need a professional workshop to begin learning robotics at home. A small table, a laptop, a beginner kit, and a few basic tools are enough for many valuable projects. What matters most is choosing tools that support learning rather than creating unnecessary complexity.
A practical beginner setup often includes a small screwdriver set, wire cutters or small snips, a breadboard, jumper wires, electrical tape or cable ties for simple wire management, a USB cable for programming, and a storage box for parts. If your kit requires assembly, tweezers and a small container for screws are very useful. Labeling parts early helps more than people expect. The time saved during troubleshooting is significant.
For kits, good beginner choices include a line-following robot, obstacle-avoiding robot car, or basic robot chassis kit with motors and room for a microcontroller. These kits are effective because they naturally teach the full workflow: assemble parts, connect sensors, upload code, test behavior, and make adjustments. They also match realistic beginner goals. Instead of chasing a huge project, you can aim for a robot that moves, detects, and reacts.
When selecting a kit, use engineering judgment. Choose one with clear documentation, standard parts, and a strong beginner community. Avoid kits that promise many advanced features but have poor instructions. A simpler kit with good examples is usually better than a feature-rich kit that is difficult to understand. The best kit is the one you can actually complete and learn from.
It is also wise to plan your first milestones before buying extras. Ask: can I first make the robot blink, move, stop, and respond to one sensor? If yes, that is enough to start. You can always add more later. This approach keeps costs under control and reduces the number of unknowns when something fails. In robotics, fewer variables usually means faster learning.
Safety is part of robotics, not a separate topic. Even small home projects involve electricity, moving parts, sharp tools, and batteries that can become dangerous if mishandled. A safe beginner is usually a faster learner because accidents, damaged parts, and avoidable confusion interrupt progress.
Start with your workspace. Use a flat, dry, well-lit surface. Keep drinks away from electronics. Make sure loose wires cannot be pulled accidentally. If your robot can move, test it in a clear area where it cannot fall off a table. Many beginners forget this and send a newly programmed robot straight to the floor. A simple test box, large tray, or floor testing zone prevents damage.
For electronics, always power off before changing major connections. Double-check polarity before connecting batteries. Never force connectors. If a part becomes unusually hot, disconnect power and inspect the circuit before trying again. Heat is often a warning sign of a short circuit, wrong wiring, or overloaded component. Learning to stop and inspect is good engineering behavior.
Tools also require attention. Use the correct screwdriver size to avoid stripping screws. Cut wires carefully and point cut ends away from your face. Keep small parts away from young children and pets. If soldering is part of your setup later, use ventilation and heat-safe habits, but many beginner kits can be learned without soldering at first.
Batteries deserve special care. Use the recommended battery type for your kit. Do not mix old and new batteries. Rechargeable battery packs should be charged with the correct charger only. Do not puncture, crush, or leave batteries in direct heat. If a battery swells, leaks, or smells unusual, stop using it. Safe battery handling is not optional in robotics because power issues affect both safety and reliability.
Finally, remember that safe work is organized work. Put tools back, store batteries properly, and leave notes about what you changed in your code or wiring. These habits prevent repeated mistakes and support the practical outcomes of this course: building, testing, modifying, and improving beginner robots with confidence.
1. According to the chapter, what is a simple way to describe what a robot does?
2. Which set of parts best matches the main parts of a basic robot described in the chapter?
3. What is the most realistic beginner goal based on the chapter?
4. Why does the chapter say beginner AI in robotics is useful?
5. Which workspace setup best follows the chapter’s safety advice?
Before a robot can act smart, it needs a few simple parts that work together reliably. In beginner robotics, the goal is not to memorize complicated electronics terms. The goal is to understand the job of each part well enough to build, test, and improve a small system at home. When people say “AI robotics,” they often imagine advanced machines, but the same core ideas appear in very simple projects. A robot senses something, decides what to do, and then acts. That loop is the foundation of intelligent behavior.
In this chapter, you will learn the building blocks that make that loop possible. We will explore controllers and power, understand sensors and motors, connect inputs and outputs, and read simple robot diagrams without getting stuck. These are practical skills. If your robot does not move, turns the wrong way, or resets when a motor starts, the problem is usually in one of these building blocks. Good robotics work starts with clear thinking about parts, power, and signal flow.
Think of a beginner robot as a small team. The controller is the brain-like computer that runs the code. Sensors are the eyes, ears, or touch-like parts that gather information. Motors are the muscles that create movement. Power is the food that keeps everything running. Wires and diagrams are the map that show how all of these parts connect. If even one team member is misunderstood, the robot may behave strangely. If each part is chosen and connected carefully, even a simple robot can react in ways that feel surprisingly intelligent.
A good home robotics workflow is simple and disciplined. First, build on a clear surface with enough light. Keep batteries organized, wires untangled, and liquids far away. Next, connect one subsystem at a time. Test the controller by blinking an LED. Test one sensor by printing readings. Test one motor at low speed before mounting it. Then combine the parts step by step. This approach prevents a common beginner mistake: assembling everything at once and not knowing which part caused the failure.
Engineering judgment matters even in small projects. A beginner often asks, “Which part should I buy?” A better question is, “What job must this part do, and what limits does my system have?” A motor that is too weak will stall. A battery that cannot supply enough current will cause resets. A sensor placed badly will give misleading readings. Good builders choose parts based on the robot’s task, not just on what looks impressive online.
As you read, keep one mental model in mind: input, decision, output. A sensor reading is an input. Your code compares that reading to a rule. A motor speed or LED state is an output. If your robot can measure a condition and respond consistently, you have already created a form of intelligent behavior. The rest is refinement. By the end of this chapter, you should be able to look at a beginner robot and identify what each major part is doing, how power reaches it, and how a simple program can make the machine react to its surroundings.
These building blocks are not separate topics. They constantly affect one another. A noisy power setup can corrupt sensor readings. A heavy robot needs stronger motors. Faster motors may require a motor driver rather than a direct controller connection. A wiring diagram helps you see these relationships before you make mistakes. That is why beginners who learn the system as a whole progress faster than those who only copy code line by line.
In the sections that follow, we will break the robot into understandable pieces. Each piece will stay connected to practical outcomes: safer setups, easier debugging, better code changes, and smarter robot behavior. That is the real purpose of learning the building blocks.
The controller is the part that runs your robot’s program. In a beginner home project, this is often a small microcontroller board such as an Arduino-compatible board, a micro:bit, or a compact single-board computer used for simple robotics tasks. You can think of it as the robot’s small computer, but with a focused job. It reads inputs from sensors, follows the instructions in your code, and sends outputs to motors, lights, or buzzers.
A useful way to understand the controller is to picture a repeated loop. The board powers on, starts your program, checks sensor values, applies decision rules, and updates outputs many times every second. For example, if a distance sensor reads “object close,” the code might reduce motor speed or stop the robot. If the path is clear, the code might keep the wheels moving forward. This input-decision-output loop is the center of beginner AI robotics.
Controllers have limits, and learning those limits is part of engineering judgment. A small board cannot safely power large motors directly from its signal pins. Its memory is limited. Its processor is fast enough for simple decisions, but not for every advanced AI task. Beginners get into trouble when they ask the controller to do work meant for another part, such as driving a motor without a proper driver module. Respecting the board’s role makes your system more reliable.
When reading beginner robot code, look for a few common patterns. There is usually a setup area where pins are assigned and devices are initialized. Then there is a main loop where the robot repeatedly checks conditions and acts. If you want to modify the robot’s behavior, change one rule at a time. For example, adjust a distance threshold from 15 centimeters to 20 centimeters and retest. Small code changes teach you more than large rewrites.
Common mistakes include using the wrong pin number, forgetting to connect ground between modules, uploading code meant for a different board, or assuming the controller can provide unlimited power. A practical habit is to label your pins in a notebook before wiring. Another is to test the controller with the simplest possible program first, such as blinking an LED or printing sensor values to a serial monitor. If the board passes that test, you know the controller itself is alive and your debugging can move on to sensors, motors, or wiring.
By the time you finish a few small projects, you should be able to point to the controller and say exactly what it does: it is not the robot’s entire intelligence, but it is the part that coordinates sensing, decision-making, and action according to the code you write.
Many beginner robot problems are really power problems. A robot may seem to have bad code when the real issue is weak batteries, the wrong voltage, or an unstable power connection. Power is the energy supply for the whole machine, and different parts often need different amounts. The controller may need a stable low voltage, while motors may draw far more current when starting or changing direction.
Voltage matters because electronic parts are designed to operate within a safe range. Too little voltage and the robot may behave unpredictably, reset itself, or fail to start. Too much voltage can overheat or permanently damage components. Current matters too, even if beginners hear less about it at first. A motor might be rated for a certain voltage, but under load it can demand more current than a small battery pack or USB connection can provide. That is why a robot may work fine on the table with wheels lifted, but fail as soon as the wheels touch the ground.
A practical home setup often uses separate thinking for logic power and motor power. Even if both eventually come from the same battery pack, the motor side may need better handling because motors create electrical noise and sudden demand spikes. If the controller shares that unstable supply without care, it can reboot or read sensors badly. This is one reason motor driver boards are common: they help the controller command motors without carrying the full motor load through fragile control pins.
Safety belongs here too. Use battery holders instead of loose cells. Turn power off before rewiring. Check polarity carefully; reversing positive and negative connections is a common beginner mistake. Keep metal tools away from exposed contacts. If anything becomes hot unexpectedly, disconnect power and inspect the circuit before trying again. A simple, tidy workspace prevents many accidents.
Good engineering judgment means matching the power source to the robot’s job. A tiny desk robot with one small sensor and two low-power motors needs a different battery approach than a heavier rover with several modules. If your robot resets when motors start, suspect power first. If sensor readings jump around only when wheels spin, suspect noise or supply instability. These patterns help you diagnose the system quickly.
The practical outcome is confidence: when you understand voltage and power behavior, you stop guessing. You can choose safer batteries, make cleaner connections, and build robots that behave consistently instead of only working sometimes.
Sensors give a robot information about its surroundings and about itself. Without sensors, a robot can still move, but it cannot react intelligently. It would only follow fixed instructions. The moment you add a sensor and use its readings in code, the robot can begin to adjust its behavior. That is the first practical step toward AI-style robotics at home.
Beginner robots often use simple sensors such as ultrasonic distance sensors, line-following light sensors, bump switches, infrared obstacle sensors, and basic temperature or light detectors. Each one answers a different question. Is something close? Is the floor dark or bright? Has the robot touched a wall? The important lesson is not to collect many sensors at once, but to understand what one sensor measures, how often it updates, and what can make its reading unreliable.
Sensor placement matters as much as sensor choice. A distance sensor mounted too high may miss small objects. A line sensor mounted too far from the floor may produce weak or inconsistent readings. A light sensor near a bright LED on the robot may be fooled by its own machine. Beginners often think poor readings mean bad code, when the real problem is mechanical placement or environmental conditions.
To use a sensor well, start by reading raw values. Print them out or display them while moving your hand, changing the light, or placing an object in front of the robot. This teaches you the real range of readings in your room, not just the ideal values from a tutorial. Then create simple decision rules. For example: if distance is less than 20 centimeters, stop and turn. If the left line sensor sees dark and the right sees light, steer left. This is exactly how a robot begins to react to its surroundings in a meaningful way.
Common mistakes include wiring the sensor to the wrong pin type, forgetting a shared ground, expecting perfect accuracy, or trusting a single noisy reading. Good practice is to sample repeatedly and use simple filtering ideas such as averaging a few readings or requiring the condition to appear more than once before acting. That reduces false triggers.
The real engineering skill is choosing sensors that are “good enough” for the task. A home robot does not need laboratory precision to avoid a chair leg or follow dark tape on the floor. It needs readings that are consistent enough for a decision rule to work. Once you understand that, sensor use becomes less mysterious and much more practical.
Motors turn electrical energy into motion. In a beginner robot, that usually means spinning wheels, moving a small arm, or rotating a simple mechanism. If the controller is the robot’s small computer, motors are the parts that let it do physical work in the world. Choosing and using motors well is important because movement reveals every weakness in your design. A robot that looks fine when powered but sitting still may fail as soon as the motors start.
Small wheeled robots often use DC gear motors. The gear reduction helps create useful torque, which is the turning force needed to move the robot. Without enough torque, the motor may spin but the robot may barely move, especially on carpet or with a heavy battery pack. Servos are another common option. They are useful when you want controlled angular movement, such as turning a sensor left and right or moving a simple claw. The right motor depends on the job.
Wheels and chassis design also matter. If wheels are mismatched in size or mounted badly, the robot may drift. If the chassis is unbalanced, one wheel may lose traction. Beginners often blame their code for poor movement when the real cause is mechanical. Robotics is always part software, part electronics, and part physical design.
Most motors should not be driven directly from the controller pins. A motor driver or transistor-based switching circuit is usually needed because motors draw more current and can create electrical noise. This is a classic beginner lesson in connecting the right part to the right role. The controller sends low-power control signals. The driver handles the higher-power motor switching.
When testing movement, start with low speed and short time intervals. Confirm wheel direction before placing the robot on the floor. If one wheel turns backward, swap motor leads or adjust code logic. Build up slowly: first one motor, then two, then forward and backward movement, then turning. This controlled workflow saves time and reduces confusion.
Practical intelligent behavior comes from combining motors with rules. A robot can move forward until a sensor sees an obstacle, then stop, reverse briefly, and turn. That sequence may be simple, but it is meaningful behavior produced by movement hardware working with sensing and code. Understanding motors and wheels gives your robot the ability to express decisions physically.
One of the most useful mental models in robotics is signal flow. Something comes in, the controller processes it, and something goes out. Inputs are the information entering the controller from buttons, sensors, switches, or communication modules. Outputs are the actions the controller commands, such as turning on an LED, spinning a motor, or sounding a buzzer. If you can trace that path clearly, you can understand most beginner robot systems.
For example, imagine a small obstacle-avoiding robot. The distance sensor provides an input value. The controller reads that value and compares it to a threshold in code. If the distance is safe, the outputs tell both motors to move forward. If an obstacle is near, the outputs change: the motors stop, reverse, or turn. This pattern is not only easy to understand, it is exactly how simple decision rules create behavior that feels smart.
Signal flow also helps you debug. If the robot does not react, ask where the chain is broken. Is the input being read correctly? Is the controller running the expected rule? Is the output signal reaching the correct device? Is the output device powered properly? This step-by-step reasoning is more effective than randomly replacing parts or rewriting code.
There are different kinds of signals. Some are digital, meaning they are treated as on/off or high/low. Others are analog, meaning they can represent a range of values. Beginners should not fear these terms. In practice, it just means some sensors give simple yes/no information while others provide more gradual measurements. Your code can use either type as long as you know what kind of reading to expect.
A common mistake is confusing control signals with power delivery. Sending a control signal to a motor driver is not the same thing as powering a motor directly. Another mistake is forgetting that many modules need a common ground reference to communicate reliably. Without that shared reference, signals can behave unpredictably.
If you want to read and modify beginner-friendly robot code, always look for three things: where the input is read, where the decision happens, and where the output is written. Once you find those points, you can make careful changes. Raise a threshold, invert a rule, slow a motor, or add a delay. This is how you turn a copied example into your own functioning robot behavior.
Many beginners are more afraid of wiring diagrams than of code, but a simple robot layout is really just a map. It shows which parts connect, where power comes from, and how signals travel. You do not need to become an electronics expert overnight. You only need a calm method for reading the diagram one connection at a time.
Start by identifying the major blocks: controller, power source, sensors, motor driver if present, and motors. Then trace the power lines first. Where does positive voltage go? Where does ground go? Which parts share ground? After that, trace signal lines. Which controller pins go to the sensor outputs? Which pins command the motor driver inputs? This order matters because power mistakes can be dangerous, while signal mistakes usually just make the robot behave incorrectly.
Do not try to understand the whole drawing in one glance. Focus on one subsystem. For example, read only the left motor path from battery to driver to motor. Then read only the distance sensor path from power and ground to signal pin. By breaking the diagram into small stories, the layout becomes manageable. This is the same mindset used in programming and mechanical assembly: divide a complex problem into simpler pieces.
Common mistakes include assuming wire color always guarantees function, missing a shared ground, connecting a sensor output to the wrong controller pin, and confusing a breadboard’s internal rows and columns. If your physical build does not match the diagram exactly, inspect it slowly and compare each wire one by one. Rushing here wastes far more time later.
A practical habit is to keep your own simplified sketch beside the official diagram. Write labels such as “distance sensor signal to pin 7” or “motor driver left input to pin 3.” This translation step helps you move from abstract diagrams to real hands-on wiring. It also makes troubleshooting easier when you return to the project after a few days.
The goal is not to memorize every symbol. The goal is confidence. When you can look at a beginner wiring layout and recognize power, ground, inputs, outputs, and main modules, you are ready to build safely, modify simple examples, and understand why your robot behaves the way it does. That is a major step forward in home robotics.
1. What is the main goal of this chapter for beginner robotics?
2. Which sequence best matches the chapter’s mental model for how a robot works?
3. According to the chapter, what is a good way to build a beginner robot system?
4. Why might a robot reset when a motor starts?
5. If a beginner wants to choose the right part, what question should they ask first?
Now that you have seen the main parts of a beginner robot and how to set up a safe workspace, it is time to give the robot instructions. This is where coding becomes practical. A robot is not intelligent just because it has wheels, lights, or sensors. It becomes useful when you write clear steps that tell it what to do, when to do it, and how to react when something changes. In this chapter, you will learn how beginner robot code works in a very hands-on way. We will move from simple commands to logic, timing, repeated actions, and careful testing.
For a beginner, robot coding can feel mysterious at first, but the core idea is simple: code is a set of instructions that a controller follows one line at a time. If your robot turns on an LED, beeps a buzzer, spins a motor, or reads a distance sensor, it does those things because your program tells it to. That means good robot coding is not about memorizing difficult syntax. It is about learning to think clearly. You must break a task into steps, put those steps in the right order, and check whether the robot behaves the way you expected.
A home robot project often starts with very small actions. You might write your first basic commands to turn a light on, wait one second, then turn it off. After that, you may control sounds or movement, such as spinning one motor for half a second or making a short beep. Once those basics work, you begin using variables and simple logic. A variable might store a speed value, a sensor reading, or a timer count. Logic helps the robot decide what to do next. For example, if an obstacle is close, stop. If the path is clear, move forward. These are small rules, but they are the foundation of intelligent behavior.
One of the most important engineering habits in robotics is to test in small steps. Do not write a long program with lights, sensors, motors, and sounds all at once and hope it works. Instead, run and test beginner programs one feature at a time. First confirm that the LED turns on. Then confirm that the motor moves in the direction you expect. Then read the sensor and display its value. Finally, combine them into a single behavior. This method saves time, reduces confusion, and helps you find mistakes quickly.
As you read this chapter, imagine a simple robot car or tabletop robot with a controller board, one or two motors, an LED, maybe a buzzer, and a basic sensor such as distance, light, or touch. The exact hardware does not matter as much as the thinking process. Every beginner robot program follows the same pattern: send commands, store information, make decisions, repeat actions, and test carefully. By the end of this chapter, you should be able to read and modify beginner-friendly robot code examples with more confidence and understand why a robot behaves the way it does.
Think of this chapter as your transition from observing robots to actively directing them. You are no longer just connecting parts. You are building behavior. That is the point where robotics starts to feel exciting, because even a short beginner program can make a machine seem responsive and purposeful. The sections that follow will show you how to write those first instructions in a way that is simple, safe, and useful.
Practice note for Write your first basic commands: document your objective, define a measurable success check, and run a small experiment before scaling. Capture what changed, why it changed, and what you would test next. This discipline improves reliability and makes your learning transferable to future projects.
A robot has hardware, but hardware alone does nothing useful without instructions. The controller board inside the robot acts like its decision center. It reads your code and carries out actions such as turning on an LED, spinning a motor, or checking a sensor value. In simple everyday language, code is how you speak to the robot in a form it can follow exactly. Unlike a person, a robot does not guess what you mean. It follows the instructions you give, in the order you give them.
This is why coding is so important in robotics. The code connects the physical world to behavior. A motor can move a wheel, but code decides whether that wheel should move forward, backward, fast, slow, or not at all. A sensor can measure distance, but code decides what to do with that measurement. If the robot detects an obstacle, should it stop, turn, beep, or flash a light? Those decisions live in the program.
When beginners start coding robots, it helps to think in very small commands. For example: turn LED on, wait one second, turn LED off. That may seem simple, but it teaches an important lesson: the robot only does what you told it to do. If it blinks too fast, your timing is wrong. If it never turns off, a command is missing. This direct connection between code and action makes robotics one of the best ways to learn programming.
Engineering judgement matters here. Start with actions that are easy to see and safe to test. Lights and sounds are better first experiments than full-speed movement across a room. A moving robot introduces extra problems such as slipping wheels, obstacles, battery weakness, and incorrect direction. By testing visible, low-risk actions first, you build confidence and reduce confusion before controlling motion.
A common mistake is to copy code without understanding what each line is supposed to do. A better approach is to read a short example and ask: what output should I expect from this line? What hardware does it affect? What would happen if I changed the delay or the speed value? That mindset turns code from a mystery into a tool. Once you understand that code is simply precise instruction-making, robot programming becomes much more approachable.
Your first useful robot programs will be made from simple commands. These commands might tell the robot to switch an LED on, play a tone, move a servo, or run a motor. What makes beginner robotics interesting is not the complexity of each command, but the way commands work together. The order matters. Timing matters. Physical devices need time to respond, and a robot that moves in the wrong sequence can behave unpredictably.
Consider a tiny example in pseudocode: LED on, wait 1000 milliseconds, LED off. That program produces a visible blink. If you remove the wait time, the light may turn on and off so quickly that you barely notice it. If you reverse the order and turn it off before it turns on, the result makes no sense. This teaches a core rule of robot coding: the controller reads one instruction after another, and the sequence creates the behavior.
The same applies to movement. Suppose you want a robot car to move forward for one second and then stop. The code needs a forward command, a delay, and then a stop command. If you forget the stop command, the robot may keep moving. If you set the speed too high on a slippery floor, it may veer off course. This is why practical coding includes engineering judgement. Choose a slow speed first. Test on a clear surface. Keep your hand near the power switch.
Controlling lights, sounds, or movement is often the first exciting moment for beginners because the robot visibly responds. But remember that visible response is also feedback. If a buzzer sounds weakly, power may be low. If a motor starts late, your wiring or code timing may need attention. The robot is always giving you clues.
A common mistake is trying to control several outputs at once before confirming each one works separately. Another is using delays so long that testing becomes slow and frustrating. Good workflow means building small, visible actions first, then combining them. This keeps your robot predictable and helps you understand why each command exists.
Variables are one of the most useful ideas in beginner programming. A variable is like a small labeled box where your program stores information. Instead of writing the same number again and again, you can put it in a variable and reuse it. In robotics, variables often hold values such as motor speed, blink delay, sensor readings, or the number of times an action has happened.
Imagine you want your robot LED to blink every 700 milliseconds. You could write 700 directly in several places, but that becomes inconvenient when you want to change it later. A better approach is to create a variable called blinkDelay and store 700 in it. Then, if you want a slower blink, you only change one value. This makes your code easier to read and easier to modify, which is very important when you are experimenting.
Variables also help when using sensors. If your distance sensor measures 18 centimeters, the program can store that number in a variable called distance. Once stored, the value can be displayed, compared, or used to control movement. In this way, variables connect sensing to action. They let your robot remember something long enough to make a decision.
For beginners, the practical advantage is huge. When reading beginner-friendly robot code examples, look for the named values first. Ask what each variable represents in the real robot. Is it a speed? A measured distance? A waiting time? Good variable names reduce confusion because they act like labels on the boxes.
Common mistakes include using vague names such as x or temp when the value is actually leftMotorSpeed, or forgetting to update a variable after taking a new sensor reading. Another mistake is assuming a variable changes itself. It does not. Your code must assign or recalculate the value when needed. A useful habit is to print or display important variables while testing. If the robot is not behaving correctly, checking the current speed or sensor value often reveals the problem.
In short, variables make robot programs flexible. They let you tune behavior without rewriting everything. That is a big step toward writing code that is not just functional, but manageable and reusable.
A robot begins to feel intelligent when it can make simple decisions. In beginner robotics, these decisions usually take the form of if-then logic. The idea is straightforward: if a condition is true, then do a specific action. For example, if the distance sensor reads less than 20 centimeters, then stop the motors. If the path is clear, then keep moving. This is one of the most important ideas in AI-related robotics because it links sensing to behavior.
You do not need advanced machine learning to create useful robot reactions. Many practical behaviors come from simple rules. A line-following robot might use logic such as: if the left sensor sees dark and the right sensor sees light, turn left. A touch sensor robot might use: if the bumper is pressed, move backward and beep. These rules are not complicated, but they are powerful because they let the robot respond to the world instead of running blindly.
Engineering judgement matters in choosing thresholds. If your obstacle-avoidance rule says stop when distance is less than 1 centimeter, that is too late. If it stops at 100 centimeters, it may never move usefully in a small room. Good thresholds come from testing. Try a reasonable value, observe the result, and adjust based on actual robot behavior.
A common beginner mistake is writing conditions that are technically valid but practically poor. For example, using only one exact sensor value can fail because sensor readings often vary slightly. In many cases, less than or greater than comparisons are more reliable than checking for one exact number. Another mistake is forgetting what should happen in the alternative case. If the obstacle is not close, what should the robot do instead? Clear logic needs both the condition and the expected response.
As you practice, you will see that simple decision rules are enough to create behavior that looks smart. The key is to keep the rules understandable, test them one at a time, and match them to what your sensor can actually measure. That is the beginner-friendly path to making a robot act with purpose.
Robots are rarely useful if they perform only one action and then stop forever. Most robotic behavior involves repetition. A robot may need to keep checking a sensor, keep updating motor output, or keep blinking an LED to show status. Loops are what make this possible. A loop tells the controller to run a set of instructions again and again.
One easy example is an LED blink pattern. Instead of writing the same on-off code ten times, you place those commands inside a loop. The same applies to motion and sensing. A robot that follows obstacles must repeatedly read the distance sensor, decide what to do, and send fresh motor commands. Without a loop, it would check once and then become unresponsive.
There are different styles of loops, but beginners should focus on the idea rather than the exact syntax. A forever loop repeats continuously while the robot is powered. A counted loop repeats a specific number of times. Both are useful. A counted loop is helpful for short demonstrations, such as blinking three times. A forever loop is common in real robot behavior, where the machine must keep reacting.
This is also where care is needed. A loop that runs too fast without any delay or useful work can make debugging harder. A loop that never updates sensor data may keep making decisions based on old information. A movement loop without a stop condition can also create safety issues. Practical robotics means thinking not just about whether the code repeats, but whether it repeats in a controlled way.
Loops are the heartbeat of most robot programs. Once you understand them, your robot can move from one-time demonstrations to continuous, responsive behavior. That is a major step in building systems that feel alive and active rather than static.
Writing code is only half the job. The other half is testing it carefully and fixing the small mistakes that always appear. In robotics, testing matters even more than in ordinary beginner programming because your code affects physical hardware. A wrong value can make a motor spin the wrong direction. A missing condition can cause a robot to drive into a wall. Good testing habits keep the process safe, efficient, and much less frustrating.
The best workflow is to test one feature at a time. If you are building a program that uses a sensor to stop a moving robot, do not start by combining everything. First test that the sensor reading changes when you move an object closer. Then test that the motors can move slowly forward. Then add the if-then rule. This step-by-step method makes it much easier to identify the source of a problem.
When a program fails, resist the urge to rewrite everything immediately. Instead, ask practical questions. Is the hardware powered? Is the wiring correct? Is the code sending the command you think it is? Are the variable values reasonable? Is the timing too fast to observe? Many beginner mistakes are small: a misspelled variable name, an incorrect pin number, a delay in the wrong place, or logic that uses old sensor data. Small errors can produce confusing results, so systematic checking is more effective than guessing.
Another good habit is to use visible or readable feedback. Print sensor values to the screen if your system allows it. Blink an LED when a condition is true. Add a short beep when a button is pressed. These tiny clues help you understand what the robot believes is happening inside the program.
Most importantly, expect mistakes. In engineering, debugging is not failure. It is part of the build process. Every test teaches you something about the robot, the code, or the environment. By running and testing beginner programs in small pieces, you build confidence and develop the judgement needed for more advanced projects later. The goal is not perfect code on the first try. The goal is clear observation, small corrections, and steady improvement.
1. According to the chapter, what is the core idea of beginner robot coding?
2. Why should commands be placed in a sensible order in a robot program?
3. What is a good example of how variables are used in beginner robot code?
4. How does simple if-then logic help a robot behave?
5. What testing approach does the chapter recommend for beginner robot programs?
A robot becomes interesting the moment it stops following only fixed commands and starts responding to the world around it. In earlier beginner projects, you may have told a motor to spin for two seconds, stop, then turn. That is useful for learning, but it is not yet behavior that adapts. In this chapter, you will help a robot sense what is happening nearby and make simple decisions from that information. This is the practical bridge between basic electronics and beginner AI robotics.
In everyday language, sensing means the robot gathers clues from its environment. Deciding means it uses those clues to choose what to do next. Even a small home robot can do this. A distance sensor can notice a wall. A light sensor can detect a bright lamp or a dark hallway. A touch sensor can tell when the robot bumps into something. None of these sensors are magical. They only provide numbers or simple states. The intelligence comes from how you interpret those values and connect them to actions.
A good beginner mindset is to think in a chain: sense, interpret, decide, act, and repeat. First, the robot reads sensor data. Next, your code turns raw readings into useful meaning. Then the robot applies reaction rules, such as stopping when an obstacle is too close or turning toward brighter light. Finally, the motors carry out the action. This loop runs again and again, often many times per second. That repeating loop is the heartbeat of autonomous behavior.
One of the most important ideas in robotics is that sensors are not perfect. Readings can jump slightly, lag behind movement, or change because of room lighting, floor color, battery level, or sensor angle. Good engineering judgment means you do not trust a single reading too much. You watch patterns, test in real conditions, and choose rules that are simple enough to work reliably. A beginner often expects exact values, but practical robotics is about handling messy reality with calm, sensible logic.
As you work through this chapter, focus on four connected skills. First, learn to read sensor data simply and clearly. Second, turn that data into actions the robot can perform. Third, build reaction rules that are easy to understand and debug. Fourth, combine those rules into a basic smart behavior that looks purposeful instead of random. These are core habits you will use in every future robotics project, from line-following cars to home-made delivery bots.
A useful workflow is to test one part at a time. Start by printing sensor values to the screen. Move your hand near a distance sensor and watch the numbers change. Cover and uncover a light sensor. Press and release a touch switch. Once you trust the readings, decide what counts as meaningful. Then connect one motor action to one sensor condition. Only after that should you combine multiple conditions into a larger behavior. This step-by-step method reduces confusion and helps you find mistakes quickly.
Common beginner mistakes are easy to avoid when you know what to look for. One mistake is using thresholds that are too strict, so the robot flickers between decisions. Another is running motors too fast, which gives sensors little time to react. A third is assuming a sensor means the same thing in every room or on every surface. In practice, calibration matters. Test your robot where it will actually run. Small adjustments in code can make behavior much smoother and more trustworthy.
By the end of this chapter, you should be able to describe what sensor data looks like, use distance, light, and touch inputs, convert raw numbers into meaning, apply thresholds and simple decision rules, combine sensing with movement, and create a basic smart behavior. That may sound modest, but it is a major milestone. Once a robot can sense and decide, it stops being just a moving gadget and starts becoming an autonomous system.
Keep your code readable and your expectations practical. In beginner AI robotics, elegant behavior usually comes from simple rules applied consistently. A robot does not need complex machine learning to appear thoughtful. If it can avoid obstacles, react to touch, and choose movement based on light or distance, you are already building the foundation of intelligent behavior. The goal is not perfection. The goal is a robot that senses enough, decides well enough, and acts safely enough to complete a useful task at home.
Before a robot can make decisions, you need to understand what its input actually looks like. Sensor data usually arrives as numbers or simple on/off states. For example, a distance sensor may report a value such as 12 centimeters, a light sensor might return a number between 0 and 1023, and a touch sensor may give only two states: pressed or not pressed. To a beginner, these values can seem abstract, but they are simply measurements the controller can read many times each second.
The first practical habit is to print or display sensor readings while testing. If your robot has a serial monitor, use it. Watch the values while moving objects near the sensor or changing the environment. This helps you answer real engineering questions: What is the normal range? How much does the reading jump? Does the sensor react quickly or slowly? You are not only collecting data. You are learning the personality of the hardware.
Expect noise and variation. If you hold your hand still in front of a sensor, the reading may still shift slightly. That does not mean the sensor is broken. It means the real world is not perfectly clean. Light changes, surfaces reflect differently, and electronics are never completely steady. A wise beginner does not panic when values wiggle. Instead, they plan for it in code by using averages, ranges, or thresholds with some extra margin.
A common mistake is to jump straight from raw readings to robot movement without first understanding the numbers. That often leads to confusing behavior. The robot may stop too early, turn too late, or react on and off very quickly. Reading sensor data simply means slowing down and asking, “What does this value usually mean in my room, on my floor, with my robot?” Once you know that, decision-making becomes much easier and much more reliable.
Three of the most useful beginner sensors are distance, light, and touch. They are practical because they map directly to everyday robot tasks. A distance sensor helps the robot avoid obstacles. A light sensor helps it detect brightness differences, which can support tracking or simple environmental awareness. A touch sensor acts like a basic bumper, telling the robot when physical contact has happened.
Distance sensors often measure how far away an object is in front of the robot. In a home project, this can mean stopping before hitting a wall or turning away from furniture legs. The important judgment is that distance readings depend on object shape, angle, and material. A flat wall may read clearly, while a soft cloth or angled surface may not. Test with the actual kinds of obstacles your robot will meet.
Light sensors are simple but surprisingly useful. They detect brightness, not the meaning of a room. A brighter value could come from a lamp, a window, or reflected light from a white surface. A darker value could mean shadow, black tape, or simply poor room lighting. This is why calibration matters. Read the sensor in both bright and dark conditions before creating rules. Do not assume a number means the same thing in every environment.
Touch sensors are among the easiest to understand because their output is usually binary. If pressed, do one thing. If not pressed, continue normally. Even so, beginners should remember that a touch sensor tells you contact happened, not what object was touched or how far away it is. It is often best used as a backup safety signal. For example, if the robot fails to avoid an obstacle with distance sensing, the touch sensor can trigger a stop and reverse action. Together, these sensors create a stronger and more practical sensing system than any one sensor alone.
Raw sensor values are rarely the final thing your robot should think about. A better approach is to translate them into useful categories. Instead of working directly with a light value of 734, your code can decide that this means bright. Instead of storing a distance reading of 8 centimeters as just a number, your robot can label it as too close. This step turns data into actions because categories are easier to reason about than raw measurements.
This translation layer is one of the most important ideas in beginner robotics. It separates sensing from behavior. First, read the sensor. Second, interpret the reading. Third, decide what action to take. For example, a robot might classify distance as near, medium, or clear. A light reading might become dark or bright. A touch input might become contact or no contact. Once you create these simple states, your decision rules become much easier to write and debug.
In practice, useful meaning often comes from context. A distance of 15 centimeters may be safe for a slow robot but dangerous for a fast one. A light level considered bright in a dim room may be normal during daytime near a window. This is where engineering judgment matters. Meaning is not fixed by the sensor alone. It depends on the robot’s speed, task, and environment. Beginners improve quickly when they stop asking for perfect numbers and start asking whether a reading is good enough to support a safe choice.
A common practical method is to define helper variables in code. For example, set obstacleAhead to true when the distance is under a chosen limit. Set roomIsDark to true when the light sensor falls below a tested value. These named meanings make your code read more like instructions and less like math. That helps when troubleshooting, especially after your project grows. Good robotics code is not only functional. It is understandable enough that you can adjust it later without starting over.
Once sensor readings have useful meaning, the next step is to create thresholds and simple decision rules. A threshold is a boundary value that changes the robot’s behavior. For example, if distance is less than 10 centimeters, stop. If the light level is above 700, turn toward the brighter side. If the touch sensor is pressed, reverse for half a second. These are basic reaction rules, but they are the building blocks of smart behavior.
The easiest way to start is with clear if-then logic. If obstacleAhead is true, then stop and turn. If contactDetected is true, then back up. If the left light sensor sees more brightness than the right one, then steer left. This kind of logic is not advanced AI, but it is exactly how many useful robots begin. The robot appears intelligent because it responds consistently to changing conditions.
The challenge is choosing thresholds that work in real life. If a threshold is too tight, the robot may switch behavior back and forth rapidly. For instance, if your stop distance is set at exactly the edge of noisy readings, the robot may jitter between moving and stopping. A common fix is to add a margin or use two thresholds: one for stopping and another for resuming movement. This reduces flickering and creates steadier motion.
Another practical tip is to keep early rules simple and observable. You should be able to look at the robot and say why it made a choice. If your logic becomes too complex too soon, debugging becomes frustrating. Start with one rule, test it, then add another. Over time, several small rules can create surprisingly effective behavior. In robotics, reliable simple logic usually beats complicated fragile logic, especially in beginner home projects.
A robot does not become useful until its decisions affect movement. This is where motors, timing, and sensor feedback work together. A good beginner workflow is to connect one sensor condition to one movement response. For example, when the robot sees open space ahead, it moves forward. When it detects an obstacle, it stops, turns, and then checks again. This repeated sensing-and-moving loop creates purposeful navigation.
Movement adds an important complication: the robot changes its own sensor readings by changing position. A distance sensor may show clear space one moment and a chair leg the next because the robot rolled forward. This means sensing is never a one-time event. Your code should read sensors often, ideally in a fast loop, so the robot keeps updating its understanding of the environment. Sense once and act forever is not robotics. Sense, act briefly, and sense again is the better model.
Motor speed matters too. If the robot moves too fast, it may outrun its sensing and hit obstacles before the code reacts. Slowing down often improves intelligence more than adding complexity. A slower robot has more time to measure, decide, and adjust. This is good engineering judgment for home experiments, where safety and control matter more than speed.
A practical example is an obstacle-avoiding rover. The distance sensor checks forward space. If the path is clear, the motors drive ahead slowly. If something gets too close, the robot stops, reverses a little, turns left or right, and then reads again. Add a touch sensor as backup so that accidental bumps trigger an emergency retreat. This combination of sensing with movement is where the robot starts to feel alive. It is not just executing a script. It is reacting to what the room presents.
A single reaction rule is useful, but a set of coordinated rules creates what looks like intelligence. Beginner-level intelligent behavior does not require complex learning algorithms. It usually comes from combining several simple reactions into a goal-driven loop. For example, a small robot might move forward when clear, avoid obstacles when blocked, and prefer brighter areas when choosing a turn direction. This is still rule-based, but it creates behavior that appears thoughtful.
The key difference between random motion and smart behavior is consistency with purpose. If the robot repeatedly avoids obstacles and keeps searching for open space, it seems to understand its environment. In reality, it is following well-designed rules. This is an important lesson in AI robotics: intelligence often emerges from structured decision-making, not from mysterious code. Your job is to design those structures carefully.
A strong beginner design uses priority. Some rules matter more than others. Safety rules should come first. If the touch sensor is pressed, the robot should immediately stop and back away, even if the light sensor suggests moving toward brightness. If an obstacle is very close, avoidance should override normal forward movement. Only when the robot is safe should lower-priority goals guide behavior. This layered thinking is common in real autonomous systems.
As you build your first smart behavior, aim for something modest and dependable. A robot that roams without crashing, pauses when blocked, and chooses a sensible direction is already demonstrating practical autonomy. Test it repeatedly, observe failures, and adjust thresholds and timings. That cycle of observing, refining, and retesting is how robotics improves. The final result is not just a machine that reacts. It is a beginner robot that senses, decides, and behaves in a way that serves a clear purpose.
1. What is the main difference between a fixed-command robot and a robot that can sense and decide?
2. Which sequence best describes the beginner robotics behavior loop in this chapter?
3. Why should you avoid trusting a single sensor reading too much?
4. What is a good first step when building a robot behavior with sensors?
5. Which example best shows turning raw sensor data into useful meaning?
This chapter brings together everything you have learned so far and turns it into a real beginner robot project you can build at home. The goal is not to create a perfect autonomous machine. The goal is to create a small working robot that senses something in its environment, makes a simple decision, and changes its behavior. That is the heart of beginner AI robotics: sensing, deciding, and acting.
A good home robot project should be small enough to finish, safe enough to test on a table or floor, and simple enough that you understand every part. In this chapter, you will plan a practical robot, assemble its core parts, wire the basic system carefully, program obstacle awareness, and then improve the robot through repeated testing. This is exactly how real engineering develops: not by guessing once, but by building, observing, and refining.
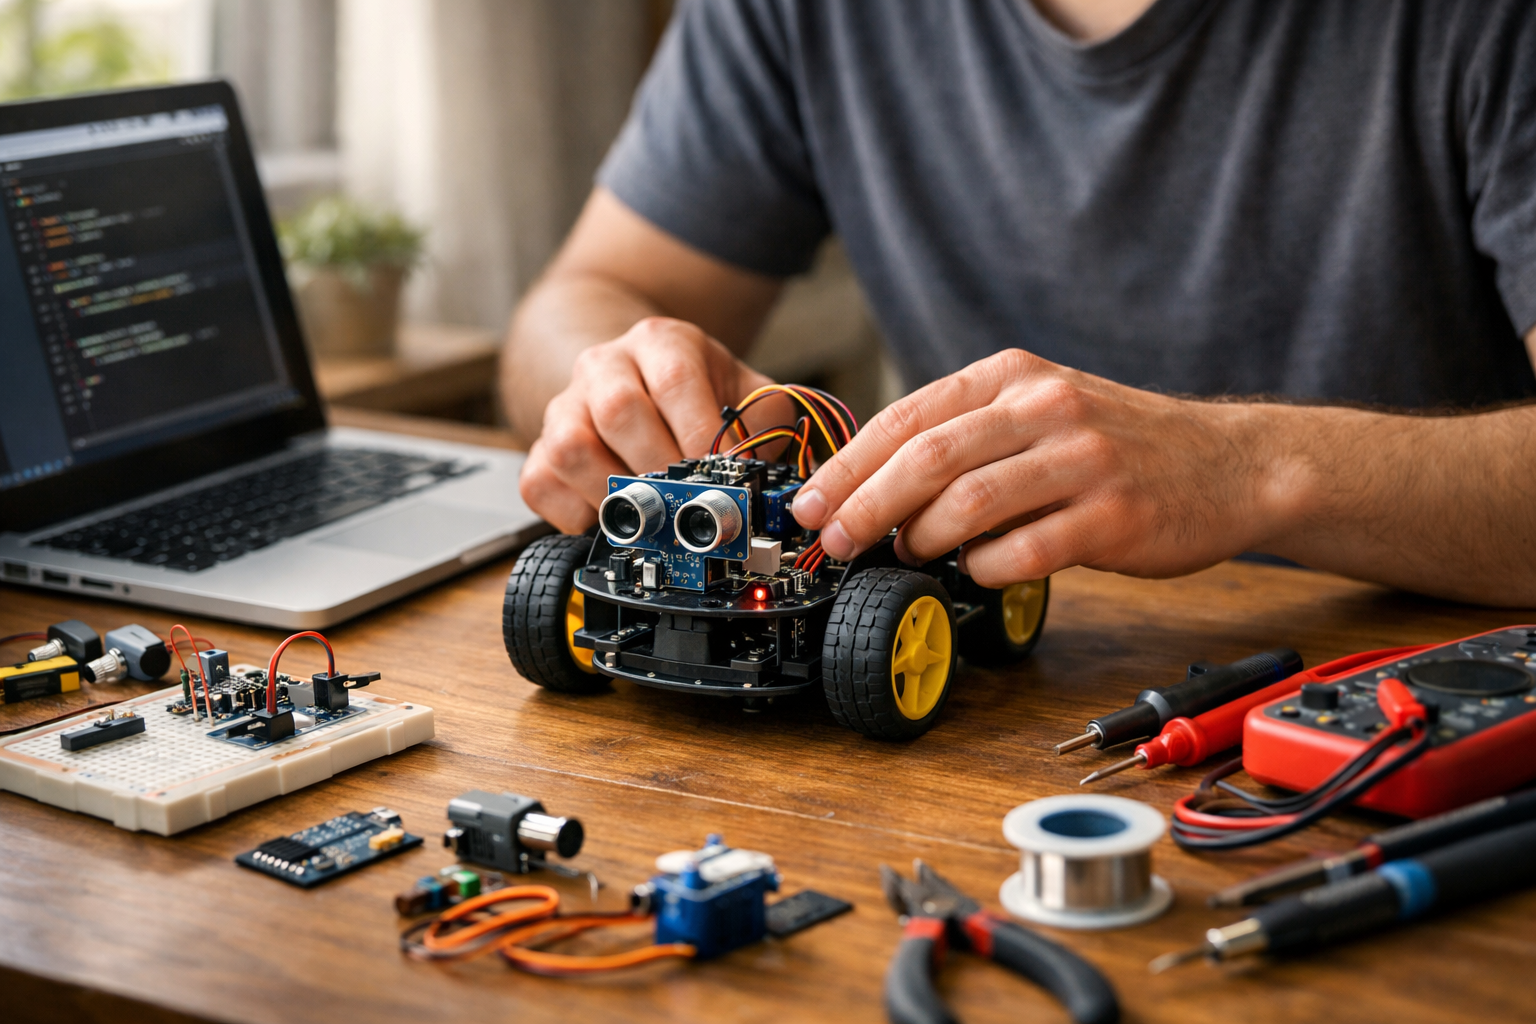
For a beginner-friendly project, imagine a tiny wheeled robot that moves forward until it detects an obstacle, then stops, backs up slightly, and turns before trying again. This behavior may sound simple, but it includes all the major ideas in entry-level AI robotics. The robot needs a controller to run instructions, motors to create movement, a sensor to notice the environment, and code that applies decision rules. Even if the logic is basic, the robot appears intelligent because it reacts to what it senses instead of following a fixed path blindly.
As you work, engineering judgment matters as much as assembly. You will make choices about battery placement, wire routing, sensor position, code timing, and test conditions. Small choices often produce big effects. A loose wheel can look like a software bug. A low battery can look like bad motor control. A badly angled sensor can make the robot seem confused. This is why careful setup and thoughtful testing are part of robotics, not optional extras.
Keep your project practical. Use a clean workspace, leave enough room for the robot to move, and test at low speed first. If something does not work, break the system into parts: power, motion, sensing, and decision code. Solving one layer at a time is faster than changing everything at once. By the end of this chapter, you should have a simple home AI robot that demonstrates the core workflow of robotics: build, observe, adjust, and improve.
Do not worry if your first version feels rough. Almost every useful robot starts as a basic prototype. What matters is that each part has a clear job and that your code matches your hardware. A finished beginner robot is not one with the most features. It is one that works consistently enough to teach you how robotic intelligence emerges from simple parts working together.
Practice note for Plan a small robot project: document your objective, define a measurable success check, and run a small experiment before scaling. Capture what changed, why it changed, and what you would test next. This discipline improves reliability and makes your learning transferable to future projects.
Practice note for Assemble the basic system: document your objective, define a measurable success check, and run a small experiment before scaling. Capture what changed, why it changed, and what you would test next. This discipline improves reliability and makes your learning transferable to future projects.
Practice note for Program obstacle awareness: document your objective, define a measurable success check, and run a small experiment before scaling. Capture what changed, why it changed, and what you would test next. This discipline improves reliability and makes your learning transferable to future projects.
Practice note for Improve the robot through testing: document your objective, define a measurable success check, and run a small experiment before scaling. Capture what changed, why it changed, and what you would test next. This discipline improves reliability and makes your learning transferable to future projects.
The best beginner robot project is not the most impressive one. It is the one you can complete, understand, and improve. A small obstacle-avoiding robot is an excellent choice because it includes all the main parts of a basic autonomous system without demanding advanced hardware or math. It gives you a clear success condition: the robot should move, sense an object ahead, and respond in a predictable way.
When planning your project, define the robot's job in one sentence. For example: My robot will drive forward, detect nearby obstacles, stop, reverse a little, and turn to find a clearer path. This simple statement helps you avoid feature overload. Beginners often try to add too much at once such as line following, voice control, lights, Bluetooth control, and mapping. Extra features can wait. First build one behavior that works reliably.
Think in terms of minimum parts. A practical build usually needs a small microcontroller, two motors with wheels, a motor driver, a battery pack, a simple front-facing distance sensor, and a chassis or base plate. This project teaches the full robotics loop: sensor input, code-based decision, and motor output. That means it directly supports the course outcomes of identifying robot parts, reading and modifying code, and using sensors to shape behavior.
Engineering judgment begins at the planning stage. Ask yourself whether the project is safe to power, easy to test indoors, and simple to repair if a wire comes loose. Also consider the workspace. A floor robot needs a clear area without stairs, pets underfoot, or trailing cables. If your testing area is small, keep the robot compact and slow. A slower robot gives the sensor and code more time to react and gives you more time to observe what is happening.
Before building anything, sketch a rough layout. Mark where the controller will sit, where the battery will go, where the sensor will face, and how the wires will travel. This does not need to be artistic. It just needs to reduce surprises. Many robotics problems come from poor placement rather than bad code. A front sensor blocked by wires or mounted too high may miss low obstacles entirely. Planning now saves troubleshooting later.
Once your project is chosen, build it in stages instead of trying to finish the entire robot in one pass. Start with the mechanical base. Attach the motors securely to the chassis and make sure the wheels spin freely. If your robot uses a caster wheel or skid at the front or rear, check that it touches the ground lightly and does not tilt the frame. Mechanical alignment matters because a robot with uneven drag may always drift to one side, even when the code tells both motors to run equally.
Next, mount the controller and motor driver in positions that leave room for cables and battery access. Keep components stable. If boards slide around, wires may disconnect during motion. Many beginners underestimate how much vibration and sudden movement a small robot produces. Even a light bump into a chair leg can loosen a poorly placed connection.
Then install the sensor with intention. For obstacle awareness, the sensor should face forward and sit at a height where it can detect the kinds of objects your robot will meet. If it is too high, it might miss boxes or shoes. If it is too low, the floor may create false readings depending on the sensor type. A centered position is often easiest for a first robot because it keeps the decision logic simple.
Build incrementally and test after each stage. First confirm that the chassis rolls. Then confirm that each motor can be controlled. Then confirm the sensor returns changing values when you place an object near it. Only after these checks should you combine everything into a complete behavior. This step-by-step approach is one of the most useful habits in robotics. It helps you find the source of problems quickly because you know what worked before you added the next layer.
Keep the design beginner-friendly. Label wires if needed. Use consistent color choices for power and ground. Leave enough slack for movement without creating tangles. Your robot does not have to look polished like a commercial product. It should look understandable. If you can point to each part and explain its purpose, you are building in the right way.
Safe and orderly wiring is one of the biggest differences between a frustrating robot and a dependable one. In a simple home robot, you usually have three main electrical concerns: power delivery, sensor connections, and motor control. These must be connected correctly and kept physically organized. A robot can fail in confusing ways when the wiring is messy. Random resets, weak movement, noisy sensor readings, and hot components often trace back to poor connections.
Begin with power. Make sure the battery pack matches the needs of your controller and motors. Many beginners assume more voltage always means better performance, but too much voltage can damage electronics. Too little voltage can cause weak motors or cause the controller to restart when the motors begin turning. Check the recommended ranges for each part. If your system uses separate supplies for logic and motors, follow that design carefully. If they share a battery, ensure the wiring is correct and the ground reference is common where required.
For sensor wiring, be methodical. Connect power, ground, and signal lines exactly as specified by your hardware. Reversed power connections can destroy a sensor quickly. Keep sensor wires away from spinning wheels and moving parts. If the sensor is on the front of the robot, route the cable along the chassis and secure it so bumps will not pull it loose.
Motor wiring deserves extra attention because motors draw more current and also create electrical noise. Use the motor driver rather than connecting motors directly to a controller pin. Check each motor direction one at a time. If the left motor goes backward when you expected forward, swap the motor leads or adjust the code consistently. Do not accept confusion here. Clear direction mapping will make your obstacle response code much easier to write and debug.
A practical habit is to create a simple connection diagram in your notebook. Record which controller pins connect to which motor driver inputs and which sensor pins. This makes troubleshooting faster and helps you understand the system as an engineered whole rather than as a bundle of mysterious wires.
Now the robot begins to feel intelligent. Obstacle awareness is created by code that reads sensor values and applies simple decision rules. This is beginner AI in a practical form. The robot is not thinking like a human, but it is using information from the environment to choose between actions. That is enough to create useful autonomous behavior.
Start with a basic control loop. The code should repeatedly read the distance sensor, compare the reading to a threshold, and decide what the motors should do. For example, if no obstacle is close, drive forward. If an obstacle is detected within a chosen distance, stop, reverse briefly, then turn for a short time. After turning, return to forward motion and check again. This logic is simple, readable, and easy to modify.
A beginner-friendly version might look like this in plain language: read distance; if distance is greater than 20 centimeters, move forward; otherwise stop, back up for half a second, turn right for half a second, then continue. The exact numbers will depend on your robot's speed, sensor reliability, and testing space. This is where engineering judgment enters the code. A fast robot may need to react at a longer distance. A slow robot in a small room may work better with shorter timings.
Common mistakes usually involve thresholds and timing. If the threshold is too small, the robot notices obstacles too late and bumps into them. If it is too large, the robot behaves nervously and keeps turning away from objects that are not really in its path. If reverse or turn times are too long, the robot may overreact and waste motion. If they are too short, it may remain trapped facing the same obstacle.
Keep the first version readable. Use clear variable names such as distance, safeDistance, and turnTime. Add short comments explaining each action. Read the code aloud if needed: sense, compare, act. Once that works, you can modify the response by alternating turn direction, slowing down near obstacles, or checking the sensor more frequently. The key lesson is that intelligent behavior often comes from simple rules executed consistently.
Testing is not a final step added after the real work. Testing is where the real learning happens. Once your robot can move and react to obstacles, run controlled trials in a clear area. Use simple test objects such as a box, a chair leg, or a storage bin. Keep conditions steady at first so you can compare one run to the next. If you change the floor surface, lighting, battery charge, and obstacle shape all at once, it becomes difficult to understand why behavior changed.
Observe with intention. Do not only ask, “Did it work?” Ask more useful questions. Did the robot detect the obstacle early enough? Did it stop smoothly or lurch? Did it back up straight? Did it always turn the same amount? Did it get stuck in corners? These observations reveal whether the problem is in sensing, motor balance, timing, or mechanical alignment.
It helps to record test results in a small table or notebook. Note the sensor threshold, motor speed setting, reverse time, turn time, and what happened. This creates an engineering trail. Beginners often rely on memory and then lose track of which settings were best. A few written notes can save hours.
Run multiple trials rather than judging from one lucky run. Robotics systems can seem correct once and then fail under slightly different conditions. Repeat the same setup several times. If the robot succeeds only occasionally, it is not yet reliable. Also watch for hidden issues such as battery drain. A robot may behave well when freshly powered but poorly ten minutes later. That tells you the system may be sensitive to power changes.
Practical testing also means staying safe. Keep fingers clear of moving wheels, lift the robot when making wiring changes, and have an easy way to cut power quickly. A calm, controlled testing routine will teach you more than a chaotic one. The purpose of trials is not just to prove success. It is to understand behavior deeply enough that you can improve it with confidence.
Once the robot works sometimes, your next goal is to make it work more consistently. Reliability usually comes from many small improvements rather than one dramatic fix. This is an important lesson in robotics. If the robot avoids obstacles in three tests out of five, do not rebuild everything. Change one factor at a time and see whether the result improves.
Start with the easiest adjustments. You might lower the motor speed so the sensor has more time to detect obstacles. You might raise or lower the sensor slightly to improve its view. You might increase the stopping distance threshold by a few centimeters. These are small changes, but they often have large effects on behavior. A slower robot that reacts earlier can seem much smarter than a faster robot with poor timing.
Next, refine the response logic. If the robot gets trapped repeatedly, try a longer reverse motion before turning. If it always turns into trouble on one side, alternate left and right turns or randomize the turn direction. If one wheel is slightly stronger than the other, adjust motor speed values in software to compensate. This is a good example of software correcting for physical imperfections.
Do not ignore mechanical fixes. Tighten loose wheels, secure the battery so weight does not shift, and tidy any cables that might brush against moving parts. Reliability is never purely about code. Robotics sits at the boundary of hardware and software, so both must support each other.
By the end of this process, you will have done far more than assemble a toy. You will have built a small autonomous system and improved it using the same mindset real roboticists use: define the task, build the system, gather evidence, and refine behavior. That is the practical foundation of home AI robotics, and it prepares you well for more capable robots in later chapters.
1. What is the main goal of the beginner robot project in this chapter?
2. Why does the chapter recommend keeping the home robot project small and simple?
3. If the robot seems confused when detecting obstacles, which hardware issue does the chapter specifically mention as a possible cause?
4. According to the chapter, what is the best way to troubleshoot when something does not work?
5. What idea does repeated testing and small adjustments demonstrate in this chapter?
By this point in the course, you have already done something important: you have moved from seeing robots as mysterious machines to understanding them as systems made from clear parts and simple decisions. A beginner robot usually has sensors to notice the world, a controller to run code, and motors or other outputs to do something physical. That basic pattern is enough to build many useful experiments at home. It is also enough to run into very normal problems. In real robotics work, improvement does not come from getting everything correct on the first try. It comes from observing carefully, changing one thing at a time, and learning how behavior emerges from simple rules.
This chapter is about that next step. Instead of only making a robot work once, you will learn how to make it work better, how to debug it when it fails, and how to decide what improvements are worth adding. You will also look at limits and ethics, because even a small home robot affects safety, privacy, and trust. A robot that bumps into furniture, scares a pet, or records people without permission is not “smart” just because it uses code or sensors. Good robotics includes technical skill and good judgment.
As you continue, think like an engineer. Engineering judgment means choosing practical changes that improve the robot without making the project too complex to understand or maintain. Beginners often try to add many features too quickly: more sensors, more code branches, more speed, more autonomy. The result can be a machine that is harder to debug and less reliable than a simpler version. A better habit is to make one focused upgrade, test it in a repeatable way, write down what changed, and only then move to the next step.
The lessons in this chapter connect directly to the course outcomes. You will troubleshoot common beginner issues, add smarter behaviors carefully, understand limits and ethics, and choose your next robotics path. If you remember only one idea from this chapter, let it be this: a successful robot project is not the one with the most features. It is the one you can understand, test, improve, and explain.
Robotics is a long learning journey. Even advanced autonomous systems are built from small ideas repeated and refined: sense, decide, act, and check the result. The same process works for your home projects. The more carefully you practice now, the easier it becomes to build robots that react to surroundings, follow rules, and behave in a way that feels increasingly intelligent.
Practice note for Troubleshoot common beginner issues: document your objective, define a measurable success check, and run a small experiment before scaling. Capture what changed, why it changed, and what you would test next. This discipline improves reliability and makes your learning transferable to future projects.
Practice note for Add smarter behaviors carefully: document your objective, define a measurable success check, and run a small experiment before scaling. Capture what changed, why it changed, and what you would test next. This discipline improves reliability and makes your learning transferable to future projects.
Practice note for Understand limits and ethics: document your objective, define a measurable success check, and run a small experiment before scaling. Capture what changed, why it changed, and what you would test next. This discipline improves reliability and makes your learning transferable to future projects.
Practice note for Choose your next robotics path: document your objective, define a measurable success check, and run a small experiment before scaling. Capture what changed, why it changed, and what you would test next. This discipline improves reliability and makes your learning transferable to future projects.
Practice note for Troubleshoot common beginner issues: document your objective, define a measurable success check, and run a small experiment before scaling. Capture what changed, why it changed, and what you would test next. This discipline improves reliability and makes your learning transferable to future projects.
Most beginner robot problems are not mysterious AI failures. They are simple system problems that appear complicated because several parts depend on each other. A robot may not move because the battery is weak, because the motor wiring is reversed, because the code never reaches the motor command, or because a sensor reading is causing an emergency stop rule. This is why robotics can feel harder than basic coding alone: software, electronics, mechanics, and the physical environment all interact.
One common issue is inconsistent power. Motors may twitch, the controller may restart unexpectedly, or sensor readings may become noisy when the robot begins moving. Beginners often assume the code is broken when the real problem is unstable power delivery or loose connections. Another common issue is incorrect assumptions about sensor data. A distance sensor may give poor readings on dark fabric, shiny surfaces, or angled objects. If your robot behaves strangely only in certain rooms or near certain materials, the environment may be affecting the sensor more than you expect.
Mechanical problems are also very common. Wheels may slip, one motor may spin slightly faster than the other, or the robot chassis may be unbalanced. That means even correct code can produce crooked motion. New builders sometimes keep changing the program when they really need to check alignment, tire grip, or whether something is rubbing against a wheel. Small physical issues often create large behavior differences.
Another beginner mistake is changing too many variables at once. If you rewrite movement code, move the sensor position, and swap batteries all in one session, you will not know which change helped or hurt. That makes debugging slow and frustrating. A much better approach is to test one subsystem at a time. First verify the controller powers on. Then test one sensor. Then test one motor. Then combine them. This modular mindset turns a confusing robot into a series of manageable checks.
Finally, many problems come from expectations. Beginners sometimes expect a simple home robot to behave smoothly in every room, under every lighting condition, and around every object. In reality, even basic autonomy has limits. Your goal is not perfection. Your goal is reliable behavior in a defined situation that you understand well enough to improve.
When your robot stops behaving as expected, use a checklist before guessing. A checklist reduces panic and helps you think clearly. Good robotics troubleshooting follows the signal path: power, connections, inputs, code logic, outputs, and environment. If you check these in a consistent order every time, you will solve problems faster and build confidence.
Start with power. Is the battery charged? Is the controller receiving the correct voltage? Are there signs of brownouts, such as sudden resets when motors start? Next, inspect wiring and connectors. Tug gently on wires, confirm the correct pins are used, and look for reversed motor connections. Then move to sensor inputs. Print values to a screen or serial monitor and confirm that the robot is actually receiving believable data. If the distance sensor always reads the same number, the problem may not be in your decision code at all.
After inputs, check code logic. Read the program from top to bottom and ask: what condition causes motion, stopping, turning, or waiting? Beginners often write rules that accidentally block one another. For example, a robot may have one rule that says “move forward if clear” and another that says “stop if value less than threshold,” but the threshold may be set so high that it always triggers. Watching live sensor values next to rule thresholds is one of the fastest ways to spot this kind of issue.
A practical workflow is to reduce the problem. If the full robot fails, create the smallest possible test. Make the motor spin for two seconds. Make the sensor print readings only. Make the LED turn on when a threshold is crossed. Simple tests isolate causes. Also keep notes. Write down what you changed, what you observed, and what happened. This habit may seem slow at first, but it prevents repeating the same unsuccessful experiments.
The real value of a checklist is that it trains engineering discipline. Instead of saying, “The robot is broken,” you learn to say, “The motor command is correct, but the left wheel stalls under load,” or “The sensor values are unstable only near sunlight.” Specific observations lead to useful fixes.
Once your robot works reliably at a basic level, the best improvements are often small and controlled. Beginners sometimes think “smarter” means adding a complex AI model right away. In home robotics, smarter behavior often begins with better measurements and better tuning. If the robot can sense more consistently and move more predictably, even simple decision rules become much more effective.
A good first upgrade is to slow the robot down slightly. This may sound less exciting, but slower movement usually improves sensing and decision quality. A fast robot reaches obstacles before its code has enough time to react. Lower speed gives sensors more time to gather stable readings and reduces collisions. Another useful upgrade is averaging sensor values over a few readings instead of trusting one instant result. This helps reduce noise, especially for distance or light sensors. You do not need a complicated algorithm; even a short average can make the robot seem much calmer and more deliberate.
You can also improve movement by calibrating left and right motors. If one wheel is stronger, the robot may drift. A small adjustment in motor power values can help it travel straighter. Physically repositioning sensors also matters. A distance sensor placed too low may read the floor or table edge poorly; too high and it may miss short obstacles. Changing the sensor angle by a small amount can produce much better data than rewriting large parts of your code.
When adding smarter behaviors, do it carefully. For example, instead of one rule that says “if obstacle, turn right,” you might add a short pause, then compare left and right sensor scans, then choose the side with more open space. That is a meaningful autonomy upgrade built from simple logic. You could also add a recovery behavior: if the robot detects repeated blocked paths, it backs up, turns farther, and tries again. This does not require advanced AI, but it does make the robot feel more adaptive.
The key is to measure whether each upgrade helps. Test on the same floor, with the same obstacle layout, and compare results. Did the robot avoid collisions more often? Did it stop oscillating? Did it move more smoothly? Practical robotics improvement is not about making the code longer. It is about making outcomes better and more reliable.
As your robots become more capable, responsibility matters more. Even a beginner home robot can move unexpectedly, make noise, record data, or interact with people and pets. Safe robotics starts with physical safety. Keep moving parts away from fingers, hair, and loose clothing. Test on clear floors and stable tables. Use low speeds during development. Have an easy shutdown method, such as a power switch you can reach quickly. If a robot behaves unpredictably, stop it first and debug second.
Home environments also raise privacy and trust concerns. If your robot uses a camera or microphone, tell others in the home what it does and when it is active. Do not record people secretly. Do not point sensors into private spaces without permission. Many beginners become excited about autonomous behavior and forget that sensing is also a form of observation. Respectful use is part of good engineering.
There are also ethical limits to what a beginner should automate. A home robot should not be trusted with decisions that could harm a person, pet, or valuable object. Avoid tasks involving heat, sharp tools, heavy lifting, stairs, or unsupervised charging unless you have advanced knowledge and proper safety design. A robot that follows simple rules can still fail in unusual situations. Sensors miss things. Wheels slip. Code gets stuck. Responsible builders assume that failure is possible and design around it.
Another ethical habit is honesty about capability. A robot that follows lines and avoids walls is not “thinking like a human.” It is applying programmed rules to sensor input. There is nothing wrong with that; in fact, it is a great way to learn. But clear language helps you make better decisions and avoids overtrust. The more realistic you are about limits, the safer and more effective your projects will be.
Responsible use does not reduce creativity. It improves it. When you design with safety, privacy, and limits in mind, you build systems people can actually trust and enjoy around the home.
Autonomous systems can sound advanced, but their growth often starts with very simple building blocks. A robot senses something, applies a rule, takes an action, and checks what changed. That cycle is the foundation of much larger systems. The obstacle-avoiding robot you build at home uses the same basic pattern as more advanced robots, even though the advanced versions use more sensors, more computation, and more refined models.
Think of autonomy as layers. The first layer is direct reaction: if the path is blocked, stop or turn. The next layer adds memory or comparison: if turning right failed twice, try left; if one direction looks more open, prefer it. Another layer adds goals: move toward a charging area, follow a line, or patrol a small space. Over time, these layers make the robot appear more intelligent, but each layer still depends on reliable sensing and understandable decisions underneath.
This matters because it shows you a practical path forward. You do not need to jump from beginner code to advanced machine learning immediately. Many useful robot behaviors come from combining simple rules carefully. For example, line following plus obstacle avoidance plus a timeout recovery rule can create surprisingly robust navigation in a small home test area. If you later explore mapping, visual recognition, or learning-based control, you will understand where those new methods fit in the system.
Engineering judgment is especially important here. Every added layer creates new failure points. More sensors mean more noise. More rules mean more interactions and edge cases. A beginner often gains more by refining a simple autonomy loop than by adding flashy features too early. Ask yourself: does this new idea improve a real weakness, or is it only making the robot more complicated?
Autonomous systems grow best when each level is testable and understandable. Build a strong base, then add one behavior at a time. This is how hobby projects become solid projects, and how solid projects eventually become platforms for deeper AI robotics learning.
To keep learning effectively, choose next projects that stretch your skills without overwhelming you. A good next project uses familiar parts in a slightly new way. For example, if you built a robot that avoids obstacles, your next step could be a line-following robot, a light-seeking robot, or a patrol robot with timed turns and recovery behavior. These projects reinforce the same core ideas: read sensors, apply decision rules, and control outputs. Repetition with variation is how robotic intuition grows.
Develop strong practice habits now. Keep versions of your code. Label your wires. Take photos before changing hardware. Test in short sessions with one clear goal. After each session, write a few lines about what worked, what failed, and what you want to try next. This turns random experimentation into deliberate practice. Over time, your notes become a personal engineering guide built from real experience.
A simple learning roadmap can help. First, strengthen fundamentals: motor control, sensor reading, thresholds, timing, and reliable loops. Second, improve robot behavior: smoother turning, better calibration, multiple sensor rules, and recovery strategies. Third, explore autonomy concepts: state machines, path choices, simple mapping ideas, or logging data from runs. After that, if you are interested, you can branch into computer vision, voice interaction, wireless control, or machine learning. Those advanced topics make more sense when the basics already feel comfortable.
Also decide what kind of robotics excites you most. Some learners enjoy physical building and chassis design. Others enjoy coding behaviors. Others care about sensing, AI, or home automation. Your path can reflect that interest. There is no single correct roadmap, but there is a common principle: keep building projects you can explain clearly and improve intentionally.
By finishing this chapter, you are not done learning robotics. You are ready to learn better. You now know how to troubleshoot common issues, add smarter behaviors carefully, think about limits and ethics, and choose a sensible next step. That is the real beginning of long-term progress. Small robots, simple rules, careful testing, and steady curiosity can take you surprisingly far.
1. According to the chapter, what is the best way to improve a beginner robot project?
2. Why does the chapter warn beginners about adding too many features too quickly?
3. Which action best reflects good robotics ethics at home?
4. What does the chapter say a successful robot project is?
5. How should you choose your next robotics project, based on the chapter?
- Learning Evolved.
- Intelligence Amplified.


