Computer Vision — Beginner
Train a simple image recognizer and use it with your phone camera.
Image recognition is the skill of teaching a computer to look at a photo and decide what it contains—like “mug,” “keys,” or “plant.” You don’t need to be a programmer to get started, and you don’t need a big lab or expensive software. In this beginner-friendly course, you’ll build a small image recognition model using photos you capture with your own phone, then test it with live camera input so it feels like your camera is getting smarter.
This course is designed for absolute beginners. If you’ve never trained a model, never labeled data, and aren’t sure what “computer vision” means, you’re in the right place. We’ll explain every idea from first principles and use simple tools so you can focus on learning the process, not fighting setup issues.
By the end, you’ll have a working image classifier trained on your own categories. You’ll be able to point a camera at an object and get a predicted label with a confidence score. More importantly, you’ll understand how to improve results by changing your data: taking better photos, adding missing examples, and fixing imbalance between categories.
The course has 6 chapters that build step-by-step. You’ll start by learning what image recognition is and how computers represent images as numbers. Then you’ll create a tiny dataset using your phone, train a first model without writing code, and test it on new images. After that, you’ll move from “it works on my photos” to “it works in live camera conditions,” which is where real-world issues show up—lighting changes, cluttered backgrounds, and look-alike objects.
Next, you’ll learn a simple but powerful rule: most improvements come from better data, not magic settings. You’ll diagnose why your model fails, collect targeted photos to fix those failures, retrain, and compare versions. Finally, you’ll learn how to share your model or demo, run a final acceptance test, and apply basic privacy and safety practices so you use camera data responsibly.
If you want a practical first win in computer vision, this course is built to get you there fast—using everyday objects and a phone camera. Register free to begin, or browse all courses to find the perfect next step after you finish.
Computer Vision Engineer and Beginner AI Instructor
Sofia Chen builds practical computer vision features for mobile apps, focusing on image classification and on-device performance. She specializes in teaching beginners using clear, step-by-step projects that work with everyday tools like a phone camera and a browser.
Image recognition is one of those technologies that feels like “magic” until you learn what it is actually doing: comparing patterns in image data to patterns it has learned before. In this course, you’ll build a small but real image recognition project that can run from a phone camera, produce a prediction, and show a confidence score that helps you judge whether the result is trustworthy.
This first chapter is about getting your bearings. You’ll see what image recognition can (and can’t) do, learn how a computer “sees” a photo as numbers, and meet the idea of a model as a function that turns an input image into an output label. You’ll also set up a beginner-friendly workspace and run a first demo so you can read outputs like a practitioner rather than guessing.
As you read, keep the course outcomes in mind: you will collect and label your own photos, train a basic classification model, test it with live camera input, improve it by fixing common data problems, and then save and share a safe demo others can try. Chapter 1 sets the vocabulary and habits you’ll use every step of the way.
Practice note for See what image recognition can (and can’t) do: document your objective, define a measurable success check, and run a small experiment before scaling. Capture what changed, why it changed, and what you would test next. This discipline improves reliability and makes your learning transferable to future projects.
Practice note for Understand how a computer “sees” a photo: document your objective, define a measurable success check, and run a small experiment before scaling. Capture what changed, why it changed, and what you would test next. This discipline improves reliability and makes your learning transferable to future projects.
Practice note for Meet the idea of a model: input, output, and prediction: document your objective, define a measurable success check, and run a small experiment before scaling. Capture what changed, why it changed, and what you would test next. This discipline improves reliability and makes your learning transferable to future projects.
Practice note for Set up your learning workspace and tools: document your objective, define a measurable success check, and run a small experiment before scaling. Capture what changed, why it changed, and what you would test next. This discipline improves reliability and makes your learning transferable to future projects.
Practice note for Run a first demo and read the results: document your objective, define a measurable success check, and run a small experiment before scaling. Capture what changed, why it changed, and what you would test next. This discipline improves reliability and makes your learning transferable to future projects.
Practice note for See what image recognition can (and can’t) do: document your objective, define a measurable success check, and run a small experiment before scaling. Capture what changed, why it changed, and what you would test next. This discipline improves reliability and makes your learning transferable to future projects.
Practice note for Understand how a computer “sees” a photo: document your objective, define a measurable success check, and run a small experiment before scaling. Capture what changed, why it changed, and what you would test next. This discipline improves reliability and makes your learning transferable to future projects.
Practice note for Meet the idea of a model: input, output, and prediction: document your objective, define a measurable success check, and run a small experiment before scaling. Capture what changed, why it changed, and what you would test next. This discipline improves reliability and makes your learning transferable to future projects.
Practice note for Set up your learning workspace and tools: document your objective, define a measurable success check, and run a small experiment before scaling. Capture what changed, why it changed, and what you would test next. This discipline improves reliability and makes your learning transferable to future projects.
In plain language, image recognition means: given a picture, the computer chooses an answer from a set of possible answers. Those answers might be “cat vs. dog,” “ripe vs. unripe banana,” or “my keys vs. my wallet.” Most beginner projects in this area are image classification: one image in, one category out.
It’s important to understand what image recognition is not. It usually does not “understand” the world the way a person does. A model can be extremely good at recognizing a pattern it has seen in training, and surprisingly fragile when the pattern changes. For example, a model trained on bright kitchen photos may fail on the same object under a warm lamp at night. This is not the model being “lazy”; it is the model doing exactly what it learned from the data you gave it.
Engineering judgment starts here: define the task narrowly and make it testable. “Recognize everything my camera sees” is not a beginner goal. “Recognize three snack types on my desk” is realistic. Throughout this course you’ll repeatedly ask: What are the categories? What conditions will the camera see? What does success look like? The clearer those answers are, the faster your model improves.
Common mistake: expecting a model to produce correct results when the training photos don’t match real use. If you plan to test with a live phone camera, your training images should look like live phone camera images: similar distance, angles, backgrounds, and lighting. This course will show you how to build that discipline into your dataset from day one.
Phone apps use image recognition in many everyday ways. Photo galleries group pictures by faces or suggest “best shots” by detecting blurriness and closed eyes. Search features let you type “dog” and retrieve dog photos, even if you never tagged them. Camera apps can detect scenes (food, night, portrait) and adjust settings automatically. These are all examples of models making predictions from pixels.
Accessibility is one of the most practical and meaningful uses. Screen readers can describe images, identify text with OCR, or detect objects to help a user navigate. Real-time recognition can announce “door,” “crosswalk,” or “person” if designed carefully. In these settings, confidence scores and safe failure behavior matter: an uncertain result should be communicated as uncertain, not presented as fact.
Visual search is another common pattern: point the camera at a product and get matches, or translate a sign in real time. These apps combine multiple steps (detect text, recognize characters, translate language), which is a reminder that image recognition is often one component in a pipeline rather than the whole product.
What you will build in this course is smaller but follows the same workflow: gather examples, label them, train a model, and run it on live camera input. The goal is not to compete with large commercial systems, but to learn the mechanics and judgment that make those systems reliable: matching training data to real use, handling uncertainty, and iterating when results are wrong.
A computer “sees” a photo as a grid of pixels. Each pixel is a set of numbers that represent color. In most images you’ll handle, color is stored as three channels: Red, Green, and Blue (RGB). Each channel is often an integer from 0 to 255. So a single pixel might be (120, 200, 30). An image is just many of these pixels arranged in rows and columns.
This matters because models don’t reason about “bananas” or “mugs.” They operate on numbers. When you train a model, you are asking it to learn a mapping from numeric patterns (pixel values) to labels (categories). The model learns statistical relationships: certain shapes, edges, textures, and color combinations tend to appear with certain labels.
Two practical consequences follow. First, preprocessing choices change the numbers and therefore change performance. Resizing an image, cropping it, or converting it to grayscale alters the pixel grid. Beginner-friendly tools often handle this for you, but you still need to be aware: if your training images are tightly cropped and your live camera images are wide shots, the numeric patterns differ.
Second, lighting and camera settings are not “cosmetic”; they are numeric transformations. A dark photo shifts many pixel values down; a warm lamp shifts colors toward red; motion blur smears edges. These are among the most common reasons a model fails in a live demo. Later chapters will show how to collect data that intentionally includes these variations so your model learns to handle them.
Labels are the answers you want your model to output. Categories are the set of allowed labels. When you build an image classifier, you are not asking “What is in this picture?” in a general sense; you are asking “Which of these categories best matches this picture?” That means your category design is part of the engineering.
Good beginner categories are visually distinct and easy to capture with a phone: for example, “apple,” “banana,” and “orange,” or “pen,” “highlighter,” and “eraser.” Avoid categories that require subtle judgment (“fresh vs. stale bread”) unless you can collect many consistent examples. Also avoid categories that depend heavily on context (“mine vs. not mine”) unless you can control background and lighting.
Labeling is where many projects quietly go wrong. A model can only learn what your labels mean, and inconsistent labeling teaches confusion. Practical rules help: decide what counts as the object being “present,” decide whether partial views are allowed, and decide what to do with tricky cases (reflections, multiple objects, occlusion). Write these rules down before collecting many photos, so you can label consistently.
You’ll also hear about an “other” or “background” category. For small projects, it can be useful: add a label like “none-of-the-above” with photos of empty scenes or unrelated items. This helps the model learn to say “I don’t see one of my target objects.” Without it, the model is forced to choose among your target categories even when none apply, which can produce confidently wrong outputs in a live camera test.
When your trained model sees an image, it produces a prediction: typically a list of categories with scores. The top score corresponds to the model’s best guess. Many tools call these scores “confidence,” but it’s best to treat them as model certainty signals, not guarantees. A model can be highly confident and still wrong if the input is outside what it learned.
In practice, you will use confidence to decide how to act. If your phone demo shows “banana: 0.92,” you might accept it. If it shows “banana: 0.38, apple: 0.35,” you should treat the result as uncertain. Good applications respond differently under uncertainty: ask the user to reposition the camera, collect another frame, or fall back to a safe message like “Not sure.”
Confidence also helps you debug. If the model is consistently low-confidence, you may have a dataset problem (too few images, inconsistent labels, too much variation). If it is high-confidence but wrong for a specific condition (e.g., only at night), you likely need to add training photos covering that condition. This is the start of an iterative workflow: test → observe failure modes → adjust data → retrain.
A common mistake is “chasing 100%.” Real-world camera input is messy: glare, shadows, motion, background clutter. Your goal is not perfection; your goal is reliable behavior in the conditions you care about. That means defining a threshold (for example, only accept predictions above 0.80) and improving the data so that correct cases cross the threshold more often while incorrect cases stay below it.
This course uses a beginner-friendly, no-code (or low-code) training tool so you can focus on the core workflow rather than wrestling with complex setup. A common option is a browser-based trainer such as Google’s Teachable Machine, which lets you collect images from a webcam or upload photos, label them into classes, train a model, and export it for use in a simple app. If your environment uses a different tool with the same features—collect, label, train, test, export—the workflow remains the same.
Your course project will follow a repeatable loop. First, you’ll define 2–4 categories that are practical for a phone camera demo. Next, you’ll collect your own photos for each category, aiming for variety: different angles, distances, and backgrounds, but still representing realistic use. Then you’ll train a basic classifier and immediately test it with live camera input. You’ll read the prediction list and confidence scores, not just the top label, and you’ll take notes on failure cases.
From there, you’ll improve results by fixing common data problems. You’ll add examples for hard lighting (backlight, indoor lamp), reduce imbalance (similar number of images per class), and remove confusing or mislabeled samples. You’ll learn a practical habit: change one thing at a time, retrain, and compare behavior, so you know what actually helped.
Finally, you’ll save and share your model in a way that others can safely try. “Safely” means thinking about what your model should not do: avoid sensitive categories (like identifying people), avoid storing personal photos unnecessarily, and communicate uncertainty. By the end of the course, you will have a small, demo-ready recognition model that runs on live camera input and a clear understanding of how it was built.
1. Which description best matches what image recognition is doing under the hood in this chapter?
2. In Chapter 1, how does a computer "see" a photo?
3. What is the role of a model in the chapter’s vocabulary?
4. Why does the chapter emphasize using a confidence score with a prediction?
5. For most beginner image recognition projects in this chapter, what tends to matter more than "clever settings"?
Before you can train even a simple image recognition model, you need something more important than code: a dataset. In practice, “dataset” just means a collection of photos plus labels that tell the computer what each photo shows. This chapter focuses on building a tiny dataset using your phone camera—small enough to finish in one sitting, but structured enough that a beginner-friendly tool can learn from it.
A good beginner dataset does not try to cover the whole world. It aims for clarity. You’ll choose a few categories you can photograph consistently, capture images with repeatable conditions, label them cleanly, and split them into training and testing sets so you can measure how well your model generalizes. Along the way you’ll learn the core engineering judgment behind data collection: the model can only learn patterns that are actually present in your images.
Think of your dataset as a “contract” between you and the model. You decide what counts as each category, and you demonstrate that decision through examples. If you’re inconsistent—mixing different objects, backgrounds, or lighting without enough coverage—the model will guess based on accidental shortcuts (like the table color) instead of the object you care about. The goal of this chapter is to make your examples intentional and your workflow tidy.
By the end of this chapter, you’ll have a small but solid dataset that sets you up for training and live testing in the next steps of the course.
Practice note for Choose two to four categories you can photograph: document your objective, define a measurable success check, and run a small experiment before scaling. Capture what changed, why it changed, and what you would test next. This discipline improves reliability and makes your learning transferable to future projects.
Practice note for Capture consistent photos that a model can learn from: document your objective, define a measurable success check, and run a small experiment before scaling. Capture what changed, why it changed, and what you would test next. This discipline improves reliability and makes your learning transferable to future projects.
Practice note for Organize and label images without confusion: document your objective, define a measurable success check, and run a small experiment before scaling. Capture what changed, why it changed, and what you would test next. This discipline improves reliability and makes your learning transferable to future projects.
Practice note for Split data into training and testing sets: document your objective, define a measurable success check, and run a small experiment before scaling. Capture what changed, why it changed, and what you would test next. This discipline improves reliability and makes your learning transferable to future projects.
Practice note for Spot and fix missing or messy examples: document your objective, define a measurable success check, and run a small experiment before scaling. Capture what changed, why it changed, and what you would test next. This discipline improves reliability and makes your learning transferable to future projects.
Practice note for Choose two to four categories you can photograph: document your objective, define a measurable success check, and run a small experiment before scaling. Capture what changed, why it changed, and what you would test next. This discipline improves reliability and makes your learning transferable to future projects.
Practice note for Capture consistent photos that a model can learn from: document your objective, define a measurable success check, and run a small experiment before scaling. Capture what changed, why it changed, and what you would test next. This discipline improves reliability and makes your learning transferable to future projects.
Practice note for Organize and label images without confusion: document your objective, define a measurable success check, and run a small experiment before scaling. Capture what changed, why it changed, and what you would test next. This discipline improves reliability and makes your learning transferable to future projects.
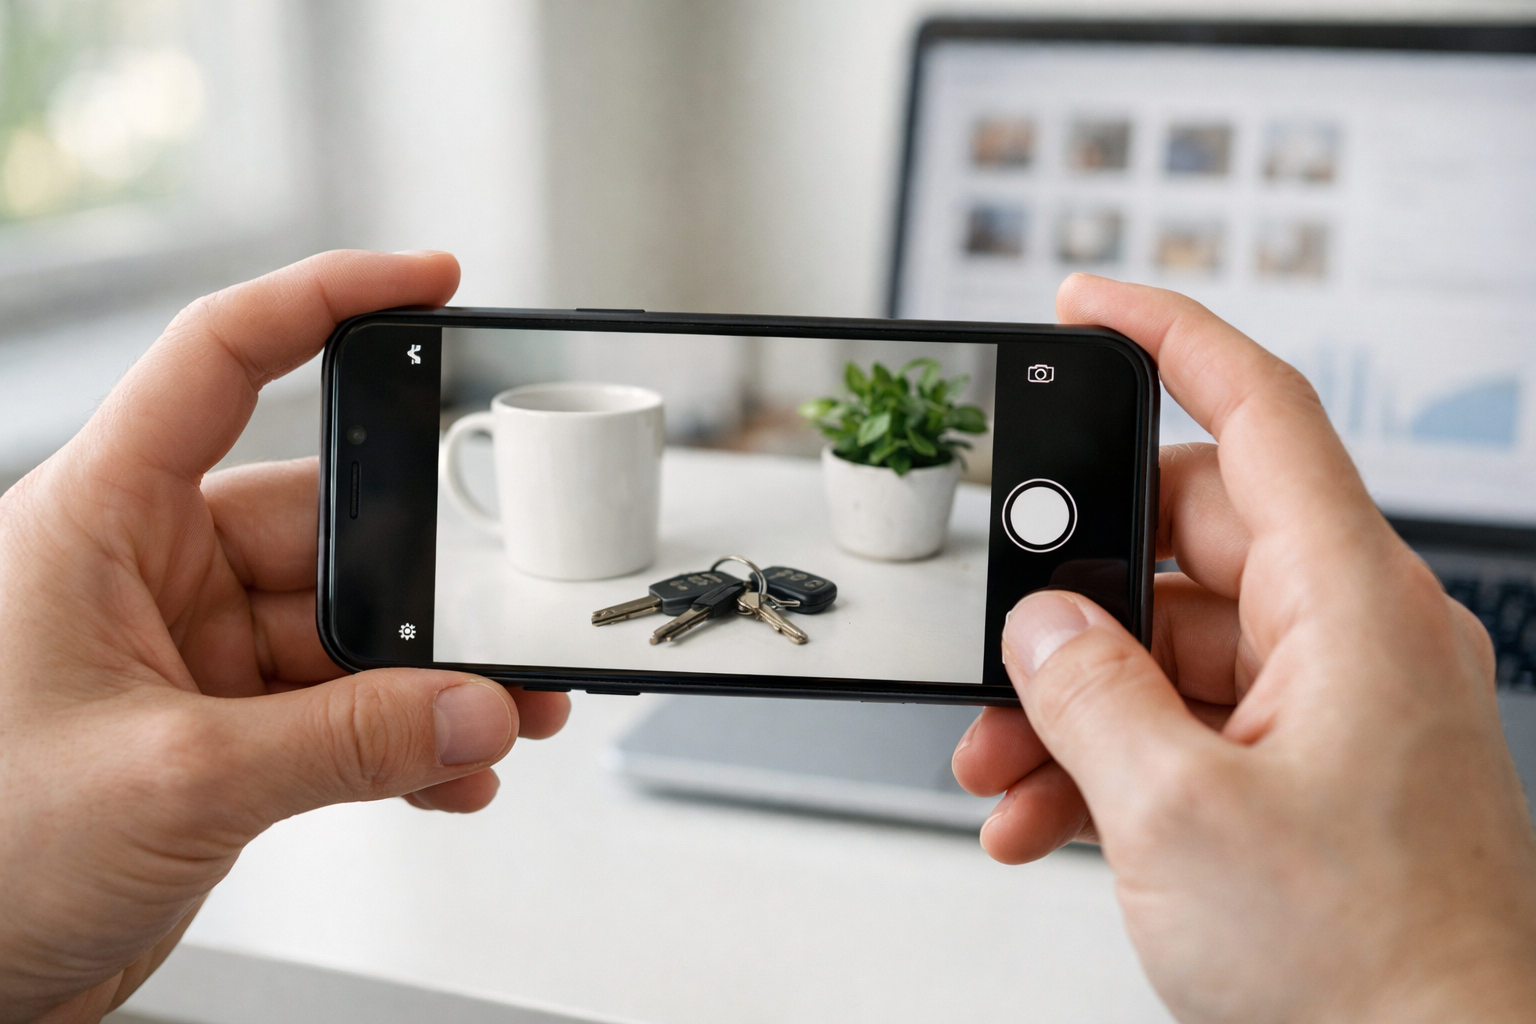
The fastest way to get stuck is to pick categories that are vague, overlapping, or hard to photograph consistently. For a first dataset, choose two to four categories that are visually distinct and under your control. “Under your control” means you can reliably take many photos of each category in similar conditions, without needing special access or perfect timing.
Good starter category sets include: mug vs. water bottle, apple vs. banana, your keys vs. your wallet, or black pen vs. red pen. These work because the shapes and textures differ, and you can place the object where you want. Categories like “happy vs. sad,” “day vs. night,” or “healthy food vs. junk food” are possible later, but they require more careful definitions and much broader data.
Also avoid categories where the difference is mostly text (like “Coke vs. Pepsi”) unless your goal is to learn text recognition. A small image classifier might latch onto fonts, glare, or label placement instead of the object itself. Similarly, avoid categories that vary wildly in appearance (for example, “chairs” could be thousands of shapes). Start with a narrow scope, then expand once your process is working.
Finally, define your categories in one sentence each, like a rule. Example: “Category = mug means a handle is visible.” That sentence becomes your labeling standard and prevents you from quietly shifting the definition halfway through collecting photos.
Models learn from patterns in pixels. Your job is to make sure the patterns you want (the object’s shape, color, texture) are strong, and the patterns you don’t want (random shadows, one special background) don’t dominate. Consistency matters, but so does realistic variety—your model should recognize the object in normal use, not only in the exact setup you staged.
Start with a simple “photo protocol” you can repeat for every category. Keep the object centered, make it fill a similar portion of the frame, and use steady lighting. Natural window light is often better than harsh overhead lights because it reduces strong glare. If your object is reflective (a phone screen, glossy bottle), change the angle slightly to avoid bright hotspots that hide details.
Distance and framing: pick a distance where the object is clearly visible and occupies around 30–70% of the image. Too far away and the object becomes a small blob; too close and you cut off key features (like the mug handle). Take a mix: a majority at your standard distance plus a smaller set closer/farther to teach scale variation.
Background: beginners often accidentally train “background recognition.” If every mug photo is on your wooden table and every bottle photo is on a white counter, the model may learn table vs. counter. To prevent this, deliberately vary backgrounds while keeping the object consistent: table, couch, plain wall, a sheet of paper, and a cluttered scene. You can also flip the script: keep the background similar for all categories during early collection, then add varied backgrounds later as an improvement step.
Practical outcome: when you scroll your photos, each category should look “consistently itself,” but not identical clones. That balance is what helps a model learn the category rather than memorizing a single scene.
For beginner tools and small models, you can start surprisingly small—but not too small. If you only have 3 images per category, the model can’t see enough variation to learn what matters. On the other hand, you don’t need thousands of photos to learn the workflow. The goal here is to build a dataset that is large enough to reveal real problems (lighting, angle, confusion) while still being quick to collect.
A practical starting target is 30–60 images per category for 2–4 categories. If you can reach 100 per category, great, but don’t let perfection block progress. What matters most is covering the “cases” your model will face: different angles, distances, and backgrounds that still clearly show the object.
Think in terms of coverage buckets. For each category, try to capture:
Also decide whether your dataset is about a specific instance (“my blue mug”) or a general concept (“any mug”). For a first project, instance-based is easier and will perform better with fewer photos. If you want concept-based categories, you’ll need more diversity (different mugs, different bottles) or the model will overfit to your single example.
Practical outcome: you should be able to hold out a test set (next section) and still have enough remaining images to train. If holding out images leaves you with fewer than ~20 training images per category, collect more before moving on.
Labeling is where small projects quietly go wrong. The model doesn’t understand your intentions; it only sees labels as truth. If your folders are inconsistent (“bottle,” “Bottle,” “water-bottle”), you can accidentally create multiple categories or import mistakes into your training tool. Clean labeling habits save hours later—especially when you share the project with someone else.
Use a simple, predictable folder structure. Create one top-level folder for the project, then one folder per category. Keep names lowercase, no spaces, and no special characters. Example:
Inside each category folder, use consistent filenames. Many phones generate filenames automatically, which is fine, but avoid renaming in ways that break sorting (like mixing “img1.jpg” and “IMG_0001.JPG”). If you do rename, use a pattern such as mug_001.jpg, mug_002.jpg. The main point is: a human should be able to audit your dataset quickly.
Labeling standard: only include images that clearly match the category definition you wrote in Section 2.1. If an image is ambiguous (“is that mug actually a cup?”), either remove it or create a separate category later. Ambiguity introduces noisy labels, and noisy labels usually show up as low confidence and unstable predictions during live testing.
Practical habit: do a fast “scroll review” after every 10–15 photos. Delete duplicates, blurry shots, and accidental wrong-category images immediately. This small review loop prevents messy examples from piling up until they’re hard to spot.
If you train and evaluate on the same photos, you’re not measuring recognition—you’re measuring memorization. A model can get very high accuracy by remembering backgrounds, lighting, and exact object positions from the training images. In real use, the camera feed will be slightly different, and performance may drop sharply. Separating your data is how you check whether the model can generalize.
Create two splits: training (what the model learns from) and testing (what you use to evaluate). A common beginner split is 80% training / 20% testing. With 50 images per category, that’s 40 training and 10 testing. If your dataset is very small, keep at least 5–10 test images per category so your evaluation isn’t based on just one lucky photo.
Important engineering judgment: don’t split randomly if your photos are “bursty.” For example, if you took 20 mug photos in the same spot and then 20 in a new spot, a purely random split might put mostly one background in training and the other in testing, making results look worse (or better) than they should. A better approach is to ensure both splits contain a mix of conditions—angles and backgrounds—similar to your intended real-world use.
Practical outcome: when you later test the model, the test set becomes your reality check. If your accuracy is high on training but low on testing, it’s a signal to improve the dataset—not to celebrate the training score.
Most early model failures are data failures in disguise. The good news is that dataset problems are usually visible if you know what to look for. Before training, do a quick audit: open each category folder and scan for oddballs. After training, if predictions feel “random,” come back to this list and fix the dataset before changing model settings.
Mistake: class imbalance. If you have 120 images of “mug” and 20 of “bottle,” the model may lean toward predicting “mug.” Fix: collect more of the smaller class, or temporarily reduce the larger class to match while you iterate.
Mistake: accidental shortcuts. One category always appears on the same background, or one object is always closer to the camera. Fix: add counterexamples: put each category on each background; take each category at multiple distances. Your goal is to break the shortcut so the object’s features become the easiest signal.
Mistake: blurry or low-quality images. Motion blur and missed focus remove details the model needs. Fix: delete and retake. A smaller clean dataset often beats a larger messy one.
Mistake: inconsistent definitions. Sometimes you label “cup” images as “mug” when no handle is visible, violating your own rule. Fix: either tighten your labeling (remove those images) or redefine the category and then relabel consistently.
Practical outcome: once you’ve cleaned the dataset, you should be able to explain why each category is learnable and how your images demonstrate that. That confidence in the data is what makes the next chapter—training and live camera testing—far smoother and more trustworthy.
1. Why does Chapter 2 recommend choosing only 2–4 categories for a beginner dataset?
2. What is the main risk of mixing inconsistent backgrounds or lighting without enough coverage across examples?
3. In this chapter, what does “dataset” mean in practical terms?
4. What is the purpose of splitting your images into training and testing sets?
5. Which workflow best matches the chapter’s goal of keeping your dataset “intentional” and your process tidy?
In Chapter 2 you built the most important ingredient for image recognition: a small, labeled dataset that reflects the real world. In this chapter you’ll turn that dataset into a working image classifier—without writing code—using a beginner-friendly training tool. The goal is not to “become a machine learning engineer overnight.” The goal is to experience the complete workflow: load images, train a model, test it, understand what it gets wrong, and save a clearly named first version you can demo and improve later.
As you work, keep one idea in mind: models do not understand your intent. They only learn patterns that are consistent in your photos. If the “banana” images were taken on a bright countertop and the “apple” images were taken on a dark table, the model may learn “countertop vs. table” rather than “banana vs. apple.” This chapter teaches you how to spot those traps early, because the fastest way to improve a classifier is usually to improve the data—not to push more buttons in the tool.
We’ll walk through: importing your labeled images into a tool, running a first training session and watching the learning process, evaluating accuracy with simple tests (including live camera testing), interpreting confidence scores, diagnosing errors, and saving your first version with notes. By the end, you should be able to hand your phone to someone else, let them point the camera at an object, and explain what the model is doing and why it sometimes fails.
Practice note for Load your labeled images into a training tool: document your objective, define a measurable success check, and run a small experiment before scaling. Capture what changed, why it changed, and what you would test next. This discipline improves reliability and makes your learning transferable to future projects.
Practice note for Train a first model and watch the learning process: document your objective, define a measurable success check, and run a small experiment before scaling. Capture what changed, why it changed, and what you would test next. This discipline improves reliability and makes your learning transferable to future projects.
Practice note for Evaluate accuracy with simple tests: document your objective, define a measurable success check, and run a small experiment before scaling. Capture what changed, why it changed, and what you would test next. This discipline improves reliability and makes your learning transferable to future projects.
Practice note for Understand errors: what the model gets wrong and why: document your objective, define a measurable success check, and run a small experiment before scaling. Capture what changed, why it changed, and what you would test next. This discipline improves reliability and makes your learning transferable to future projects.
Practice note for Save your first version and name it clearly: document your objective, define a measurable success check, and run a small experiment before scaling. Capture what changed, why it changed, and what you would test next. This discipline improves reliability and makes your learning transferable to future projects.
Practice note for Load your labeled images into a training tool: document your objective, define a measurable success check, and run a small experiment before scaling. Capture what changed, why it changed, and what you would test next. This discipline improves reliability and makes your learning transferable to future projects.
Practice note for Train a first model and watch the learning process: document your objective, define a measurable success check, and run a small experiment before scaling. Capture what changed, why it changed, and what you would test next. This discipline improves reliability and makes your learning transferable to future projects.
Practice note for Evaluate accuracy with simple tests: document your objective, define a measurable success check, and run a small experiment before scaling. Capture what changed, why it changed, and what you would test next. This discipline improves reliability and makes your learning transferable to future projects.
Practice note for Understand errors: what the model gets wrong and why: document your objective, define a measurable success check, and run a small experiment before scaling. Capture what changed, why it changed, and what you would test next. This discipline improves reliability and makes your learning transferable to future projects.
“Training” can sound mysterious, but for image classifiers it’s essentially pattern learning from examples. You show the system many labeled images (for example, “mug” and “bottle”), and it adjusts internal parameters so that the patterns common to “mug” images produce a different output than patterns common to “bottle” images. Importantly, the model is not memorizing names—it’s learning statistical regularities: edges, textures, shapes, and combinations of those features.
Here is the practical mental model: during training, the tool repeatedly does three steps. First, it guesses a label for each training image. Second, it checks that guess against the correct label you provided. Third, it updates itself to be slightly less wrong next time. After many iterations, it usually gets better—if your labels are accurate and your photos represent the situations you care about.
Engineering judgment matters because the model will happily learn “shortcuts.” If one class consistently includes a hand holding the object and another class never does, the model may use “hand present” as the key signal. When you later test with the live camera, confidence scores may drop or flip classes because the shortcut is missing. Training is therefore a partnership: you provide consistent, representative examples; the model finds a boundary between classes based on what you gave it.
Finally, training is not proof of understanding. A model can score highly on images similar to what it saw and still fail in new lighting or angles. That’s why this chapter focuses on evaluating with simple tests and understanding errors, not just celebrating a number on a dashboard.
Beginner-friendly training tools (such as web-based “teach by example” trainers) typically follow the same structure: you define classes (your labels), import images for each class, then click Train. Start by creating class names that are short, specific, and consistent. Prefer “mug” over “cup” if your dataset is mugs; prefer “recycling_bin” over “bin” if you have multiple bin types later. Names are part of your documentation, not just UI text.
When you import images, watch for two common mistakes: importing the wrong photos into a class, and mixing “junk” images that don’t contain the object. Misfiled examples are poison because they teach the model the wrong patterns. Many tools let you preview thumbnails; use that preview to quickly scan for accidental duplicates, near-identical photos, or a photo that clearly belongs to another class.
Keep classes balanced at this stage. If you have 120 images of “mug” and 20 images of “bottle,” a first model often leans toward the majority class, especially when the camera view is ambiguous. If you can’t collect more images immediately, you can sometimes reduce the larger class to match the smaller one for a fair first pass. It’s better to train on 30 vs. 30 good examples than 120 vs. 20 uneven ones.
As you load images, also think ahead to live camera testing. If the tool supports it, include photos that resemble how your phone will see the object: typical distance, background clutter, partial views, and everyday lighting. If your dataset only includes “hero shots” on a blank background, the first demo may look impressive but won’t hold up in real use.
No-code tools often expose a small set of training settings such as “epochs,” “training time,” “learning rate,” “model type,” or “advanced/standard mode.” You don’t need to master them all, but you should know what they broadly do so you can make safe, practical choices.
Epochs (or “iterations”) means how many passes the model makes over your training images. More epochs can improve performance up to a point, but too many can cause the model to overfit—getting very good on the imported images while becoming brittle on new ones. For a first model, start with the tool’s default. If you later see unstable live camera predictions, try fewer epochs or add more varied photos rather than cranking epochs higher.
Training/validation split is how the tool holds out some images for testing during training. If your tool lets you choose, use a standard split (for example, 80/20). This matters because it forces the tool to report performance on images it didn’t directly learn from. If your dataset is tiny, the split can feel “wasteful,” but it’s your early warning system for label problems and shortcuts.
Data augmentation (if offered) means the tool automatically creates variations—small rotations, crops, brightness changes—to simulate different camera conditions. Augmentation can help when you have limited data, but it cannot fix a fundamentally biased dataset (for example, all “mug” images on one background). Use it as a multiplier for diversity you already have, not as a replacement for collecting better photos.
Finally, if the tool offers multiple model sizes (fast vs. accurate), pick the one aligned with your demo goal. A lightweight model is easier to run on a phone in real time; a heavier model may score higher in the tool but lag during live testing. Your “best” setting is the one that works reliably in the environment you care about.
After training, tools typically show an accuracy number (and sometimes precision/recall). Accuracy is simply the fraction of test images the model labeled correctly. It’s useful, but it’s not the whole story—especially for small datasets and no-code workflows.
First, learn to run simple tests. Most tools let you upload a new image or turn on a live camera view and see predicted labels with a confidence score (often a percentage). Confidence is not a guarantee; it’s the model’s internal certainty given what it has learned. In practice, a model can be confidently wrong if your classes overlap or if the training data taught it a misleading shortcut.
Perfect or near-perfect accuracy can be suspicious. It often means the held-out test set was too similar to the training images (for example, duplicates or near-duplicates), or your classes are separated by an easy non-object cue (background color, lighting, a particular table). If you see 100% accuracy, immediately test with brand-new photos taken in different conditions and with the live camera. If performance drops sharply, your score was measuring similarity—not generalization.
When you see mistakes, treat them as a debugging signal, not a failure. Ask: Was the image mislabeled? Is the object too small in the frame? Is the lighting unusual? Is the background doing the work? A practical workflow is to create a small folder called “hard_examples” and save the images that break the model. Those examples become your next data-collection targets, and they help you improve systematically instead of guessing.
Many first classifiers fail in a predictable way: they confuse look-alike classes. For example, “diet soda can” vs. “regular soda can,” “red apple” vs. “red ball,” or “mug” vs. “small bowl.” This is not because the model is “bad”; it’s because the visual evidence in your training set may not contain consistent signals that separate the classes.
Use the tool’s error views if available (often called a confusion matrix or misclassification list). Look for patterns: does Class A frequently get predicted as Class B? That tells you the boundary between those classes is weak. Your fix is usually to increase the distinctive evidence in your data. For example, include angles where the handle of a mug is visible, or include close-ups of brand text if your classes differ mainly by label. If the only difference is something the camera can’t reliably capture (tiny print, subtle color shade), consider whether your class definitions are realistic.
Also watch for overlaps in labeling rules. If sometimes you label a travel mug as “mug” and sometimes as “bottle,” the model will learn a muddled concept. Decide a clear rule (“travel mugs count as mugs”) and relabel accordingly. Consistent labeling is one of the highest-leverage improvements you can make.
Finally, test with “none of the above” situations. If your tool supports a background/negative class, add examples of empty scenes or irrelevant objects. If it doesn’t, you can still observe confidence: when pointing the camera at something unrelated, the model should ideally show low confidence. If it confidently picks a class anyway, that’s a sign your classes are too broad or your training set lacks variety in backgrounds and lighting.
Once you have a model that “mostly works,” resist the urge to keep tweaking without saving. Treat models like documents: you need versions so you can compare changes and roll back when an improvement accidentally makes things worse.
Start by saving your first model as a clearly named version, such as mug-v1-2026-03-27 or fruitclassifier-v1-balanced30. Include the key detail in the name: what changed, what data size you used, or what environment you targeted. Many no-code tools let you export, publish, or share a link. Whatever the format, keep a stable copy of “v1” before you begin adding more photos or relabeling.
Keep short notes alongside each version. You want to answer, later: What classes were included? How many images per class? Any special capture conditions (kitchen light, near window)? Any known failures (confuses green apple with lime)? A simple text note or spreadsheet is enough. The purpose is not bureaucracy; it’s to make your learning repeatable and to support safe demos to others.
When you share a demo, be explicit about limitations. Tell testers what objects and conditions it was trained for, and remind them that confidence scores can be misleading outside that scope. This is part of “responsible shipping,” even for a tiny project: you’re setting expectations and preventing people from trusting the model beyond what it can do.
With a saved v1 and notes, you’re ready for the next chapter’s mindset: iteration. From here on, improvement is a cycle—collect better examples, retrain, retest, and version—until the live camera behavior matches the real-world task you care about.
1. What is the main goal of Chapter 3?
2. Why does the chapter stress that “models do not understand your intent”?
3. If banana photos were taken on a bright countertop and apple photos on a dark table, what is a likely problem?
4. According to the chapter, what is often the fastest way to improve a classifier?
5. Which set of actions best matches what you should be able to do by the end of the chapter?
Training a model is only the halfway point. The moment you point a live phone camera at the world, your neat training setup disappears: lighting shifts, backgrounds get messy, hands shake, and the object you care about might only take up a small part of the frame. This chapter is about making the jump from “it works in my dataset” to “it works in my hand.” You’ll test on truly new photos, try live camera classification, interpret confidence scores, and make practical choices like where to set a confidence threshold and what to do when nothing matches.
Think like an engineer building a small product, not just running an experiment. Your goal is a reliable demo flow: start, scan, result. That means you need repeatable testing, clear feedback to the user, and honest documentation of what works and what fails. The payoff is big: you’ll understand why image recognition is sometimes “wrong,” and you’ll gain tools to make it predictably useful.
By the end of this chapter, you should be able to demo your classifier to someone else, explain what the output means, and identify the next improvements with a clear plan.
Practice note for Test your model on new photos you didn’t train on: document your objective, define a measurable success check, and run a small experiment before scaling. Capture what changed, why it changed, and what you would test next. This discipline improves reliability and makes your learning transferable to future projects.
Practice note for Try live camera classification and interpret the output: document your objective, define a measurable success check, and run a small experiment before scaling. Capture what changed, why it changed, and what you would test next. This discipline improves reliability and makes your learning transferable to future projects.
Practice note for Choose a confidence threshold that feels reliable: document your objective, define a measurable success check, and run a small experiment before scaling. Capture what changed, why it changed, and what you would test next. This discipline improves reliability and makes your learning transferable to future projects.
Practice note for Create a simple demo flow (start, scan, result): document your objective, define a measurable success check, and run a small experiment before scaling. Capture what changed, why it changed, and what you would test next. This discipline improves reliability and makes your learning transferable to future projects.
Practice note for Document what works and what fails: document your objective, define a measurable success check, and run a small experiment before scaling. Capture what changed, why it changed, and what you would test next. This discipline improves reliability and makes your learning transferable to future projects.
Practice note for Test your model on new photos you didn’t train on: document your objective, define a measurable success check, and run a small experiment before scaling. Capture what changed, why it changed, and what you would test next. This discipline improves reliability and makes your learning transferable to future projects.
Practice note for Try live camera classification and interpret the output: document your objective, define a measurable success check, and run a small experiment before scaling. Capture what changed, why it changed, and what you would test next. This discipline improves reliability and makes your learning transferable to future projects.
Practice note for Choose a confidence threshold that feels reliable: document your objective, define a measurable success check, and run a small experiment before scaling. Capture what changed, why it changed, and what you would test next. This discipline improves reliability and makes your learning transferable to future projects.
Practice note for Create a simple demo flow (start, scan, result): document your objective, define a measurable success check, and run a small experiment before scaling. Capture what changed, why it changed, and what you would test next. This discipline improves reliability and makes your learning transferable to future projects.
“It got 95% accuracy!” sounds impressive until you realize the model was tested on images that look a lot like the training set—or worse, the same images. Real-world performance is about generalization: can the model recognize the class on photos it has never seen, taken in different places and conditions?
Start by creating a small “new photos” test set. Use the same labels as your training set, but deliberately change the conditions: different rooms, backgrounds, distances, and times of day. If you trained on a mug on a desk, test it on a mug near a sink, on a shelf, and partially occluded by your hand. These are not edge cases; they are normal phone-camera reality.
Keep your evaluation practical. Instead of chasing one number, look for patterns: which classes are confused, and under what conditions. A common mistake is to only test “nice” photos because it feels good. Don’t do that. Your test set should include imperfect shots: motion blur, glare, off-center framing, and clutter.
If your performance drops sharply on new photos, that’s not a disaster—it’s a diagnosis. It usually means your training data was too narrow: same lighting, same angle, same background. The fix will come later (more varied data, better balance), but first you need a truthful measurement that reflects how the model will be used.
Live camera classification is harder than classifying saved photos because the input is less controlled. The camera feed is a stream of frames, and each frame may differ slightly: exposure adjusts automatically, white balance shifts, and the object moves relative to the lens. Even tiny changes can push a small model into different predictions from one moment to the next.
Another major difference is framing. In a training photo, the object may fill most of the image. In a live feed, the object might be small, partially cut off, or surrounded by background. If your model was trained mostly on close-up shots, it may struggle when the object is far away. This is one reason many apps add a guide box or ask the user to center the object.
To try live classification, treat it like an engineering integration problem:
A common mistake is to assume the model is “broken” when it flickers. Often the model is reacting sensibly to noisy input. Your job is to add small system-level protections—smoothing, better framing, and a clear “scan” moment—so the output feels stable and trustworthy.
Most beginner-friendly classifiers output a list of labels with confidence scores (often interpreted as probabilities). The top label might be “apple: 0.62, banana: 0.21, orange: 0.07.” Confidence is not the same as truth; it is the model’s internal belief given what it has learned. In messy real-world scenes, confidence will often be lower than in your curated training set.
You need a confidence threshold: a cutoff above which you accept a prediction as “reliable enough.” This is not purely mathematical; it’s a product decision. If you’re building a playful demo, you can tolerate occasional mistakes and use a lower threshold. If you’re building something safety-adjacent (even a simple “allergen warning” demo), you should be stricter.
Choose your threshold by testing, not guessing. Use your new-photo set and a few live scans:
Engineering judgment means choosing the failure you can live with. In many real apps, a false accept is worse than a false reject because it confidently tells the user something incorrect. For a first phone demo, a good target is: “When it shows a label, it’s usually right,” even if it sometimes says “not sure.” That leads directly to the next section: handling unknown cases.
Your model can only choose among the labels it was trained on. In real life, the camera will see endless things outside your classes. If you force the model to always pick a label, it will confidently mislabel “unknown” objects as the nearest known class. A usable camera demo needs an explicit “unknown” behavior.
The simplest approach is threshold-based: if the top confidence score is below your cutoff, return “Unknown” (or “Not sure”). This is not perfect, but it is practical and aligns with user expectations. You can also add a second check: if the top two labels are close (e.g., 0.41 vs 0.39), treat it as uncertain even if the top is above a low threshold.
Design the “unknown” message carefully. Avoid blaming the user. Provide an action:
A common mistake is to hide uncertainty. If your interface always shows a label, people will assume it is certain. Showing “Unknown” is honest and often improves trust. It also helps you debug: if many correct items become “unknown,” your threshold may be too high or your training set may not include enough variation (angles, distances, backgrounds) for that class.
A good demo is not just the model running; it’s a user flow that makes the model’s strengths visible and its weaknesses manageable. Keep it simple: start → scan → result. Each step should tell the user what to do and what the system is doing.
Here is a practical flow that works well for beginner projects:
Feedback matters as much as accuracy. If the user understands how to improve the input, your demo feels smarter. If the user sees confidence scores, they learn that the model can be uncertain. Also consider stability: if you do continuous classification, freeze the result after a confident prediction and require a reset to scan again.
Common mistakes include overwhelming the screen with raw numbers, hiding the supported classes, and not giving the user control. Remember: you are not building a research tool; you are building a first experience that makes image recognition feel concrete and understandable.
Once your camera demo “kind of works,” the next challenge is repeatability. If you can’t reproduce behavior, you can’t improve it. A lightweight checklist turns random trial-and-error into a simple test process. Use it every time you retrain your model or change your threshold.
Build a small, repeatable routine that takes 10–15 minutes:
Document outcomes in a simple table: scenario, expected result, predicted label, confidence, pass/fail, notes. This documentation is not busywork; it becomes your roadmap for improvements. Patterns will jump out: “Fails on backlight,” “Confuses banana with yellow sponge,” “Needs closer framing.” Those notes point directly to data fixes in the next iteration—collect more varied photos, balance classes, and include tricky look-alikes as either new classes or explicit negatives.
If you can run the same checklist after each change and see measurable improvement, you’ve moved from a one-off experiment to a real, safe-to-demo system.
1. Why does a model that works well on your training dataset often perform worse when using a live phone camera?
2. What is the main purpose of testing your model on new photos you didn’t train on?
3. When running live camera classification, what should you do with the model’s confidence output?
4. What does choosing a confidence threshold help you achieve in a live demo?
5. Which approach best reflects the chapter’s recommended mindset for making a live camera classifier usable?
When your first image recognition model disappoints, it’s tempting to hunt for a “better algorithm” or a hidden advanced setting. In practice, most beginner models struggle for boring reasons: the photos don’t represent real use, labels contain mistakes, or one category dominates the dataset. This chapter is about getting accuracy gains the reliable way—by improving the data your model learns from.
Think like an engineer, not a magician. A model is a pattern-finder. If your training images don’t include the patterns you expect in the real world (different angles, lighting, backgrounds, and distances), the model can’t learn them. If one class has far more examples than others, the model learns a shortcut: “guess the most common class.” If labels are inconsistent, the model is punished for being correct and rewarded for being wrong.
Over the next sections, you’ll learn to identify the top reasons your model struggles, add the right new photos to fix specific failures, balance categories, reduce background and lighting surprises, and retrain in a disciplined way. The goal isn’t just higher numbers; it’s a model that behaves predictably when you point your phone camera at the real world.
By the end, you’ll have a repeatable workflow: test → diagnose → collect targeted photos → retrain → compare versions → keep the best run. That workflow scales to bigger projects later, even if the tool changes.
Practice note for Identify the top three reasons your model struggles: document your objective, define a measurable success check, and run a small experiment before scaling. Capture what changed, why it changed, and what you would test next. This discipline improves reliability and makes your learning transferable to future projects.
Practice note for Add the right new photos to fix specific failures: document your objective, define a measurable success check, and run a small experiment before scaling. Capture what changed, why it changed, and what you would test next. This discipline improves reliability and makes your learning transferable to future projects.
Practice note for Balance categories so one class doesn’t dominate: document your objective, define a measurable success check, and run a small experiment before scaling. Capture what changed, why it changed, and what you would test next. This discipline improves reliability and makes your learning transferable to future projects.
Practice note for Reduce background and lighting surprises: document your objective, define a measurable success check, and run a small experiment before scaling. Capture what changed, why it changed, and what you would test next. This discipline improves reliability and makes your learning transferable to future projects.
Practice note for Retrain, compare versions, and keep the best: document your objective, define a measurable success check, and run a small experiment before scaling. Capture what changed, why it changed, and what you would test next. This discipline improves reliability and makes your learning transferable to future projects.
Practice note for Identify the top three reasons your model struggles: document your objective, define a measurable success check, and run a small experiment before scaling. Capture what changed, why it changed, and what you would test next. This discipline improves reliability and makes your learning transferable to future projects.
Practice note for Add the right new photos to fix specific failures: document your objective, define a measurable success check, and run a small experiment before scaling. Capture what changed, why it changed, and what you would test next. This discipline improves reliability and makes your learning transferable to future projects.
Practice note for Balance categories so one class doesn’t dominate: document your objective, define a measurable success check, and run a small experiment before scaling. Capture what changed, why it changed, and what you would test next. This discipline improves reliability and makes your learning transferable to future projects.
If your model struggles, start by assuming the tool is fine and the inputs are not. That sounds harsh, but it’s empowering: you can fix data today, while “tweaking the model” often creates confusion and inconsistent results. A simple model with clean, representative data frequently beats a complex model trained on messy, narrow data.
A practical diagnostic habit is to keep a small “failure gallery.” Each time the model misclassifies (or gives a low confidence score), save the image and write a one-line note about what made it hard: “backlit,” “too far,” “cluttered background,” “side view,” “motion blur,” “looks like another class,” or “label might be wrong.” After 20–30 tests, patterns appear. Those patterns usually map to the top three reasons models struggle:
Before collecting more images, define your class rules in plain language. For example: “Class A is a mug with a handle visible; Class B is a cup without a handle.” If you can’t explain the difference clearly, the model can’t learn it reliably. Then check a few random training images per class and confirm they obey your rule. Fixing five wrong labels can outperform adding fifty new images.
Only after you’ve cleaned labels and clarified classes should you collect more data. And when you do, collect with intent: each new photo should answer a specific failure you observed. This is how you improve inputs before touching tools.
Two words show up constantly in model troubleshooting: underfitting and overfitting. You don’t need advanced math to use them correctly—you just need to connect them to behavior you can observe.
Underfitting means the model hasn’t learned the signal well enough. In beginner projects, it often looks like low accuracy on both training and test images, and low confidence scores even on “easy” photos. Example: you train on 15 photos per class, but the model keeps guessing randomly. The fix is usually more (and clearer) examples, better labels, and more variety in the training set so the model can detect what matters.
Overfitting means the model learned your training set too specifically and fails on new images. It may perform great on the training images (or images very similar to them) but poorly when you change the scene. Example: you trained “Apple” photos only on a wooden table, and “Banana” photos only on a white plate. The model may learn “wood texture” versus “plate color” instead of fruit shape. In live camera testing, it breaks as soon as you switch tables.
A simple way to tell which one you’re seeing is to run two tests:
Notice that the data-first fixes differ. For underfitting, add more clean examples and remove confusing classes. For overfitting, add controlled variety: same object in multiple places, with different lighting, and with different camera distances. In both cases, your next move is guided by observed behavior—not hope.
Class imbalance is one of the most common “silent killers” of accuracy. If one class has far more images than others, the model can achieve deceptively high overall accuracy by predicting the dominant class too often. In a live demo, this looks like the model stubbornly calling many things the same label.
Spotting imbalance is straightforward: count images per category and look for large gaps (for example, 200 photos of “Cat” and 40 photos of “Dog”). Many beginner tools display these counts in the dataset view. As a rule of thumb, aim for roughly similar counts across classes while you’re learning. Perfect balance isn’t required, but extreme imbalance will bias predictions.
Also watch for effective imbalance. You might have equal counts, but one class has much more visual variety. Example: “Bottle” images include many bottle types and backgrounds, but “Can” images are all the same can on the same desk. The bottle class becomes “bigger” in practice because it covers more situations.
Practical fixes:
Balance is not only about fairness—it’s about teaching the model that each class deserves attention. Once your counts and variety are comparable, your confidence scores usually become more meaningful and stable.
Real camera input is messy. People tilt phones, objects are partially blocked, rooms have mixed lighting, and backgrounds change. If your training set doesn’t include that variation, your model will be surprised—and surprised models guess.
Collect variation intentionally, one factor at a time, so you know what you’re teaching:
The goal isn’t to make the dataset chaotic. The goal is to make it representative. A good pattern is “80/20 realism”: keep most images clear and well-framed, then add a smaller set that reflects real conditions. Too many terrible images can confuse early models, but zero challenging images makes them fragile.
Watch out for “background labels.” If every photo of Class A is on your kitchen counter and every photo of Class B is on your sofa, you are training a background detector. Mix backgrounds across all classes to force the model to focus on the object.
When you reduce background and lighting surprises, you’ll see fewer sudden confidence drops in live camera testing—especially when you change rooms or time of day.
After you add basic variety, the fastest accuracy gains often come from “hard examples”—photos that are difficult but realistic. Hard examples are not random; they are targeted fixes for specific failure modes you observed during testing.
Use your failure gallery to decide what to collect next. If the model confuses two classes, collect images that sit near the boundary. Example: if “Diet Soda Can” and “Regular Soda Can” are mixed up, photograph both under the same lighting and angle so the model must learn the real difference (logo, color band, text placement) rather than “shiny vs not shiny.”
Common types of hard examples worth adding:
Add hard examples to all classes when possible. If you only add “messy background” to one class, you create a new imbalance: the model learns “messy background = Class X.” Instead, add a small batch of similar difficulty across categories.
Finally, don’t forget labels. Hard examples are where labeling mistakes are easiest to make (“Is that cup actually a mug?”). If your class rules are written down, you can label consistently. Consistency is what turns hard examples into a lesson the model can actually learn.
Improving data is iterative, so you need a way to compare versions without fooling yourself. Treat each retraining as a “run” with notes: what changed, what you expect to improve, and how you will measure it. This is how you retrain, compare versions, and keep the best—without guessing.
Start with a fixed evaluation set: a small set of images (or camera snapshots) you do not use for training. Keep it consistent across runs so improvements are real. Include both easy and realistic images: multiple rooms, angles, and distances. If your tool supports it, keep the same train/test split to make comparisons meaningful.
When you retrain, compare:
Be careful with “regressions.” It’s common to fix one problem and accidentally create another, especially if you add data unevenly. That’s why you keep the same evaluation set and track notes per run.
Choosing a winner is a product decision, not just a number. Prefer the model that is stable across environments and fails gracefully (lower confidence when unsure) over a model that is slightly higher on a narrow test but brittle in live camera use. Once you pick a winning run, archive the dataset and settings that produced it so you can reproduce it later and safely share the model with others to try.
1. Your first model performs poorly in real-world phone use. According to the chapter, what is the most reliable place to look for improvements first?
2. Why can a model fail even if it works on your training photos?
3. What is the main risk when one category dominates the dataset?
4. How do inconsistent or incorrect labels affect training?
5. Which workflow best matches the chapter’s repeatable approach to improving accuracy?
Up to now, you’ve done the hard part: you collected photos, labeled them, trained a classifier, and tested it with a live camera. This chapter turns your prototype into something you can safely show to other people and realistically use in your daily life or work. That means three things: (1) make it easy to run (share a link or export a model), (2) prove it behaves acceptably outside your training setup (final acceptance testing), and (3) use it responsibly (privacy, consent, and sensible boundaries).
A beginner mistake is to treat “it works on my desk” as the finish line. In practice, sharing a model exposes it to new lighting, different phones, cluttered backgrounds, and users who do unexpected things. Even if your tool is beginner-friendly, you still want an engineer’s mindset: define what “good enough” means, test against real scenes, and communicate limitations clearly so no one mistakes a demo for a guaranteed truth machine.
We’ll start by choosing a sharing method, then run a final reliability check, then plan a simple “camera smarter” use case. We’ll also explain the plain-language tradeoffs between running on-device versus in the cloud, and we’ll close with privacy basics and a realistic roadmap for your next learning steps.
Practice note for Export your model or create a shareable demo link: document your objective, define a measurable success check, and run a small experiment before scaling. Capture what changed, why it changed, and what you would test next. This discipline improves reliability and makes your learning transferable to future projects.
Practice note for Run a final acceptance test on real-life scenes: document your objective, define a measurable success check, and run a small experiment before scaling. Capture what changed, why it changed, and what you would test next. This discipline improves reliability and makes your learning transferable to future projects.
Practice note for Plan a simple “camera smarter” use case for your life or work: document your objective, define a measurable success check, and run a small experiment before scaling. Capture what changed, why it changed, and what you would test next. This discipline improves reliability and makes your learning transferable to future projects.
Practice note for Learn privacy basics: what to capture and what to avoid: document your objective, define a measurable success check, and run a small experiment before scaling. Capture what changed, why it changed, and what you would test next. This discipline improves reliability and makes your learning transferable to future projects.
Practice note for Create a next-steps roadmap to keep learning: document your objective, define a measurable success check, and run a small experiment before scaling. Capture what changed, why it changed, and what you would test next. This discipline improves reliability and makes your learning transferable to future projects.
Practice note for Export your model or create a shareable demo link: document your objective, define a measurable success check, and run a small experiment before scaling. Capture what changed, why it changed, and what you would test next. This discipline improves reliability and makes your learning transferable to future projects.
Practice note for Run a final acceptance test on real-life scenes: document your objective, define a measurable success check, and run a small experiment before scaling. Capture what changed, why it changed, and what you would test next. This discipline improves reliability and makes your learning transferable to future projects.
Practice note for Plan a simple “camera smarter” use case for your life or work: document your objective, define a measurable success check, and run a small experiment before scaling. Capture what changed, why it changed, and what you would test next. This discipline improves reliability and makes your learning transferable to future projects.
Practice note for Learn privacy basics: what to capture and what to avoid: document your objective, define a measurable success check, and run a small experiment before scaling. Capture what changed, why it changed, and what you would test next. This discipline improves reliability and makes your learning transferable to future projects.
Sharing is easiest when you choose a format that matches your audience. If your goal is “let a friend try it right now,” a shareable demo link is usually best. Many beginner tools can publish a simple web page that uses the camera and runs the model in the browser or through a hosted endpoint. This is great for fast feedback, but you must understand what data is sent where (more on privacy later).
If your goal is “put this into an app,” you’ll typically export a packaged model file (for example, a TensorFlow Lite or Core ML model), then embed it into a mobile project. Packaged models are also the right choice when you want offline use, predictable latency, and less risk of sending images over the network. The tradeoff is engineering effort: app integration, device testing, and versioning.
A middle path is a small web demo you host yourself. You can build a minimal page that shows the camera feed and prints the top prediction with a confidence score. When you share it, include a short “how to use” note: what classes exist, what distance/angle works best, and what the model is not meant to recognize.
Common mistake: sharing a model without sharing its assumptions. When you send a link or model file, also share the label list (class names), the intended camera distance/lighting, and an example of “good” versus “bad” input images. That context prevents misuse and reduces confusion when confidence scores fluctuate.
Before you call your project “done,” run a final acceptance test on real-life scenes, not just the training setup. Think of this as a checklist-driven walk-through: you’re trying to discover where it breaks, how it fails, and whether those failures are acceptable for your use case.
Start with a simple reliability test. Take 20–50 new photos per class (or short camera clips), captured at different times of day and in different rooms. None of these images should be in your training set. Record the model’s top prediction and confidence score. If your tool shows a confusion matrix, use it; otherwise, create a small table: actual label vs predicted label. You’re looking for patterns like “always confuses mug vs bottle” or “fails in warm indoor lighting.”
Then test edge cases: far away vs close up, partial occlusion (object partly hidden), messy backgrounds, motion blur, reflections, and unusual orientations. Also test “negative” scenes: point the camera at something that is not any of your classes. Many beginner classifiers will still pick one of the known classes with moderate confidence. Your acceptance rule might be: “If confidence is below 0.75, show ‘Not sure’ and do nothing.” That single threshold can prevent embarrassing demos.
Engineering judgment matters here. If you find errors caused by imbalance (one class has far more images), fix the dataset and retrain. If you find errors caused by ambiguous labels (two classes overlap), redefine classes or add a “misc/other” class. The goal is not perfection; it’s predictable behavior and clear boundaries that make your demo safe and useful.
Image recognition becomes motivating when it solves a small, personal problem. Choose a use case where mistakes are low-risk and the benefit is convenience, not safety-critical decisions. The simplest “camera smarter” projects usually fall into three categories: sorting, reminders, and lightweight assistance.
Sorting projects use the camera to categorize items you already control. Examples: identify recyclable vs trash items for a quick reminder; sort office supplies into “stapler / tape / scissors”; or classify LEGO bins by color group. For these, your acceptance rule can be strict: if confidence is low, ask the user to reframe the object.
Reminders projects detect a trigger object and then display a prompt. Example: recognize your lunch box and remind you to pack utensils; recognize a plant pot and remind you to water; recognize a gym bag and remind you to bring a water bottle. These are great because the output is a suggestion, not an irreversible action.
Simple assistance can mean “help me find the right thing,” like identifying which cleaning spray is which, or distinguishing similar containers. Keep the scope narrow: 3–6 classes is often enough. More classes increases confusion unless you significantly improve your dataset.
Common mistake: starting with a “big” goal like recognizing hundreds of objects. You’ll learn faster by shipping one small use case with tight boundaries. Once it’s reliable, expand gradually by adding one class at a time and retesting.
When you deploy image recognition, you must decide where the model runs: on the phone (on-device) or on a server (cloud). In plain language: on-device means the image stays on the phone and the phone does the computation; cloud means the phone sends the image (or features) to a server that runs the model and returns the result.
On-device advantages: faster response when network is weak, works offline, and can be better for privacy because images never have to leave the device. It also reduces ongoing server cost. The limitations are phone performance, model size, and battery usage. For beginners, this is often ideal for small classifiers with a few classes.
Cloud advantages: you can run larger models, update the model without updating an app, and centralize logging for debugging (for example, counting how often the model is unsure). The limitations are latency, network dependency, and higher privacy risk because images may be transmitted and stored. Cloud also introduces operational responsibilities: authentication, rate limits, and securing user data.
Beginner deployment tip: whichever route you choose, document the data flow. A one-paragraph “What happens to the image?” note builds trust and forces you to think clearly about where sensitive data might leak.
Image recognition projects feel harmless until you remember what cameras capture: faces, addresses on mail, license plates, screens with notifications, family photos in the background, and location clues. Responsible use starts during data collection. Capture only what you need for your classes, and avoid collecting personal information by accident.
Use these beginner rules. First, get consent from anyone who might be identifiable in your dataset, and avoid photographing bystanders in public spaces. Second, avoid sensitive contexts: schools, medical environments, and private documents. Third, treat your dataset like personal data: store it securely, don’t post it publicly, and delete images you no longer need. If you use a hosted training tool, read its basic privacy notes: does it upload your images, and how long are they stored?
Also think about your demo behavior. If your app shows a live camera feed, warn users before recording or saving anything. Prefer designs that do not store frames at all—just compute predictions and discard the image. If you do log mistakes for improvement, store the minimum necessary (for example, store a cropped object region, blur backgrounds, or store only anonymized metadata like “confidence was low under warm light”).
Common mistake: accidentally training on background cues that include personal information (like a roommate’s photo on the wall). Even if you never meant to “recognize people,” the model can learn correlations you didn’t intend. Keeping backgrounds simple and reviewing images before training prevents that.
Once your classifier is shared and tested, your next steps should improve capability without losing reliability. A practical roadmap is: expand slowly, increase dataset quality, and then upgrade the model type when your use case demands it.
First, add more classes carefully. Add one new class at a time, then retrain and re-run your acceptance test. When accuracy drops, diagnose: are classes visually similar, or is the new class underrepresented? You’ll often need more images per class than you think, especially in varied lighting and backgrounds.
Second, build better datasets. Improve diversity (angles, distances, clutter), but keep labels consistent. Consider a simple dataset “spec”: how many images per class, required lighting conditions, and examples of what should be excluded. This turns data collection from a random activity into a repeatable process.
Third, move from classification to object detection when you need to locate items in the scene, not just name the whole frame. Classification answers “What is this image mostly?” Detection answers “Where is each object, and what is it?” That enables features like drawing boxes around items, counting objects, or recognizing multiple objects at once.
Your goal after this course is not just a model—it’s a repeatable workflow. If you can collect clean data, test honestly in real scenes, deploy in a way that matches your privacy needs, and iterate carefully, you’ve learned the core skill behind making a phone camera “smarter” in the real world.
1. According to Chapter 6, what are the three main things needed to turn a prototype into something you can safely share and realistically use?
2. Why does Chapter 6 warn that “it works on my desk” is not the finish line?
3. What is the purpose of a final acceptance test as described in Chapter 6?
4. Which best reflects the “engineer’s mindset” Chapter 6 recommends when sharing a beginner-friendly image recognition tool?
5. Which sequence matches the chapter’s recommended flow for wrapping up and moving forward?
- Learning Evolved.
- Intelligence Amplified.


