AI Robotics & Autonomous Systems — Beginner
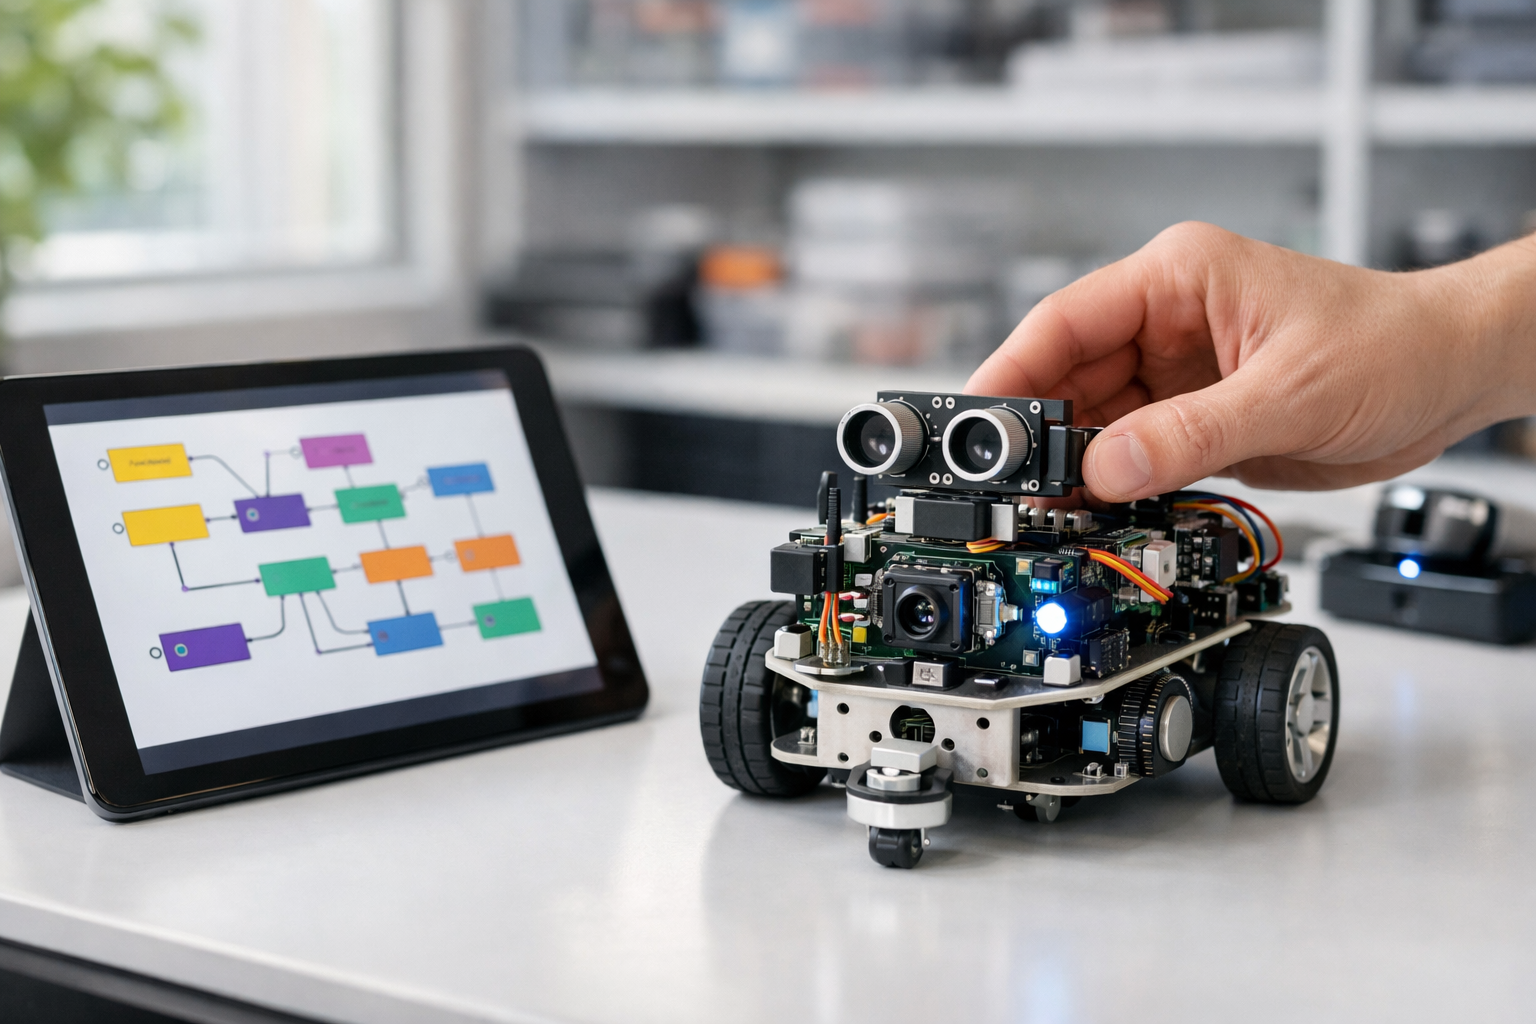
Design robot “brains” with drag-and-drop logic—no code required.
This course is a short, beginner-friendly technical book disguised as a hands-on course. You will learn how to create smart robot behaviors using visual tools—drag-and-drop blocks, simple rules, and ready-made AI features. If you’ve never coded, never studied AI, and have no robotics background, you’re in the right place.
Instead of starting with math or programming, we start with the most important idea in robotics: a robot repeats a loop—sense → decide → act. Once you understand that loop, you can build surprisingly capable behaviors with visual logic.
Across six chapters, you will assemble a complete “robot mission” workflow. You’ll start with basic triggers and actions, then add sensor-based decisions, then organize everything into clean states (like Idle, Explore, Avoid, and Dock). Finally, you’ll connect a no-code AI block—such as a simple object detection or classification output—to drive real behavior changes.
The course stays tool-agnostic on purpose: you’ll learn patterns that apply to most visual robotics builders and no-code autonomy platforms. Each chapter reads like a short book chapter with milestones that guide you from “I’m not sure what a sensor output is” to “I can build a stable behavior flow and explain why it’s safe.”
You can follow along using a simulator or a beginner robot kit. Either way, you’ll practice safe setup, slow testing, and clear observation—habits that matter more than fancy features when you’re starting out.
This course is for absolute beginners: students, career switchers, operations teams, and public-sector learners who need a practical introduction to AI robotics without a programming barrier. If you can use a web browser and follow step-by-step instructions, you can succeed here.
Robots move in the real world, so safety is not optional. You’ll learn beginner-friendly safety patterns: speed limits, stop rules, time-outs, and fail-safe defaults. You’ll also learn basic privacy and consent considerations when cameras or AI perception are involved.
When you’re ready, Register free and begin Chapter 1. Or, if you want to compare learning paths first, you can browse all courses.
By the end, you’ll have a complete no-code robot behavior workflow you can demo, explain, and reuse as a foundation for more advanced autonomy later.
Robotics Product Designer and Autonomous Systems Educator
Sofia Chen designs beginner-friendly robotics workflows that turn real-world tasks into clear visual logic. She has helped teams prototype safe autonomous behaviors using no-code tools, sensor rules, and simple testing methods.
A robot is not “a program on wheels.” It is a complete loop that touches the physical world: it senses what’s happening, decides what to do next, and then acts through motors, lights, and sound. In this course, you will build that loop without writing traditional code—by connecting visual blocks that represent events, rules, timers, and actions. The goal is practical: create robot behaviors that are understandable, testable, and safe.
This chapter sets the foundation. You will learn how to describe robot behavior in plain language, then translate it into a visual workflow. You will also learn why beginner robot projects often fail (not because the logic is “wrong,” but because it ignores sensors, timing, and safety). By the end, you will complete a first “Hello Robot” workflow and run it carefully: stop first, then move.
Keep one idea in mind: a good robot behavior is not a clever trick—it is a reliable routine that handles normal conditions, edge cases, and recovery. That reliability comes from a clear mental model of inputs, decisions, and outputs, plus disciplined observation when you test.
Practice note for Milestone: Understand the robot loop (sense → decide → act): document your objective, define a measurable success check, and run a small experiment before scaling. Capture what changed, why it changed, and what you would test next. This discipline improves reliability and makes your learning transferable to future projects.
Practice note for Milestone: Identify inputs (sensors) and outputs (motors, lights, sound): document your objective, define a measurable success check, and run a small experiment before scaling. Capture what changed, why it changed, and what you would test next. This discipline improves reliability and makes your learning transferable to future projects.
Practice note for Milestone: Map a real task into a simple behavior checklist: document your objective, define a measurable success check, and run a small experiment before scaling. Capture what changed, why it changed, and what you would test next. This discipline improves reliability and makes your learning transferable to future projects.
Practice note for Milestone: Build your first visual “Hello Robot” workflow: document your objective, define a measurable success check, and run a small experiment before scaling. Capture what changed, why it changed, and what you would test next. This discipline improves reliability and makes your learning transferable to future projects.
Practice note for Milestone: Run and observe a behavior safely (stop first, then move): document your objective, define a measurable success check, and run a small experiment before scaling. Capture what changed, why it changed, and what you would test next. This discipline improves reliability and makes your learning transferable to future projects.
A robot is a system that can perceive its environment, make decisions, and take physical actions—autonomously or semi-autonomously. A phone app can “decide,” but it cannot push a door open. A remote-control car can “act,” but it does not decide. A robot connects both: sensing plus acting, joined by some decision logic.
In practice, you’ll interact with three categories of parts. Sensors provide inputs: distance sensors to avoid collisions, cameras to detect objects, and IMUs (inertial measurement units) to estimate tilt and motion. Compute runs the behavior: your visual workflow and any embedded AI models (for detection or classification). Actuators produce outputs: wheel motors, arm servos, LEDs, speakers, or a gripper.
Beginners often focus on the “cool output” first—making the robot move—while ignoring what makes it a robot: feedback from sensors. That leads to brittle demos that work once and fail in a new room or lighting condition. A better mindset is: “What evidence will the robot use to choose the next action?” Even a simple behavior like “drive forward” is safer and more robot-like when it includes “unless the distance sensor reports something close.”
This chapter’s milestones start here: you’ll identify inputs and outputs clearly, then use them to build your first behavior flow.
Hardware gives your robot capabilities; behavior logic decides when and how to use them. Two robots can share the same motors and sensors but behave completely differently. Your no-code tools control the “when/if/how long/how fast” layer: the policy that turns readings into actions.
Think in terms of inputs and outputs. Inputs are sensor values and events: “distance = 18 cm,” “camera sees a person,” “tilt exceeded,” “button pressed,” “timer elapsed.” Outputs are commands: “set left motor speed,” “stop motors,” “set LED red,” “play beep,” “return to home.” The visual workflow is the bridge between them.
Engineering judgment matters because hardware is never perfect. A distance sensor might fluctuate by a few centimeters, a camera detector might miss a frame, and wheel motors might not move identically. If your logic treats every reading as absolute truth, the robot will twitch, oscillate, or behave unpredictably. A simple fix is to use thresholds with margins (e.g., stop at 25 cm, resume at 35 cm) or timers (e.g., require the condition to be true for 200 ms). These are behavior-level tools, not hardware changes.
Common mistake: wiring actions directly to raw sensor values. For example, “if distance < 30 cm then stop else go” without a stability rule can cause rapid stop-go flicker when the distance hovers around 30 cm. Better: add hysteresis, a brief confirmation timer, or a state that holds “stopped” until a clearer condition is met.
This section supports the milestone of identifying inputs and outputs: list what the robot can sense and what it can do, then decide what logic must sit between them.
Nearly every robot runs a repeating loop: sense → decide → act. “Sense” means sampling the world (sensor readings, button presses, camera frames). “Decide” means selecting the next action based on rules, priorities, and the robot’s current state. “Act” means sending commands to motors and other outputs. Then the loop repeats, often many times per second.
Why does the loop matter in no-code tools? Because visual programming can hide timing. You might connect blocks and assume decisions are instant and continuous, but real robots have update rates and delays. A camera detector may update at 10–30 Hz, a distance sensor at 20–50 Hz, and motor controllers at higher rates. Your workflow must handle stale data and decide what happens between updates.
Start with a plain-language loop you can say out loud: “Every 100 ms, read distance. If it’s too close, stop. Otherwise drive forward.” This already contains key design choices: sampling interval, threshold, and a default action. Add AI carefully: “Every new camera detection, if a person is detected, slow down and turn toward them.” AI outputs should be treated as inputs to your decision step, not as direct motor commands.
A practical way to structure decisions is to define priorities: safety first (stop), then mission behavior (patrol or follow), then cosmetics (LED effects). When conditions conflict, priorities prevent surprising behavior. For example, “follow a person” must be overridden by “stop if obstacle detected.”
This is your first milestone: understand the robot loop. Everything else in the course—states, timers, triggers, AI blocks—fits into this repeating structure.
No-code robotics tools typically offer a canvas with blocks or nodes connected by lines. Although the UI varies, most systems share the same building blocks: triggers, rules/conditions, timers, actions, and often state or mode blocks.
Triggers start a flow: “on start,” “on button press,” “on new sensor reading,” “on detection event.” Rules branch the flow: “if distance < 25 cm,” “if class == ‘person’,” “if tilt > threshold.” Timers create rhythm and stability: “every 100 ms,” “wait 0.5 s,” “if condition true for 200 ms.” Actions command the robot: motor speeds, stop, LED color, play sound, set a variable, or switch state.
Your first visual “Hello Robot” workflow should be intentionally small. Example structure: Trigger: On Start → Action: Set LED to blue → Timer: Wait 1 second → Action: Play beep → Action: Stop motors. Notice that it already includes a safety-friendly output (stop) even before motion. This makes your testing routine disciplined: you confirm the workflow runs, that you can observe it (LED/beep), and that stopping is reachable.
Common mistakes when connecting blocks: (1) creating multiple paths that command motors differently at the same time, (2) forgetting to add an “else” path so the robot keeps the last command forever, and (3) relying on a single trigger without a repeating timer when you actually need continuous updates.
Practical outcome: you’ll be able to look at a behavior canvas and answer, “What triggers it? What sensor values does it depend on? What does it command? How often does it update?” That is the foundation for debugging later with logs and checklists.
Robotics feels complex until you translate a task into a checklist. Before touching the canvas, write the behavior as steps and conditions in plain language. This is the milestone: map a real task into a simple behavior checklist, then implement it as a flow.
Example task: “Patrol a room safely.” A beginner-friendly checklist might be: (1) Start in Patrol state. (2) Drive forward slowly. (3) If distance sensor reads close, stop and turn away for one second. (4) If battery low (or a “return” button pressed), switch to Return-to-home state. (5) In Return-to-home, follow a beacon/marker (or a pre-set heading), and stop when home condition is met.
This is where state-based behaviors become natural. Instead of one giant rule tree, you define modes like Patrol, Follow, Stop, and Return. Each state has its own flow, and transitions happen on clear triggers (obstacle detected, target detected, timer elapsed). States reduce bugs because you limit which actions are allowed in each mode. For example, in Stop state, the only motor command should be “stop,” regardless of what the camera sees.
AI fits the same pattern. A ready-made detection/classification model provides a label and confidence (e.g., “person, 0.82”). In your checklist, treat that as an input: “If person detected with confidence > 0.7 for 3 consecutive frames, transition to Follow.” This avoids reacting to one noisy frame and makes the behavior feel intentional.
Practical outcome: you will be able to take any new task—“follow me,” “stop at edges,” “return when lost”—and express it as a flow that a no-code tool can implement.
Robots fail in physical ways: they fall off tables, scrape walls, pinch fingers, or run into ankles. A safety mindset is not optional—it is part of correct engineering. Your first successful run is not “it moved.” It is “I could stop it instantly, and I learned something from observing it.” That is why this chapter ends with the milestone: run and observe a behavior safely (stop first, then move).
Set up a safe space: clear a test area, remove loose cables, keep pets and people away, and avoid elevated surfaces. Use wheel chocks or a stand for early tests if available. Start with slow mode: reduce motor speeds and accelerations so the robot has time to sense and you have time to react.
Build a stop-first routine into every workflow. Include at least one of these: an emergency-stop button on the UI, a physical button mapped to “Stop motors,” or a “dead-man switch” behavior (robot only moves while a button is held). In visual logic, make “Stop” a high-priority path that overrides other actions. If your tool supports it, centralize motor commands so only one block (or one state) owns motor output at a time.
Common beginner mistake: testing movement before confirming observability. Add simple observability signals: LED changes per state (e.g., Patrol=green, Follow=blue, Stop=red), short beeps on transitions, and a basic log panel showing sensor values and current state. When something goes wrong, you want evidence: “distance dropped below threshold,” “state changed to Stop,” “motor command set to 0.”
Practical outcome: you will be able to run your “Hello Robot” workflow safely—confirm stop behavior first, then enable movement—while watching sensor readings and state indicators to understand what the robot thinks is happening.
1. Which description best matches the chapter’s definition of a robot?
2. In the robot loop, what is the role of sensors and outputs?
3. According to the chapter, why do beginner robot projects often fail even when the logic seems correct?
4. What is the purpose of mapping a real task into a simple behavior checklist before building a workflow?
5. What testing habit does the chapter recommend for running and observing a behavior safely?
No-code robot programming works because most robot behaviors are built from a small set of repeatable building blocks. Whether your platform is a mobile rover, a small arm, or a wheeled classroom bot, the pattern is the same: something happens (a trigger), the robot evaluates the situation (conditions), then it does something (actions). In this chapter you will assemble those blocks into behavior flows you can read like a diagram, debug like a checklist, and reuse like a template.
Think in terms of “behavior loops.” A safe robot continuously senses (distance sensor, camera, IMU), decides (rules and thresholds), and acts (drive, stop, turn, signal). Visual editors make this loop explicit: blocks connect left-to-right or top-to-bottom, and the wiring shows what must be true before an action can run. Your milestones here are to start behaviors from time, buttons, and sensor events; add if/else decisions; control movement and signals; shape motion with timers; and finally combine everything into a stable routine that doesn’t jitter, lock up, or surprise you.
Two engineering habits will pay off immediately. First, treat safety as a default: obstacle avoidance and emergency stop should override everything else. Second, prefer stable, repeatable flows over clever but fragile ones: a simple threshold with a little hysteresis and timing is often better than a complex chain of rules that behaves differently every run.
Practice note for Milestone: Create triggers from time, buttons, and sensor events: document your objective, define a measurable success check, and run a small experiment before scaling. Capture what changed, why it changed, and what you would test next. This discipline improves reliability and makes your learning transferable to future projects.
Practice note for Milestone: Add decisions with if/else rules and thresholds: document your objective, define a measurable success check, and run a small experiment before scaling. Capture what changed, why it changed, and what you would test next. This discipline improves reliability and makes your learning transferable to future projects.
Practice note for Milestone: Control actions (move, stop, turn, signals): document your objective, define a measurable success check, and run a small experiment before scaling. Capture what changed, why it changed, and what you would test next. This discipline improves reliability and makes your learning transferable to future projects.
Practice note for Milestone: Use timers and delays to shape motion: document your objective, define a measurable success check, and run a small experiment before scaling. Capture what changed, why it changed, and what you would test next. This discipline improves reliability and makes your learning transferable to future projects.
Practice note for Milestone: Combine blocks into a stable, repeatable routine: document your objective, define a measurable success check, and run a small experiment before scaling. Capture what changed, why it changed, and what you would test next. This discipline improves reliability and makes your learning transferable to future projects.
Practice note for Milestone: Create triggers from time, buttons, and sensor events: document your objective, define a measurable success check, and run a small experiment before scaling. Capture what changed, why it changed, and what you would test next. This discipline improves reliability and makes your learning transferable to future projects.
Practice note for Milestone: Add decisions with if/else rules and thresholds: document your objective, define a measurable success check, and run a small experiment before scaling. Capture what changed, why it changed, and what you would test next. This discipline improves reliability and makes your learning transferable to future projects.
Practice note for Milestone: Control actions (move, stop, turn, signals): document your objective, define a measurable success check, and run a small experiment before scaling. Capture what changed, why it changed, and what you would test next. This discipline improves reliability and makes your learning transferable to future projects.
Practice note for Milestone: Use timers and delays to shape motion: document your objective, define a measurable success check, and run a small experiment before scaling. Capture what changed, why it changed, and what you would test next. This discipline improves reliability and makes your learning transferable to future projects.
A trigger is the entry point into a behavior flow. In visual programming tools, triggers usually appear as special “hat” blocks or event blocks: On button pressed, On start, Every 100 ms, When distance < X, or When object detected. Your first milestone—creating triggers from time, buttons, and sensor events—is about choosing the right kind of start signal for the job.
Use button triggers for explicit operator intent. For example, “Start Patrol” should not begin because a sensor briefly flickered; it should begin because a human pressed a button or a UI toggle. Use time triggers for periodic work like reading sensors, updating a state, and publishing logs. Use sensor event triggers when the sensor itself is designed to publish reliable events (e.g., “bumper pressed”).
Common mistake: using too many sensor event triggers for continuous sensors (distance, camera confidence, IMU angle). These signals are noisy and can fire rapidly, causing multiple copies of the same behavior to run or to interrupt itself. A safer pattern is: one periodic trigger (a control tick) that reads the latest sensor values and makes decisions once per cycle.
Practical outcome: by the end of this section, you should be able to start a behavior from a button, run a repeated loop from a timer, and still reserve a high-priority safety trigger (like bumper or “E-stop pressed”) that always wins.
Conditions are the “if/else” blocks of robotics: if obstacle is close, then stop; else keep moving. Your second milestone—adding decisions with if/else rules and thresholds—is where robot behavior becomes meaningful. In practice, most no-code robot logic is a combination of comparisons (greater/less than), boolean checks (true/false), and simple state comparisons (mode == PATROL).
Thresholds deserve engineering judgement. A distance threshold of 20 cm might be safe at slow speed, but unsafe at high speed. Tie thresholds to motion: faster movement needs earlier stopping. For camera detections, treat confidence like a threshold too: “person_detected if confidence > 0.6.” If your model is jittery, raise the confidence, require detection for N frames, or add a time-based hold (covered later).
IMU-based conditions are often used for stability: “if tilt angle > 15°, stop and alert.” This prevents drive commands that would cause a tip-over. Combine sensors cautiously: if distance < stop_dist OR bumper pressed → stop is a good safety rule. if camera sees target AND distance is safe → follow is a more advanced rule that relies on two sensors being healthy.
Practical outcome: you can express behaviors like “follow unless too close,” “patrol until obstacle,” and “return-to-home when battery low,” using readable if/else blocks that map directly to your intent.
Actions are the blocks that change the world: drive forward, set wheel speeds, turn to heading, stop motors, blink an LED, play a beep, or publish a message. Your third milestone—controlling actions (move, stop, turn, signals)—is where you learn to treat actuation as both capability and liability. Robots don’t just “do” things; they continue doing them until you command otherwise or until an internal controller finishes.
Prefer high-level actions when available (e.g., “Drive forward at 0.2 m/s” or “Turn 90°”) because they are easier to reason about and often include built-in smoothing. Use low-level actions (set left/right motor power) when you need precise control, but remember you are then responsible for stability (no oscillations, no runaway).
Always include explicit stop actions in at least two places: (1) a safety override path (obstacle/bumper/tilt) and (2) an “end of routine” or “mode exit” path. A frequent bug in visual workflows is a flow that never sends a stop command on exit, so the robot keeps rolling on the last motor command.
Practical outcome: you can build a controlled motion sequence (move → turn → move), and you can clearly communicate internal state with signals so a human can see what the robot thinks it is doing.
Variables turn reactive behaviors into state-based behaviors. Without memory, a robot can only respond to the current sensor reading; with memory, it can implement “patrol,” “follow,” “stop,” and “return-to-home” as distinct modes. In visual tools, variables are often simple: numbers, booleans, and small enums (strings like PATROL/FOLLOW/STOP).
Start with a mode variable. A button trigger can set mode = PATROL, another can set mode = STOP. Your timer tick reads sensors and then chooses actions based on mode. This is more stable than starting multiple independent flows for each behavior.
Next add “remembering” variables: last_seen_time (when the camera last detected the target), home_heading (IMU heading captured at start), or obstacle_latched (a boolean that stays true for a short time after an obstacle was detected). These let you smooth over brief sensor dropouts. For example: if a person detector loses the target for 0.2 seconds due to motion blur, you don’t want the robot to instantly switch from FOLLOW to SEARCH; you want a small grace period.
Practical outcome: you can implement a clear state machine: PATROL (wander safely), FOLLOW (track target), STOP (halt and signal), RETURN_HOME (turn to home heading and drive cautiously), with smooth transitions based on remembered facts.
Timers are the difference between a robot that feels calm and one that jitters. Your fourth milestone—using timers and delays to shape motion—focuses on choosing update rates and adding deliberate timing to decisions. In robotics, “how often” you decide is as important as “what” you decide.
Use a periodic control tick (e.g., every 50–200 ms) as the heart of your behavior. Too fast and you can amplify sensor noise or overload the system; too slow and the robot reacts late. Distance sensors might be read at 10–20 Hz, camera detections at the model’s frame rate, and IMU readings faster—but your decision logic can still run at a steady, human-auditable rate.
Add delays carefully. A delay block that freezes the entire flow can prevent safety logic from running. Prefer non-blocking timers: set a timestamp variable (turn_end_time = now + 800 ms) and, on each tick, check whether now has passed. This keeps safety checks alive while a maneuver is in progress.
Practical outcome: your robot’s motion becomes repeatable: turns last the same duration, follow behavior doesn’t stutter, and safety checks still execute even while time-based maneuvers are underway.
Your final milestone—combining blocks into a stable, repeatable routine—depends on wiring patterns that scale. A messy visual program is hard to debug because you can’t tell what runs first, what overrides what, and which blocks are “always on.” Clean wiring is not cosmetic; it is reliability.
A strong default pattern is a single main loop plus priority overrides. The main loop (timer tick) reads sensors, updates variables, and then selects actions based on mode. Priority overrides (like bumper pressed, tilt too high, battery critical) sit at the top and immediately force mode = STOP and motors = STOP. This prevents conflicting action writers and makes safety explicit.
Group related logic into labeled regions or subflows: Sensing (read distance/camera/IMU), Decision (if/else and mode transitions), Actuation (motor commands and signals), Logging (print current mode, key sensor values). Logging is your no-code debugger: if the robot behaves oddly, you want to see “mode=FOLLOW, dist=18cm, target_conf=0.72” at the moment it chose to stop.
Practical outcome: you can build a routine like “Start patrol on button → roam with obstacle avoidance → switch to follow when a target is detected → stop if too close or tilted → return-to-home when commanded,” and you can debug it with structured logs and a readable visual layout.
1. In the chapter’s “behavior loop,” what is the correct order of the main building blocks?
2. Which set of items best matches the chapter’s three categories of behavior-building blocks?
3. Why do visual block editors help you build reliable robot behaviors, according to the chapter?
4. What does the chapter recommend as the default priority when combining blocks into a routine?
5. To avoid routines that jitter, lock up, or behave unpredictably, what approach does the chapter prefer?
Robots feel “smart” when their actions look intentional: slowing down near a wall, turning smoothly around a chair, stopping when a person steps in front, or returning home when they’ve lost what they were following. In a no-code robotics tool, you create that intent by turning raw sensor signals into clear decisions. This chapter makes sensors practical: what they output, how to set safety thresholds, how to avoid obstacles without jitter, how to use an IMU to keep direction stable, how to treat camera input as a simple event (“seen / not seen”), and how to validate sensors before you trust them.
Think in a three-step loop: sense → decide → act. Sensing gives you numbers (like distance), states (like “tilted”), or events (like “person detected”). Deciding is your visual flow: triggers, rules, timers, and state transitions. Acting is what the robot does: drive, turn, stop, speak, flash a light, or switch behaviors. The main engineering judgment is choosing what counts as real—because sensors are noisy, delayed, and sometimes wrong. Your job isn’t to eliminate uncertainty; it’s to build behavior that stays safe and understandable even when inputs wobble.
We’ll build the chapter milestones as we go: read distance sensor data and set safe thresholds; build obstacle-avoid with smooth turning; use IMU/gyro concepts to keep direction stable; add camera input as an event; and finish by calibrating and validating with quick tests. If you can do those, you can build robust state-based behaviors like patrol, follow, stop, and return-to-home.
Practice note for Milestone: Read distance sensor data and set safe thresholds: document your objective, define a measurable success check, and run a small experiment before scaling. Capture what changed, why it changed, and what you would test next. This discipline improves reliability and makes your learning transferable to future projects.
Practice note for Milestone: Build obstacle-avoid behavior with smooth turning: document your objective, define a measurable success check, and run a small experiment before scaling. Capture what changed, why it changed, and what you would test next. This discipline improves reliability and makes your learning transferable to future projects.
Practice note for Milestone: Use IMU/gyro concepts to keep direction stable: document your objective, define a measurable success check, and run a small experiment before scaling. Capture what changed, why it changed, and what you would test next. This discipline improves reliability and makes your learning transferable to future projects.
Practice note for Milestone: Add camera input as an event (seen/not seen): document your objective, define a measurable success check, and run a small experiment before scaling. Capture what changed, why it changed, and what you would test next. This discipline improves reliability and makes your learning transferable to future projects.
Practice note for Milestone: Calibrate and validate sensors with quick tests: document your objective, define a measurable success check, and run a small experiment before scaling. Capture what changed, why it changed, and what you would test next. This discipline improves reliability and makes your learning transferable to future projects.
Practice note for Milestone: Read distance sensor data and set safe thresholds: document your objective, define a measurable success check, and run a small experiment before scaling. Capture what changed, why it changed, and what you would test next. This discipline improves reliability and makes your learning transferable to future projects.
Practice note for Milestone: Build obstacle-avoid behavior with smooth turning: document your objective, define a measurable success check, and run a small experiment before scaling. Capture what changed, why it changed, and what you would test next. This discipline improves reliability and makes your learning transferable to future projects.
Practice note for Milestone: Use IMU/gyro concepts to keep direction stable: document your objective, define a measurable success check, and run a small experiment before scaling. Capture what changed, why it changed, and what you would test next. This discipline improves reliability and makes your learning transferable to future projects.
In robotics, “sensor data” is not automatically useful. A sensor outputs a signal; your workflow turns that signal into a decision. In no-code tools, it helps to classify sensor outputs into three practical types: numbers, states, and events.
Numbers are continuous values, typically updated many times per second: distance in centimeters, yaw angle in degrees, wheel speed, battery voltage, or confidence scores from a model. Numbers are powerful, but they require interpretation: choosing thresholds, converting units, and handling noise.
States are already simplified labels derived from numbers, often by the platform or by your own rules: “too close,” “tilted,” “moving,” “target locked.” States are great for behavior flows because they reduce decision complexity. For example, your patrol state might only care whether “front is clear” is true or false.
Events are moments in time: “object detected,” “button pressed,” “line lost,” “timer elapsed.” Events are ideal as triggers in visual blocks. A common no-code pattern is: Event triggers a state change, then rules inside that state control motion.
A frequent mistake is mixing these categories accidentally. For example, treating a noisy number like a reliable event (“distance dropped below 40 cm once, so I’m definitely about to crash”). Instead, convert numbers into states with hysteresis or smoothing (you’ll do this in Sections 3.5 and 3.6), then use state changes as your “events.” That single design habit makes your robot feel calm rather than nervous.
Your first safety sensor is usually a distance sensor (ultrasonic, IR time-of-flight, LiDAR, or a depth module). The milestone here is simple and important: read distance values and set safe thresholds. “Safe” is not one number; it’s a small policy that matches speed, stopping distance, and the robot’s size.
Start by defining two thresholds rather than one:
This creates a buffer so the robot doesn’t oscillate between “go” and “stop.” In a visual flow, you might have a periodic trigger (every 50–100 ms) that reads DistanceFront. Then rules set states: FrontClear, FrontCaution, FrontBlocked. Actions depend on state: drive at full speed when clear, drive slow when caution, and stop/turn when blocked.
Now build the milestone behavior: obstacle-avoid with smooth turning. Smooth turning is about avoiding “bang-bang” control (hard left, hard right). In no-code terms, instead of setting turn = 0 then suddenly turn = 1, you apply a gentle ramp or a short timed turn with re-checks. A practical pattern is:
Engineering judgment: pick thresholds based on your robot’s momentum. A heavier platform at higher speed needs larger StopDistance. Also consider the sensor’s blind zone (some ultrasonic sensors are unreliable very close) and field of view (a narrow sensor can miss chair legs). A common mistake is placing the distance sensor too high or too low, so it “sees” table edges but misses low obstacles, or vice versa. Your behavior can only be as safe as what the sensor actually covers.
Practical outcome: with two thresholds and a timed turning loop, you get a robot that slows down early, doesn’t jerk, and reliably escapes simple dead-ends—without writing code.
An IMU (Inertial Measurement Unit) typically combines a gyroscope (rotation rate), accelerometer (linear acceleration and gravity direction), and sometimes a magnetometer (compass). For no-code behaviors, you don’t need deep math; you need the right mental model: gyro helps you keep direction stable, and accelerometer helps you detect tilt or bumps.
Heading stability milestone: use gyro/yaw to keep a straight line during patrol or follow. Without IMU correction, small motor differences cause drift. In a visual flow, create a “HoldHeading” variable when you enter a state like PatrolForward:
In no-code tools, this often appears as a “steering bias” block: base speed stays constant, while turn value is proportional to the error. Keep it gentle. Over-correction is a classic mistake: large corrections make the robot weave. Start with small adjustments and increase only if it still drifts.
Tilt awareness: accelerometer-derived pitch/roll can prevent risky behavior. For example, if Tilt > 15° for more than 200 ms, you can stop and switch to a “Recover” state (back up slowly, then stop). This is especially useful on ramps, thick carpets, or when a wheel gets stuck.
Important limitation: yaw from gyro drifts over time. That’s normal. For short behaviors (seconds to a minute), it’s usually fine. For long-term navigation (return-to-home over a long session), you’ll combine IMU with other cues (wheel odometry, landmarks, beacons, or camera-based features). The practical takeaway is to use IMU for stability, not absolute truth.
A camera is a rich sensor, but beginners get stuck thinking they must process images manually. In a no-code AI robotics workflow, you typically convert camera frames into simple outputs using ready-made models: detections (“person”), classifications (“red ball”), or tracking (“target center x”). The milestone here is to add camera input as an event (seen/not seen) and use it to drive behavior.
Start by choosing a single concept your model can reliably detect in your environment, such as “person,” “marker,” or “box.” Configure the model block to output:
Then wire it into a state machine. Example: a simple “Follow” behavior can be built without continuous image reasoning:
Common mistake: reacting to single-frame detections. Cameras drop frames, lighting changes, and models occasionally flicker. Use a short persistence timer (“Seen for 200 ms”) before switching states, and a slightly longer timeout before declaring NotSeen (“missing for 1 second”). This turns unreliable frame-by-frame output into stable events that your robot can trust.
Practical outcome: you treat the camera like a high-level sensor that produces decisions-ready signals. That’s where no-code AI shines: you focus on behavior design, not pixel math.
Real sensors jitter. Distance readings bounce, yaw drifts, and camera detections flicker. If you feed raw values directly into rules, your robot will twitch: stop-go-stop near a threshold, zig-zag while trying to go straight, or rapidly switch between Follow and Search. The fix is not complex math; it’s simple smoothing and decision hygiene.
Three no-code techniques cover most cases:
Apply smoothing where it matters: on the signal that triggers state changes. For the distance sensor, you might smooth the number and then evaluate thresholds. For the camera, you might smooth the boolean by requiring consecutive “Seen” frames (or time-based persistence) before firing the Seen event.
Also be careful with update rates. If your loop runs every 10 ms but your sensor updates every 50 ms, you’ll reuse stale data and create artificial patterns. A practical rule is to run your decision loop at or slightly slower than the sensor’s update frequency (or use “on new reading” triggers if available).
Engineering judgment: smoothing adds delay. Too much smoothing makes the robot react late, which is dangerous for safety sensors. For distance-based stopping, keep smoothing light and rely more on hysteresis and two-threshold policies (SlowDownDistance and StopDistance). For comfort behaviors like camera-based following, more smoothing is usually fine and makes motion look more natural.
The last milestone is the one that prevents hours of confusion: calibrate and validate sensors with quick tests. Calibration means aligning sensor output with reality (units, offsets, orientation). Sanity checks mean confirming the data behaves plausibly before it drives motors.
Use a short, repeatable checklist for each sensor:
Build these checks into your no-code workflow with a dedicated “Test Mode” state. In Test Mode, you don’t drive; you only display/log sensor values and derived states (FrontBlocked, Seen, HeadingError). This is where logs are not optional: they are your window into what the robot believes.
Add two protective sanity rules before enabling full autonomy:
Common mistake: tuning thresholds while the robot is moving unpredictably. Instead, calibrate while stationary, then test at low speed, then increase speed only after behavior is stable. Practical outcome: you’ll trust your decisions because you’ll know the signals are real—and your robot will act consistent with what you see in the logs.
1. In the chapter’s three-step loop, what is the correct mapping of sense → decide → act?
2. Why is choosing a “safe threshold” for a distance sensor described as an engineering judgment?
3. When building obstacle avoidance, what approach best matches the chapter’s goal of avoiding jitter?
4. How does the chapter suggest treating camera input in a no-code behavior system?
5. What is the main reason the chapter recommends calibrating and validating sensors with quick tests before trusting them in behaviors?
As soon as your robot does more than one thing—move, avoid obstacles, watch for people, and charge itself—its behavior can become chaotic unless you give it structure. In no-code tools, that structure usually looks like visual blocks connected in flows. But a single “mega-flow” quickly turns into spaghetti: too many conditions, too many exceptions, and lots of mysterious interactions.
This chapter introduces a practical way to keep behaviors readable and safe: state-based design. You will build states like Idle, Explore, Avoid, and Dock. You will add transitions driven by sensor events and timers. Then you’ll assemble two classic behaviors—patrol and follow—with safety rules and “stop zones.” Finally, you’ll harden your behavior with priorities and overrides so that when sensors conflict, the robot still does the right thing.
Keep one engineering goal in mind: your robot should be understandable. You should be able to point to a state and answer, in plain language: what the robot is trying to do, what sensors it trusts, and what conditions force it to stop or switch modes.
Throughout, treat logs and simulation as first-class tools. A behavior that “usually works” in the lab may fail in a hallway with glare, reflective surfaces, or curious humans. Robust behavior design is less about cleverness and more about clear rules, measurable thresholds, and safe fallbacks.
Practice note for Milestone: Create states like Idle, Explore, Avoid, Dock: document your objective, define a measurable success check, and run a small experiment before scaling. Capture what changed, why it changed, and what you would test next. This discipline improves reliability and makes your learning transferable to future projects.
Practice note for Milestone: Add transitions based on sensor events and timers: document your objective, define a measurable success check, and run a small experiment before scaling. Capture what changed, why it changed, and what you would test next. This discipline improves reliability and makes your learning transferable to future projects.
Practice note for Milestone: Build a patrol behavior with safe fallback rules: document your objective, define a measurable success check, and run a small experiment before scaling. Capture what changed, why it changed, and what you would test next. This discipline improves reliability and makes your learning transferable to future projects.
Practice note for Milestone: Build a follow behavior with stop zones: document your objective, define a measurable success check, and run a small experiment before scaling. Capture what changed, why it changed, and what you would test next. This discipline improves reliability and makes your learning transferable to future projects.
Practice note for Milestone: Make behavior robust with priorities and overrides: document your objective, define a measurable success check, and run a small experiment before scaling. Capture what changed, why it changed, and what you would test next. This discipline improves reliability and makes your learning transferable to future projects.
Practice note for Milestone: Create states like Idle, Explore, Avoid, Dock: document your objective, define a measurable success check, and run a small experiment before scaling. Capture what changed, why it changed, and what you would test next. This discipline improves reliability and makes your learning transferable to future projects.
Practice note for Milestone: Add transitions based on sensor events and timers: document your objective, define a measurable success check, and run a small experiment before scaling. Capture what changed, why it changed, and what you would test next. This discipline improves reliability and makes your learning transferable to future projects.
Practice note for Milestone: Build a patrol behavior with safe fallback rules: document your objective, define a measurable success check, and run a small experiment before scaling. Capture what changed, why it changed, and what you would test next. This discipline improves reliability and makes your learning transferable to future projects.
When beginners build robot logic visually, they often start with a trigger: “When distance sensor < 30 cm, stop.” Then they add another: “When camera detects person, follow.” Then another: “Every 10 seconds, rotate to scan.” Each rule works in isolation, but together they compete. The robot may oscillate between turning and following, or stop unexpectedly because one rule fired at the wrong moment. This is behavioral chaos, and it’s common in no-code robotics because visual blocks make it easy to add rules without revisiting the overall architecture.
States reduce chaos by forcing you to group rules by intent. In an Explore state, you allow motion and scanning; in an Avoid state, you temporarily ignore “follow” and focus purely on safety. In a Dock state, you prioritize navigation to a charger. This separation makes your system readable and debuggable: if the robot is acting oddly, you first ask, “Which state are we in?” and then inspect only the logic relevant to that state.
Practically, start your milestone set with four foundational states: Idle (do nothing safely), Explore (patrol/wander), Avoid (collision prevention and escape), and Dock (return-to-home/charge behavior). Even if you later add more states (Follow, Search, Align, SpinScan), these four give you a safety-centered backbone.
Outcome: you’ll gain control over complexity. Your robot will feel less “twitchy” and more intentional, because it commits to a mode and stays there until a clear transition occurs.
A state machine sounds formal, but you already use the concept daily: your phone is in “locked” or “unlocked,” your car is “parked,” “driving,” or “reversing.” A robot state machine is simply a set of named modes plus the rules for moving between them.
In no-code tools, each state is usually a container or canvas with its own blocks: triggers, conditions, timers, and actions. To keep things predictable, define three parts for every state:
Now map the four baseline states to sensor-driven intent:
Engineering judgment shows up in naming and scoping. If a state’s name cannot be described in one sentence (“In this state the robot tries to …”), it’s too broad. If a state contains many unrelated actions (“explore + follow + charge”), it’s likely three states disguised as one. Keep states small and purposeful; transitions do the coordination.
Outcome: a behavior diagram that reads like a story: Idle → Explore → Avoid → Explore, and eventually → Dock when battery is low.
Transitions are where “simple” becomes “smart.” A transition is a rule that says, “If condition X is true, switch to state Y.” The milestone here is to add transitions based on sensor events and timers without creating rapid bouncing between states.
Use three categories of transition triggers:
Build a patrol behavior with safe fallback rules by treating Explore as “patrol mode” and adding explicit transitions:
Then add a follow behavior with stop zones by introducing a Follow state (even if it’s not in the initial four, it plugs in cleanly). The key transitions:
Common mistakes include using a single noisy frame to trigger Follow, or exiting Avoid the moment the distance rises above a threshold. Fix these with debouncing (require the condition to hold for N samples) and timed minimum dwell (stay in Avoid at least 1 second). Outcome: fewer oscillations, smoother behavior, and clearer logs (“Transition: Explore→Avoid because distance=22 cm”).
Robots live in conflicting signals. The camera says “person detected, go forward,” while the distance sensor says “object too close, stop.” The IMU says “tilting,” while the path planner says “keep moving.” If you do not decide priorities explicitly, the robot will decide for you—often through accidental ordering of blocks or whichever trigger happens to run last.
Design priorities as a small, explicit ladder. A practical default for mobile robots is:
In no-code tools, implement this with overrides and guards. An override is a high-priority transition that can fire from “any state” (for example, Any→Avoid or Any→Idle on emergency stop). A guard is a condition that blocks lower-priority actions (“Only allow Follow motor commands if NOT in Avoid and NOT in Dock”).
This is the milestone about making behavior robust with priorities and overrides. Concretely:
Common mistake: letting a “timer tick” trigger keep running in the background after state changes, causing unexpected actions. Fix it by resetting timers on enter/exit and scoping timers to the state container. Outcome: you will be able to reason about conflicts before they happen, and your robot will choose safety and stability over jittery mission chasing.
Recovery is what separates a demo from a dependable robot. Real environments produce failure modes: the person you were following leaves the camera frame, the robot wedges against a chair leg, or battery sags earlier than expected. If you don’t define recovery, your robot will either freeze or repeat the same failing action forever.
Build recovery as short, purposeful states or subroutines with timers and clear exit rules:
In no-code AI robotics, you can also add simple AI features safely by using ready-made detection/classification models as inputs to recovery, not as replacements for safety. Example: a “dock marker detected” model can trigger Dock alignment, but distance sensors should still enforce a near-field stop.
Common mistakes: recovering without a timeout (infinite spinning), or recovering without memory (repeating the same turn direction into the same trap). Add timed limits and a tiny bit of state memory (alternate left/right turns, record last known target direction). Outcome: your robot fails gracefully, returns to a stable behavior, and communicates what happened through logs and indicators.
Even autonomous robots need human-friendly controls. A good behavior design includes Start, Pause, and Stop that work predictably from any state. This is not just usability; it’s safety and test efficiency. When you’re tuning thresholds or testing new transitions, you must be able to halt motion instantly and resume without resetting the whole system.
Implement controls as global events with explicit transitions:
Make controls visible and testable. Add an LED or on-screen badge for the current state (“Explore,” “Avoid,” “Dock”). In logs, record transitions with timestamp, state-from/state-to, and the triggering condition. During debugging, this becomes your checklist: Did the robot enter Avoid when distance dropped? Did it exit Avoid only after the safe threshold and minimum time?
Common mistake: treating “Pause” as “Stop motors right now” without freezing timers or clearing queued actions. The robot then “unpauses” into a stale command and jumps unexpectedly. Fix it by resetting motion commands on pause and requiring a fresh command cycle on resume.
Outcome: you’ll have a robot that is not only autonomous, but also cooperative during development and safe around people—one button to stop, one button to pause and inspect, and a consistent way to resume the intended behavior.
1. Why does the chapter recommend state-based design instead of building a single large “mega-flow” for robot behavior?
2. In the chapter’s framing, what is the most accurate distinction between states and transitions?
3. A robot is patrolling but detects an obstacle. According to the chapter’s approach, what is the safest design pattern?
4. How do priorities and overrides help make behavior robust when multiple sensors or rules trigger at the same time?
5. What does the chapter suggest you should be able to explain clearly for any given state to keep behavior understandable?
By this point in the course, you already know how to build reliable robot behaviors with visual blocks: triggers, rules, timers, and actions. This chapter adds one more ingredient—“AI”—without asking you to write code or train models. In no-code robotics tools, AI usually appears as a ready-made detection or classification block that reads from a camera (sometimes audio or other sensors) and outputs simple, usable signals. The goal is not to become a machine learning engineer. The goal is to make your robot behave better using extra context: “Is there a person?” “Is that a stop sign?” “Is the path clear?”
We will treat AI as just another sensor-like source of information. Like any sensor, it can be wrong, delayed, noisy, or biased by lighting and environment. Your job as a robot builder is to interpret the output in plain terms, connect it to a behavior flow, reduce false alarms using confidence and time rules, and deploy in a privacy-aware, ethical way.
As you work through the milestones, keep a clear mental pipeline: the model outputs a label (what it thinks it sees) and a confidence (how sure it is). Your behavior flow then decides what to do: stop, alert, follow, or ignore. The best results come from combining AI with non-AI safety rules (like distance sensors and speed limits) rather than replacing them.
The sections below walk you from “what does this model output mean?” to “how do I turn it into safe, testable robot behavior?” using the same state-based thinking you used in earlier chapters (patrol, follow, stop, return-to-home).
Practice note for Milestone: Understand AI outputs (labels, confidence) in plain terms: document your objective, define a measurable success check, and run a small experiment before scaling. Capture what changed, why it changed, and what you would test next. This discipline improves reliability and makes your learning transferable to future projects.
Practice note for Milestone: Connect a detection/classification block to your behavior: document your objective, define a measurable success check, and run a small experiment before scaling. Capture what changed, why it changed, and what you would test next. This discipline improves reliability and makes your learning transferable to future projects.
Practice note for Milestone: Build an AI-triggered action (stop, alert, follow): document your objective, define a measurable success check, and run a small experiment before scaling. Capture what changed, why it changed, and what you would test next. This discipline improves reliability and makes your learning transferable to future projects.
Practice note for Milestone: Reduce false alarms with confidence and time rules: document your objective, define a measurable success check, and run a small experiment before scaling. Capture what changed, why it changed, and what you would test next. This discipline improves reliability and makes your learning transferable to future projects.
Practice note for Milestone: Create an ethical and privacy-aware camera workflow: document your objective, define a measurable success check, and run a small experiment before scaling. Capture what changed, why it changed, and what you would test next. This discipline improves reliability and makes your learning transferable to future projects.
Practice note for Milestone: Understand AI outputs (labels, confidence) in plain terms: document your objective, define a measurable success check, and run a small experiment before scaling. Capture what changed, why it changed, and what you would test next. This discipline improves reliability and makes your learning transferable to future projects.
Practice note for Milestone: Connect a detection/classification block to your behavior: document your objective, define a measurable success check, and run a small experiment before scaling. Capture what changed, why it changed, and what you would test next. This discipline improves reliability and makes your learning transferable to future projects.
In this course, “AI” means using a pre-built model block that turns raw sensor data (usually a camera frame) into a small set of outputs your behavior flow can use. Think of it like a “smart sensor.” A distance sensor outputs meters; an AI detector outputs labels such as person, chair, or dog, plus a confidence score. A classifier might output one label for the whole image (“warehouse aisle” vs “office”), while a detector might output many objects with bounding boxes.
Your first milestone is simply to read those outputs in plain language: a label is the model’s guess; confidence is how strongly it believes that guess for this moment. Neither output is a guarantee. Models are influenced by lighting, motion blur, camera angle, and the environment they were trained on. Treat the model output like a vote—not a fact.
Practically, you will use AI outputs as triggers and conditions inside your visual behavior graph. Example: “If label=person with confidence>0.7, then enter FOLLOW state.” Or “If label=stop_sign with confidence>0.8, then STOP and alert.” Importantly, AI should rarely be your only safety mechanism. A follow robot should still use distance and speed limits so it doesn’t bump into someone when the camera misfires or the person steps out of view.
Common mistake: building a direct one-step action from AI detection to motor command (e.g., “person detected → drive forward”), which causes twitchy behavior and unexpected motion. Instead, plan for decision logic: AI informs a state change, and the state defines stable motor behavior with additional checks.
No-code platforms typically offer a menu of pre-trained models: general object detection, face detection (sometimes), QR/marker detection, hand/gesture models, or domain-specific models like “packages,” “helmets,” or “pallets.” Your second milestone is to connect a detection/classification block to your behavior flow and read its output in a log panel or debug view. Before you act on it, confirm what the block actually emits: does it give multiple detections per frame? does it include bounding boxes? does it output a top-1 label or top-k list?
What pre-trained models can do well: recognize common categories they were trained on, in conditions similar to their training data. What they can’t do reliably: identify specific individuals, understand intent, or handle rare objects not represented in training. Also, models may struggle with reflective surfaces, backlighting, partial occlusions, and unusual camera positions (for example, a low-mounted camera looking up at people).
Engineering judgement: choose the simplest model that solves the task. If your robot only needs to know “something is in the way,” a distance sensor may outperform a complex vision model. Use AI when semantic understanding matters—like distinguishing a person from a chair—or when you want a richer trigger than geometry alone.
Common mistake: assuming the model’s label set is complete. If the model never outputs “forklift,” your “avoid forklift” behavior will never trigger. In that case, either select a model that supports the needed label, or redesign the behavior to use other signals (e.g., large obstacle detected + speed restriction zone).
Confidence is the key to turning AI output into a stable robot decision. Confidence is usually a number between 0 and 1 (or 0–100%). Your milestone here is to interpret confidence as “strength of evidence,” not “probability of being correct.” A 0.60 confidence detection might be correct in one environment and wrong in another. That’s why thresholds must be tuned with real testing.
Start with three bands rather than a single cutoff: high confidence (act), low confidence (ignore), and middle (uncertain). For example: confidence ≥ 0.80 = reliable; 0.55–0.80 = uncertain; < 0.55 = ignore. This banding prevents rapid flip-flopping when the model hovers around one threshold.
Use thresholds differently depending on risk. For a “stop” behavior, you may want a lower threshold if the cost of missing is high (safety first), but you must add additional rules to prevent constant false stops. For an “alert” behavior, you may accept more false hits. For “follow,” you want consistency, so a higher threshold plus time smoothing is often better.
Combine confidence with simple time rules: “require 3 consecutive frames above 0.75” or “confidence above 0.70 for 0.5 seconds.” This reduces one-frame spikes and fulfills the milestone of reducing false alarms using confidence and time rules.
AI outputs change from frame to frame. If you wire them directly to actions, your robot can oscillate: stop/go, alert/no alert, follow/stop-follow. The stable pattern is to convert raw detections into states. A useful trio is: SEEN, NOT_SEEN, and UNCERTAIN. This is the milestone of turning AI events into behavior structure.
Define state entry rules using confidence and time:
Then define actions per state. Example for a “person-aware patrol”:
This approach makes “AI-triggered actions” safer: the AI block proposes a state transition, but the state logic enforces smooth motion, speed limits, and fallback behavior. Common mistake: forgetting an exit condition, which traps the robot in FOLLOW even after the person is gone. Always add timeouts: “if not SEEN for 3 seconds → PERSON_LOST.”
You do not need a full machine learning lab to evaluate a ready-made model. You do need a disciplined, repeatable check. The goal is to measure two everyday failure modes: misses (the object is there but not detected) and false hits (the model claims it’s there when it isn’t). Your milestone is to test and tune behavior using logs, simulation (if available), and a checklist.
Create a small test script for yourself: same location, same camera angle, same robot speed. Run 10 short trials and log outcomes: label, confidence, and what your robot did. Examples:
Engineering judgement: tune for the behavior’s purpose, not for perfect recognition. A safety stop behavior can tolerate some false hits if it prevents risky motion. A “count objects” behavior cannot. Also, test at different distances and speeds; motion blur increases with speed, which can raise misses and lower confidence.
Common mistake: evaluating only the model, not the full system. Your real metric is behavioral: “Did the robot stop when it should?” “Did it follow smoothly?” “Did it recover when uncertain?” Keep your evaluation tied to state transitions and actions, because that is what users experience.
Camera-based AI changes the social contract around a robot. Even if you are only detecting “person” labels and not saving images, people may feel monitored. Your final milestone is to create an ethical and privacy-aware camera workflow that is appropriate for the setting.
Start with data minimization: use the least data needed to achieve the behavior. Prefer on-device inference over cloud processing when possible. Avoid storing video unless you have a clear safety or debugging need, and if you do store it, restrict retention time and access. Many no-code platforms let you toggle recording separately from live inference—treat that as a deliberate design choice, not a default.
Common mistake: using face detection or identity-like features for convenience (“follow my face”) without considering privacy and bias risks. Prefer non-identifying triggers: “person present” rather than “who the person is.” If you must track a person for following, do it transiently (session-only) and avoid storing identifiers.
Safe deployment also means graceful failure. Plan what the robot does when the camera is blocked, the model is unavailable, or confidence stays uncertain: slow down, stop, or return-to-home. When you combine privacy-aware choices with robust fallback states, you get a robot that is both socially acceptable and operationally dependable.
1. In this chapter, how should you think about an AI detection/classification block inside a no-code robotics tool?
2. What is the recommended mental pipeline for using ready-made AI models in a behavior flow?
3. Why does the chapter emphasize reducing false alarms using confidence and time rules?
4. Which design choice best matches the chapter’s guidance for safe robot behavior when adding AI?
5. What is the chapter’s primary goal for learners when adding “AI” without coding?
You can build a robot mission visually in an afternoon, but you earn reliability through testing discipline. In no-code robotics, your “code” is the behavior flow: triggers, rules, timers, and actions connected into states like Patrol, Follow, Stop, and Return Home. This chapter is about turning that flow into something you can trust, demonstrate, and re-run without surprises.
The key mindset shift is to stop thinking “Does the mission work?” and start thinking “Under what conditions does the mission fail, and how do I detect and handle that?” Robots sense imperfectly, decide with thresholds and timing, and act in a physical world full of friction, reflections, and drift. Your job is to make those imperfections visible (logs and indicators), controllable (parameters), and safe (fail-safes).
We will follow a practical sequence: test first in simulation or a safe tabletop mode, debug by finding the broken link in your visual graph, add observability so you can see what the robot thinks, tune thresholds and timing for your space, add fail-safes like timeouts and stop rules, and then package a complete mission demo you can share.
By the end, you’ll have a repeatable process you can apply to every new mission, and a final workflow that is ready to demo without hand-waving.
Practice note for Milestone: Test in simulation or safe “tabletop mode” first: document your objective, define a measurable success check, and run a small experiment before scaling. Capture what changed, why it changed, and what you would test next. This discipline improves reliability and makes your learning transferable to future projects.
Practice note for Milestone: Debug with logs, indicators, and step-by-step playback: document your objective, define a measurable success check, and run a small experiment before scaling. Capture what changed, why it changed, and what you would test next. This discipline improves reliability and makes your learning transferable to future projects.
Practice note for Milestone: Tune thresholds and timing to match your space: document your objective, define a measurable success check, and run a small experiment before scaling. Capture what changed, why it changed, and what you would test next. This discipline improves reliability and makes your learning transferable to future projects.
Practice note for Milestone: Add fail-safes (time-outs, stop rules, safe speed): document your objective, define a measurable success check, and run a small experiment before scaling. Capture what changed, why it changed, and what you would test next. This discipline improves reliability and makes your learning transferable to future projects.
Practice note for Milestone: Package and present a complete mission demo: document your objective, define a measurable success check, and run a small experiment before scaling. Capture what changed, why it changed, and what you would test next. This discipline improves reliability and makes your learning transferable to future projects.
Practice note for Milestone: Test in simulation or safe “tabletop mode” first: document your objective, define a measurable success check, and run a small experiment before scaling. Capture what changed, why it changed, and what you would test next. This discipline improves reliability and makes your learning transferable to future projects.
Practice note for Milestone: Debug with logs, indicators, and step-by-step playback: document your objective, define a measurable success check, and run a small experiment before scaling. Capture what changed, why it changed, and what you would test next. This discipline improves reliability and makes your learning transferable to future projects.
Practice note for Milestone: Tune thresholds and timing to match your space: document your objective, define a measurable success check, and run a small experiment before scaling. Capture what changed, why it changed, and what you would test next. This discipline improves reliability and makes your learning transferable to future projects.
Your first goal is not to run the whole mission—it’s to prove each capability safely. Start with a “small steps” test plan that moves from zero-risk to real-world. If your platform supports simulation, begin there. If not, use a safe “tabletop mode”: wheels off the ground, robot in a stand, or motion-limited mode where actions are logged but not executed at full power.
Break the mission into micro-tests that each answer one question. For example: “Does the distance sensor update?” “Does the camera model detect the target?” “Does the state machine actually switch from Patrol to Stop?” Test triggers and actions separately before combining them. A common beginner mistake is to test the entire patrol-follow-return loop at full speed, then have no idea which piece failed.
Write down your expected outcome for each micro-test. “When obstacle distance < 0.4 m, state becomes Stop within 200 ms.” That expectation becomes your debugging anchor later. Treat every test as a controlled experiment: change one thing, observe the outcome, and revert if needed.
Visual behavior graphs fail for the same reasons code fails: the wrong condition is evaluated, an event never fires, or the program is in a different state than you think. The advantage is you can often “see” the logic—if you know where to look. Debugging is the skill of finding the broken link in the chain: sensor → trigger → rule → state → action.
Start by forcing the workflow into a known state. Many builders debug while the robot is transitioning rapidly, which hides the root cause. Add a temporary “Debug Pause” block: a manual trigger or a one-shot timer that holds the robot in the current state so you can inspect values. Then follow the path a decision should take and confirm it step-by-step.
A common mistake in no-code workflows is “floating logic”: a rule block that looks connected visually but is not actually on the execution path, or a branch that never re-joins, leaving the robot stuck. Use a disciplined approach: disable (or bypass) half the graph, test, then re-enable. This binary search on your behavior flow finds the broken link faster than random tweaking.
You cannot tune or debug what you cannot observe. Good observability answers three questions at any moment: What does the robot sense? What state is it in? Why did it choose this action? In a no-code tool, that typically means logs, on-screen indicators, and step-by-step playback (a timeline of state transitions and block executions).
Start with a minimal “mission HUD” (heads-up display). Show the active state (Patrol/Follow/Stop/Return), key sensor values (front distance, IMU yaw, camera confidence), and the latest decision reason (“Stop because distance 0.32 m < 0.40 m”). If your platform supports it, add color-coded indicators: green when conditions are safe, yellow when near thresholds, red when stop rules are active.
Engineering judgment: log what helps you decide, not everything. Too much logging can hide the one value that matters. A common mistake is logging only actions (“Set speed to 0.2”) without logging the cause. Always pair “what happened” with “why it happened.” When you later tune thresholds, these logs become your evidence that a change improved stability rather than just getting lucky once.
Most “AI robot bugs” are actually tuning problems. Your behavior is correct, but the parameters are mismatched to the environment: the robot moves too fast for the distance sensor to react, the obstacle threshold is too tight for noisy readings, or the detection confidence is too low and triggers false follows. Tuning is the process of turning a brittle demo into a repeatable mission.
Choose a small set of explicit parameters and name them clearly: SafeSpeed, StopDistance, FollowDistance, ReturnTimeout, DetectionConfidenceMin. Place them in one “Parameters” group so you don’t chase magic numbers across the graph. Then tune in this order: safety margins first, then responsiveness, then performance.
Common mistake: tuning multiple parameters at once. Change one parameter, run the same test path, compare logs, and decide. Practical outcome: your robot should behave similarly across repeated runs and minor environmental changes (lighting shifts, floor texture differences). When it doesn’t, your logs should tell you which threshold or timer is responsible.
Shipping a mission means you can stop it safely, not just start it. Fail-safes are not optional features—they are core behaviors. In a no-code system, implement safety as a set of high-priority rules that can override any state. Think of them as a “safety layer” that sits above Patrol/Follow/Return and can force Stop when conditions are unsafe.
Use a checklist before every real-world run. The checklist forces you to catch predictable failures: low battery causing brownouts, loose sensors causing bad readings, or a blocked camera producing garbage detections. Then encode fail-safe patterns directly into your graph so safety does not depend on operator attention.
Engineering judgment: prefer “fail safe” over “fail operational” for beginner missions. If unsure, stop. A common mistake is placing stop logic inside a specific state; when the robot is in a different state, the stop never triggers. Put safety rules at the top level with highest priority, and test them deliberately (simulate a stale sensor, force a timeout) before trusting the mission.
Your final deliverable is a complete mission workflow that someone else can run and understand. A shareable demo is not just a graph that works on your desk—it includes clear states, named parameters, visible indicators, and a repeatable test script. Package your mission like a product: predictable startup, predictable behavior, predictable shutdown.
Use a clean state structure: Init → Patrol → (Detect Target → Follow) → (Obstacle → Stop) → (Low Battery or Timeout → ReturnHome) → Dock/Stop. Each transition should have an explicit reason that appears in logs. Include a “Demo Mode” switch that reduces speed and shrinks timers for indoor demos, while keeping the same logic as “Full Mode.”
Common mistake: presenting only the “happy path.” A strong mission demo shows controlled handling of failure: obstacle avoidance or stopping, loss of detection triggering a fallback, and a timeout forcing a safe end. Practical outcome: you can hand the robot to a classmate, give them the demo script, and the mission will behave consistently because it was tested in simulation/tabletop mode, debugged with playback, tuned with evidence, and protected by fail-safes.
1. What mindset shift does Chapter 6 emphasize for making a mission reliable?
2. Why does the chapter recommend testing in simulation or safe tabletop mode first?
3. If you’re unsure why the robot chose a particular action, what does the chapter suggest adding to reduce guesswork?
4. Which approach best matches the chapter’s recommended debugging method for a visual behavior flow?
5. Which set of steps most closely follows the chapter’s practical sequence for shipping a mission demo?
- Learning Evolved.
- Intelligence Amplified.