3D & Design — March 8, 2026 — Edu AI Team
Procedural texturing in Blender is one of the most powerful skills you can learn as a 3D artist. Instead of relying on image files, you generate textures mathematically using nodes. The result? Fully customizable, resolution-independent materials that can be adjusted in seconds.
In this beginner tutorial, you’ll learn what procedural texturing is, how the Shader Editor works, and how to create your first procedural materials step by step. By the end, you’ll be able to build wood, metal, and abstract textures without importing a single image.
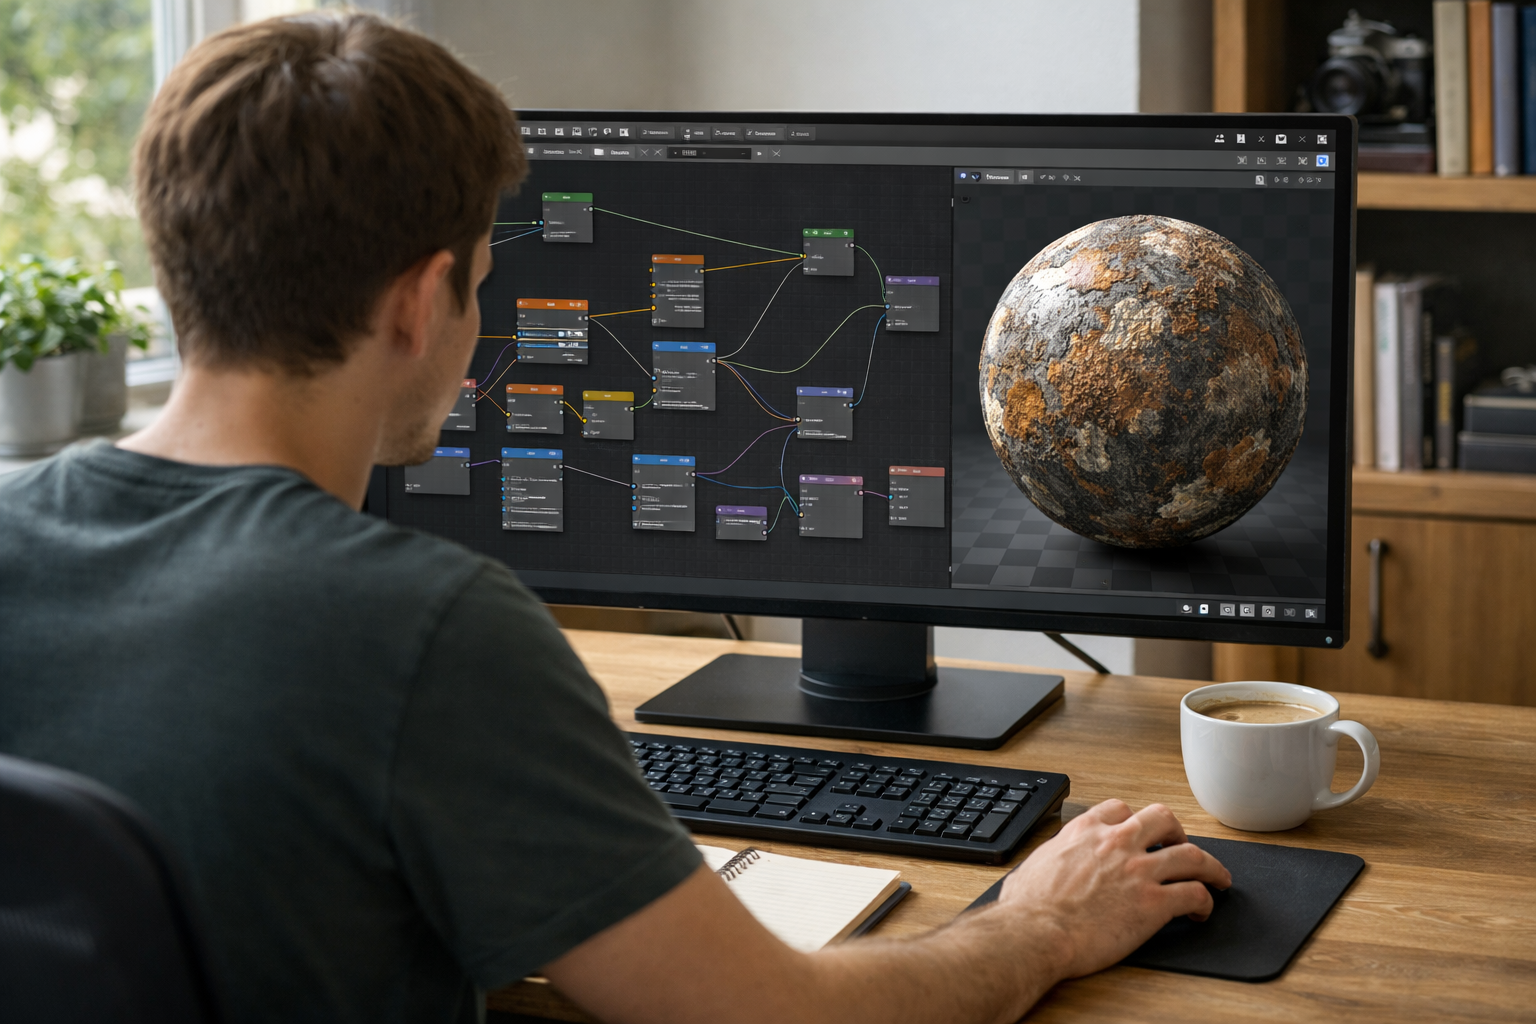
Procedural texturing is the process of generating textures using algorithms rather than image files. In Blender, this is done inside the Shader Editor using nodes.
Unlike image textures:
Because everything is node-based, you can combine patterns, distort them, control roughness, and mix colors in a non-destructive workflow.
To start working with procedural materials:
You’ll see two key nodes by default:
Add a Noise Texture node and connect:
Adjust the Scale value to stretch the pattern.
Wood grain needs direction. Add:
Scale one axis (for example, X = 5, Y = 1, Z = 1) to elongate the pattern.
Use the ColorRamp to increase contrast. Bring the black and white sliders closer together for sharper lines.
Connect:
Lower the Strength value (around 0.1–0.3). This creates subtle grooves like real wood.
You now have a fully procedural wood material that can be adjusted in seconds.
In the Principled BSDF:
Add a Noise Texture and connect it to a ColorRamp, then into the Roughness input.
This creates subtle variation in reflectivity, making the metal feel realistic.
Use a stretched Noise Texture through a Bump node connected to Normal. Lower the strength to keep it subtle.
Realism in procedural texturing often comes from small imperfections.
Change one value and you instantly get a new material. No need to repaint or re-import textures.
You can animate scale, distortion, or color over time. This is ideal for sci-fi effects, magical materials, or growing surfaces.
Procedural workflows are widely used in:
If you want structured guidance on mastering Blender and professional workflows, explore our courses designed for beginners to advanced learners.
Start simple. One texture, one ColorRamp, one Bump node. Add complexity gradually.
If your texture looks unrealistic, the scale is often wrong. Always adjust scale using a Mapping node.
High bump values make surfaces look artificial. Keep it subtle for realism.
Even procedural materials should be based on real-world references. Observe how wood grain flows or how metal reflects light.
Procedural thinking extends beyond Blender. It builds problem-solving skills used in:
If you're interested in combining 3D graphics with automation or AI-driven workflows, Edu AI offers integrated learning paths across 3D, computing, and artificial intelligence. You can register free and start exploring immediately.
Once you're comfortable, try mixing textures:
This layering approach is how complex materials like marble, lava, or sci-fi panels are built.
Procedural materials shine in the Cycles renderer due to accurate light interaction.
Good lighting dramatically improves how textures appear.
Use Material Preview mode to quickly test adjustments before final rendering.
Try this beginner challenge:
Repeat the process with different settings until you can intentionally control the outcome.
Procedural texturing in Blender may seem complex at first, but it becomes intuitive once you understand how nodes interact. Start with simple setups, focus on scale and contrast, and build materials step by step.
The key advantage is flexibility. You’re not locked into static images—you’re building dynamic systems. That’s what makes procedural workflows so valuable in modern 3D production.
If you're serious about developing high-income creative skills in 3D design, structured guidance can accelerate your progress. Explore our courses and continue building expertise in Blender, AI-powered tools, and digital production.
Now open Blender, add a sphere, and start experimenting. The best way to master procedural texturing is by building it yourself.
- Learning Evolved.
- Intelligence Amplified.